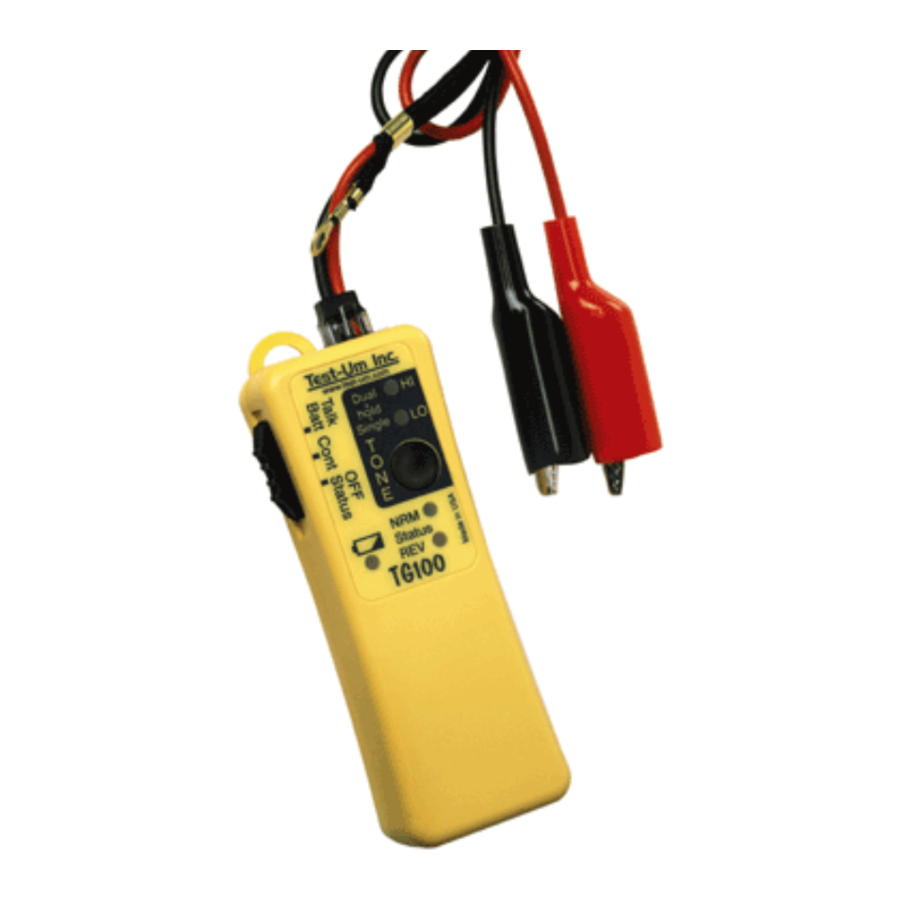
Test-Um TG100 - Tone Generator Operating Manual
- Operating instructions (2 pages)
Advertisement
Features
- Three distinctly different tones selected fromfront panel
- Constant tone amplitude over life of battery
- Two tone amplitude levels — normal and half
- Auto-off of tone after 3 hours — no dead battery if left on
- Tone may be added in any mode — allows phone sets without monitor feature to pick up tone
- No power draw in continuity mode with leadsopen — no dead battery if left in continuity
- Separate Talk Battery mode for increasedvoltage and power for Butt sets
- RJ jack allows use of modular cable or provided alligator clip leads

Do not attach to live AC circuits. This could cause an extreme shock hazard and damage the TG100.
Instructions for Use

To check the status of a phone circuit
- Move slide switch on left side of TG100 to the "OFF Status" position.
- Connect black lead to TIP and the red lead to RING — or one lead to each wire of the pair, if designation is unknown.
If NRM LED turns on: the polarity is correct and the black lead is connected to TIP.
If the REV turns on: the leads are reversed. If the NRM or REV LED is bright: the line is not in use.
If the LED is dim: the circuit is in use. If both NRM and REV are on or flashing: an AC voltage is present.
Application Hints
The TIP signal is nominally at ground potential. So RING can be identified by attaching the black lead to a ground point and connecting the red lead to each wire of the pair. When the red lead is connected to RING, the NRM LED will light.
The status LEDs also indicate a ringing line by both NRM and REV LEDs flashing brightly. To verify a phone line, connect the TG100 (in status mode) to the line to be tested and call that line's number from another line. The TG100 status LEDs should indicate a ringing line.
To check continuity of a circuit
Use only on non-energized circuits. Any energy present may damage the TG100 or cause erroneous results.
- Move slide switch on left side of TG100 to the "Cont" position.
- Connect TG100's leads to each end of the circuit to be tested. If the DC resistance of the path is approximately 11,000 ohms or less, the REV LED will light.
- Move slide switch to "OFF Status" when finished. The TG100 draws no power when the leads are open, but the leads touching during storage could drain the battery.
To supply talk battery power
- Move slide switch on left side of TG100 to the "Talk Battery" position.
- Connect TG100 in series with a phone set at one end of a dead pair. To connect the TG100 in series with a phone set, connect one lead from the TG100 to one lead of the phone set and connect the two remaining free leads to the dead pair.
- Connect a second phone set across the dead pair at the other end of the line.
- Take both phone sets off hook and communications is established.
- Move slide switch to "OFF Status" when finished. The TG100 draws no power when the leads are open, but the leads touching during storage could drain the battery.
To send a tone for tracing
- Move slide switch on left side of TG100 to the "OFF Status" position for normal operation, especially if toning powered phone lines. See "Application Hints" for other configurations.
- Connect leads across the line, or attach one lead to ground and the other lead to one wire of a cable or pair to be traced.
- Press the button on the unit briefly to turn on the signal. If the desired signal level indicator (HI or LO) is not blinking, press the button briefly until the correct signal level is selected. The TG100 rotates through a HI-LO-OFF sequence.
- Select a different signal type, if desired (see "To Select or Verify Signal Type").
- To turn off the signal, press the button briefly. If it has been more than 15 seconds since the last press, the TG100 will go directly to OFF. If not, a second press may be necessary, if the unit was set to HI.
Application Hints:
When tracing wires terminated to a terminal block, such as a "66 block", attaching both TG100 leads to the cable or pair tends to contain the signal within the cable. The tracer must nearly touch the end of the cable to detect the signal, which is helpful when the wires are close together, as when terminated. The LO amplitude setting may generate a stronger signal when connecting both leads of the TG100 to a cable, by reducing the field canceling effect of having a signal and it's return close together, especially in twisted pair cable. A modular phone cable can be used to connect the TG100 directly to a wall jack.
When tracing along cable runs and to maximize radiated signal, connect one lead of the TG100 to the wire or cable, and the other end to ground (case of an electrical box, electrical conduit, metallic water pipe or ground rod). If no ground is available, do not connect the other lead to anything — let it dangle as near to the earth as possible. Connect the TG100 to the ungrounded shield of a coax cable. The shield will do it's job, if connected to the center lead, and block the tone. The LO amplitude setting is useful if there is too much bleeding of the signal, or the tracer being used has fixed volume and is overloading.
There are several useful techniques that take advantage of the ability to generate tone in any slide switch position. Both leads of the TG100 must be connected to the pair in order for them to work. With tone on, the "Cont" mode can be used on a dead line to indicate finding the line to a helper, or to verify having found both leads of a pair. Once the pair is presumed to be found, short out the pair and the REV LED should light on the TG100, indicating the pair has been found. The "Talk Battery" mode can be used with tone to allow a phone set without a passive monitor function to hear the tone when the phone leads are attached across the pair the TG100 is powering.
To Select or Verify Signal Type
The TG100 has three distinctly different tone types available — one single and two dual (or warble) tones.
- Press and hold the front panel button until both the HI and LO LEDs turn on — this indicates entry into the tone style selection function.
- Continue holding the button down, one of the two LEDs will turn on steady or flash to indicate the currently selected type. The Sngl LED will turn on steady to indicate the single type is selected. The Dual LED will either flash for one of the dual tones, or be on steady for the other. Releasing the button before two seconds have passed will leave the signal type unchanged.
- To select another signal type, continue holding the button down until the desired type is displayed. The TG100 will continue to cycle through the three types until the button is released, or the unit times out and turns off (10 to 12 seconds).
Hint:
The currently selected tone type is generated at the RJ jack once the signal selection function is entered. Holding a tone tracer near the jack will allow the user to hear each tone type as it is selected.
Battery Replacement
- Remove screw on the rear of the TG100 with a #1 Phillips screwdriver. Carefully open the tester.
- Remove old battery and disconnect from battery leads.
- Snap the battery leads onto a new battery (9V, alkaline). Place battery in case.
- Close tester and replace screws. Do not over tighten.
Accessory Parts
All Lil' Buttie and Lil' Buttie PRO cord sets will work with the TG100
LB10
Lil' Buttie Cable Set with Alligator Clips (5.5 ft in length)
LB20
Lil' Buttie Cable Set with Angled Piercing Clips (5.5 ft in length)
LB30
Lil' Buttie Cable Set with Angled Bedof-Nails Clips (5.5 ft in length)
TG10
Tone Generator Cable Set with Alligator Clips (2 ft in length)
TG20
Tone Generator Cable Set with Angled Bed-of-Nails Clips (2 ft in length)
www.Test-Um.com
805-383-1500

Documents / ResourcesDownload manual
Here you can download full pdf version of manual, it may contain additional safety instructions, warranty information, FCC rules, etc.
Advertisement

Need help?
Do you have a question about the TG100 and is the answer not in the manual?
Questions and answers