Table of Contents
Advertisement
Quick Links
Advertisement
Table of Contents

Related Manuals for Boston DSP-388

Summary of Contents for Boston DSP-388
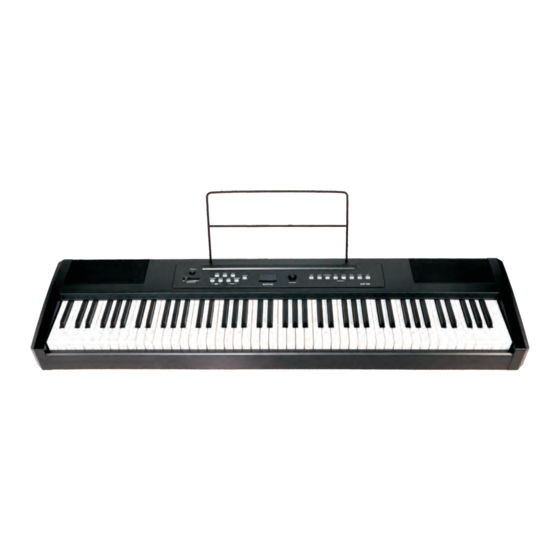
- Page 1 Digital Piano User’s Manual...
- Page 4 Thank you for choosing the DSP-388 Digital Piano Your DSP-388 is a high quality digital piano featuring an 88 note hammer action, touch sensitive keyboard and the most advanced PCM tone generation technology that combined will provide you with a rich performing and playing experience. You can also record your own performances to play along to.
-
Page 5: Table Of Contents
Table Of Contents ....... 3 Panel Control To Cancel Recording While in Record ........Setup ..........Wait Mode CONNECTOR PANEL ....To Turn Off the Metronome While ......... Midi Out ........Recording USB To Host ........To Clear all Data in the Song Record .......... -
Page 7: Panel Control
Panel Control Top Panel Rear Panel 1. STANDBY/ON 14. DC 12V Jack 2. MASTER VOLUME 15. PHONES Jack 3. LED DISPLAY 16. LINE IN/OUT Jacks 4. [DATA CONTROL] Knob 17. PEDAL Jack 5. [REVERB] Button 18. USB TO HOST Jack 6. -
Page 8: Setup
Set up Thank you for purchasing the DSP-388 Digital Piano. Included with the piano you will find: The foot pedal included sustain pedal ,double pedal(optional) and 3-Foot pedal (optional), one music rest, one power supply and of course this user guide. -
Page 9: Connector Panel
Connector Panel Midi Out MIDI (Musical Instrument Digital Interface) is a world-standard communication interface which allows electronic musical instruments to communicate with each other, by sending and receiving compatible note, program change and other types of MIDI data. NOTE MIDI OUT Transmits MIDI data to another MIDI device. Using USB To Host This product allows the transfer of MIDI information over USB to a laptop, tablet or smartphone. - Page 10 NOTE Ensure the piano is turned off before connecting the pedal. Otherwise, it will affect the piano sound. As standard, the pedal will affect the note playing after pressed. To change polarity, hold the foot pedal down during power up. Double Pedal(optional) This digital piano can be used with a Double pedal.
-
Page 11: Line Out/In
SUSTAIN Sostenuto Pedal (Center): If you play a note or chord on the keyboard and press the sostenuto pedal while the notes are held, those notes will be sustained as long as the pedal is held, but all subsequently played notes will not be sustained. SOSTENUTO Soft Pedal (Left): The Soft Pedal controls the sound volume. -
Page 12: Panel Controls
Panel Controls Turning on the power Turn the power on, the LED will light. STANDBY/ON 1.Standby On This product will switch off automatically in 30 minutes after no any operation on it. In this case, press the [STANDBY/ON] button twice to turn the power switch on. -
Page 13: Data Control Knob
Data Control Knob The [DATA CONTROL] knob changes parameter values for voice, function, volume (0-127),metronome tempo (20-280), reverb/chorus depth(0-127), time signature, transpose value (-12 - +12),octave setting (-2 - +2), Master Tuning setting (-64- +63), track, MIDI channel/program number and Bank MSB/LSB values (0-127). -
Page 14: Demo Songs
Demo Songs There are 8 demo songs pre-recorded in the DSP-388 piano. Each demo song will demonstrate a different voice as indicated in the chart below. Here's how you can select and play the demo songs. Select the Demo Song 1.Use the Data Control Knob to Select... - Page 15 Demo Song # Voice Piano E.Piano Harpsochord Vibes N.Guitar Organ Strings Bass Stop Playing To stop the demo song. press the [SONG] button again. To replay the current song from the beginning, press the flashing voice select button. SONG...
-
Page 16: Reverb
Reverb Press [REVERB] button, The button will illuminate, and you will hear the Reverb effect when you play the currently selected voice. To turn Reverb off, press the Reverb button again. The button LED will turn off to indicate that Reverb is no longer active. - Page 17 The Chorus Effect may be applied to each voice individually and will be retained even when the power is turned off. This effect simulates the same tone coming from multiple sources, like several singers or instruments singing or playing the same note. To apply the Chorus Effect, select the desired voice and press [CHORUS].
-
Page 18: Voice
Voice The DSP-388 piano has 8 built-in voices, which include several pianos as well as other instruments. These digitally-sampled musical instrument sounds may be selected one at a time, layered to produce two voices at once, or as signed to the left or right hands. -
Page 19: Split Mode
Split Mode Split Mode allows the keyboard to be divided into two sections so that different voices may be played with the left and right hands. The volume may be independently adjusted for each voice, the Split Point (the highest note played with the left hand) may be adjusted and the Split Voice may be changed as desired. - Page 20 Change the Split (left hand) voice In the Split Mode, Press a new [VOICE SELECT] button to select a new Split Voice Change the Main (right hand) voice SPLIT Exit Split Mode by pressing the [SPLIT ] button again, select the appropriate voice and then press [SPLIT ] again to re-enter Split mode.
- Page 21 Change the Main volume (right hand) Press the [FUNCTION] button to enter Edit Mode Press the F 0 key to assign the [DATA CONTROL] knob to the Main (right hand) Voice Volume. The LED will show: Turn the [DATA CONTROL] knob to the desired value (0-127) while striking any keyboard key to hear the effect.
-
Page 22: Layer Mode
Layer Mode In Layer mode two voices may be played simultaneously, each at selected volumes. To enter Layer mode, press and hold the button to select the MAIN sound, then press the button for LAYER sound, and release. The buttons will light, the two voices will sound simultaneously and the LED will indicate: PIANO E.PIANO... -
Page 23: Turn Off Layer Mode
To Adjust the Volume of the Layer Voice Press the [FUNCTION] button to enter Edit Mode. FUNCTION Press the Layer Volume key (A 0). The LED will display: Turn the [DATA CONTROL] knob to the desired volume (0-127). DATA CONTROL NOTE If Split Mode is engaged and Layer Mode is selected, the Layer Voice will only be applied to the keys to the right of the split point. -
Page 24: Metronome
Metronome The built-in metronome will help maintain accurate timing while recording a song. The time signature and tempo may be adjusted for the song to be recorded. To turn the metronome on, press the metronome button. SONG METRONOME Tempo The tempo of the metronome may range from 20 to 280 beats per minute (BPM). -
Page 25: Transpose
Transpose The Transpose function will raise or lower the pitch of the keyboard in semitone increments from -12 to +12. To turn Transpose on, press the [TRANSPOSE] button. The LED will display: . Now use the [DATA CONTROL] knob to select the desired transpose value. -
Page 26: Octave
Octave The Octave function will raise or lower the keyboard pitch in octave increments from -2 to +2. To enable the Octave function, press and hold the [OCTAVE] button. The LED will display: Now use the [DATA CONTROL] knob to select the desired pitch. -
Page 27: Song Recording
Song Recording The Song Recorder built into the piano can record two individual tracks, allowing you to record one part and then record a second complementary part while the first part is played back. To Record a Track Press the [SONG] button and the [METRONOME] button simultaneously to enter Record Wait Mode. -
Page 28: To Manually Select A Track To Record To
As mentioned at the beginning of this section, you can record to two independent tracks within each song you record. This means that you can make a recording, and after you’re done, play back what you recorded while recording a complementary part on a second track. -
Page 29: To Cancel Recording While In Record Wait Mode
When the LED display shows the track you wish to record to, you may begin playing whenever you are ready, and recording will automatically begin as soon as you play the first note. To Cancel Recording While in Record Wait Mode Turn the [DATA CONTROL] knob until the LED display shows: DATA CONTROL Press the [SONG] button. -
Page 30: To Clear All Data In The Song Record
To Clear all Data in the Song Recorder Press the [SONG] button and the [METRONOME] button at the same time to enter Song Recording Mode. This will start the Metronome and place the Song Recorder in Record Wait. SONG METRONOME RECORD Turn the [DATA CONTROL] knob until the LED displays: DATA CONTROL... -
Page 31: To Erase A Single Track In The Song Recorder
To Erase a Single Track in the Song Recorder Press the [SONG] button and the [METRONOME] button at the same time to enter Song Recording Mode. SONG METRONOME RECORD Use the [DATA CONTROL] knob to select the track you wish to erase. DATA CONTROL Press the [SONG] button twice. -
Page 32: To Play Back Your Song Recorder Tracks
After you selected, double click the [SONG] button. SONG :Erase both of the Song Recorder tracks simultaneously. :Erase Song Recorder Track1. :Erase Song Recorder Track2. To Play Back Your Song Recorder Tracks From Performance Mode, press the [SONG] button to enter Song Play Mode. SONG Use the [DATA CONTROL] knob to select one of the following: DATA CONTROL... -
Page 33: To Stop Playback And Exit Song Play Mode
NOTE If there is nothing recorded on either of the tracks (1 or 2), then the Song will not play. Rather, the Song LED will flash 3 times quickly, and this piano will exit Song Play Mode and resume Performance Mode, with the LED display showing the currently selected voice. -
Page 34: Edit Functions
Edit Functions In Edit Mode, the function of the [DATA CONTROL] knob is changed to specify a number of different values. The [DATA CONTROL] knob will "time out"after 10 seconds and return to default metronome tempo. Keyboard control keys are used to select the function upon which the [DATA CONTROL] knob will have an effect. -
Page 35: Touch (Sensitivity)
NOTE Master tuning must always be manually adjusted back to -0-. Touch (Sensitivity) The Touch Select function allows the choice of 4 sensitivity settings or velocity curves which determine how the force with which you hit the keys affects the volume of the notes played. This piano provides you with four different keyboard sensitivity options: Normal (A 3 key): This is the default setting and should work well for most... -
Page 36: To Set The Keyboard Sensitivity
To Set the Keyboard Sensitivity Press the [FUNCTION] button to enter Edit Mode. FUNCTION Press the desired Touch Select key (F3, F 3, A 3, B 3).The LED display will show the selected Touch setting. Please note that these keys are in the middle of the keyboard. -
Page 37: Midi Functions
MIDI Functions The Musical Instrument Digital Interface (MIDI) is an industry-standard protocol that enables electronic musical instruments such as keyboards, computers, drum machines, etc. to communicate, control, and synchronize with each other. MIDI transmissions consist of electronic codes that communicate notes to be played, the instrument, pitch or intensity that notes are to be played with, and controlling codes such as volume, vibrato, cues and clock signals. -
Page 38: Multitimbral Mode
NOTE Because the DSP-388 is receiving playback information via MIDI, the currently selected voice on the piano may not correspond to the voice being played back. -
Page 39: Main Midi Transmit Channel(C 2)
Press the Local On/Off key (C 3)The LED display will show: Turn Local On/Off to On Repeat the above procedure. The LED display will show: Main MIDI Transmit Channel(C 2) The main MIDI transmit channel number may be changed as necessary by increasing or decreasing the channel number. -
Page 40: Numeric Data Entry Keys
Use the [DATA CONTROL] knob to select the desired Main MIDI Transmit Channel. DATA CONTROL NOTE The MIDI channels used for the Split and Layer voices are relative to the Main MIDI Transmit Channel, in the following way: Split Voice Transmit Channel = Main MIDI Transmit Channel +1 Layer Voice Transmit Channel = Main MIDI Transmit Channel +2 Numeric Data Entry Keys(G5,A5,B5,C6,E6,F6,G6,A6,B6) Some of the advanced MIDI editing functions of this piano require that a numeric... -
Page 41: Enter Keys(C7)/Cancel Keys(B 6) B
Enter Keys(C7) When entering data in Edit Mode, pressing the Enter key will send the selected data to this piano as a MIDI command. After pressing the Enter key, this piano will return to Performance Mode. Numeric Data Entry Keys Cancel Keys(B 6) Pressing the Cancel key at any time while in Edit Mode will exit Edit Mode and return this piano to Performance Mode. - Page 42 Press the Data Control Assign key (C 6) Using the Numeric Data Entry keys, select the Continuous Controller number you wish to assign to the Data Control knob. Press the ENTER key (C7). piano is now back in Performance Mode and [DATA CONTROL] knob may be used to send values for the Continuous Controller (CC) number assigned to the [DATA CONTROL] knob.
- Page 43 Panic Key(F 6) “ ” “ Pressing the Panic key will send out a Reset All Controllers All Notes ” MIDI Message on ALL MIDI Channels 1 - 16. This can be especially useful “ ” for clearing stuck notes when controlling external MIDI devices or software.
- Page 44 When the Default Key is applied to Program, Bank MSB, or Bank LSB, those parameters will be returned to their default value of zero. When the Default Key is applied to the Data Ctrl Assign parameter, the [DATA CONTROL] knob will be returned to its default function of“Metronome Tempo”. To apply the Default Key, press the [FUNCTION] button to enter Edit Mode.
-
Page 45: Sending Midi Program Changes
Sending MIDI Program Changes There are two ways to send MIDI Program Number changes. You can either enter a single specific Program Number (Data Control knob assignment remains unchanged), or you can assign the Data Control knob to send MIDI Program Changes. 1.To send a single specific Program Number (Data Control knob assignment remains unchanged): Press the [FUNCTION] button to enter Edit Mode. - Page 46 Press the Enter Key (C7) to send the MIDI command. 2.To assign the Data Control knob to send MIDI Program Changes: Press the [FUNCTION] button to enter Edit Mode. FUNCTION Press the Program Number Data Control Key (F 1). : The LED display will momentarily show The piano is back in Performance Mode, and the [DATA CONTROL] knob has been assigned so that a MIDI Program Change will be sent out each time...
- Page 47 Press the Enter Key (C7) to send the MIDI command. 2.To Assign the Data Control Knob to Send Bank LSB Changes: Press the [FUNCTION] button to enter Edit Mode. FUNCTION Press the Bank LSB Data Control Key (A 1). The LED display will momentarily show: NOTE That this is different than the Bank LSB Key (A 5) that you used to input a single Bank LSB value.
-
Page 48: Sending Bank Lsb/ Msb Changes
Sending Bank MSB Changes There are two ways to send Bank MSB changes. You can either enter a specific MSB (Most Significant Byte) value using the Numeric Data Entry Keys, or you can assign the Data Control knob to send Bank MSB changes. (Please note that after any kind of bank message, it is usually necessary to follow up with a MIDI Program Change message in order to affect a sound change on the receiving device.) 1.To Send a Specific Bank MSB Value Using the Numeric Data Entry Keys:... - Page 49 Sending Bank LSB Changes There are two ways to send Bank LSB changes. You can either enter a specific LSB (Least Significant Byte) value using (Data Control knob assignment remains unchanged), or you can assign the Data Control knob to send Bank LSB changes. (Please note that after any kind of bank message, it is usually necessary to follow up with a MIDI Program Change message in order to affect a sound change on the receiving device.)
- Page 50 Press the Enter Key (C7) to send the MIDI command. 2.To assign the Data Control Knob to Send Bank MSB Changes: Press the [FUNCTION] button to enter Edit Mode. FUNCTION Press the Bank MSB Data Control Key (B 1). The LED display will momentarily show: NOTE That this is different than the Bank MSB Key (B 5) that you used to input a single Bank MSB value.
-
Page 51: Appendix
Appendix MIDI Implementation Chart F u n c t i o n T r a n s m i t t e d R e c o g n i z e d R e m a r k s Default Basic *Up to 3 channels... -
Page 52: Data Control Assignments And Midi Cc List
Data Control Assignments and MIDI CC List When the Data Control back in Tempo, the metronome button’s light will flash 3 times. CC no. Controller Name Display Name Default Value Tempo 20~280 Octave Transpose Voice Volume Layer Volume Split Volume Metronome Volume Time Signature Program Change... - Page 53 CC no. Controller Name Display Name Default Value 42 Pan position (fine) 43 Expression (fine) 44 Effect Control 1 (fine) 45 Effect Control 2 (fine) 046,047,048...063 46-63 64 Hold Pedal (on/off ) 65 Portamento (on/off ) 66 Sostenuto Pedal (on/off ) 67 Soft Pedal (on/off ) 68 Legato Pedal (on/off ) 69 Hold 2 Pedal (on/off )
-
Page 54: Defaults
Defaults Default Settings The table below shows the piano factory default settings and whether or not user changes to these settings are retained after a power-cycle (turning the device off and on): Parameter Factory Default Retained on Power-Down Program Number & Voice Selected 000 - Grand Piano Bank MSB Number Bank LSB Number... - Page 55 Additional Default Information 1.Effects Defaults Sound Name Reverb On/Off Reverb Depth Chorus On/Off Chorus Depth Piano On 40 E.Piano On 40 Harpsochord On 40 Vibes On 48 N. Guitar On 96 Organ On 40 Strings On 64 Bass On 32 (Metronome) Off n/a 0 MIDI Channel 10...
-
Page 56: Advanced Functions Keyboard Chart
Advanced Functions Keyboard Chart Touch=High Enter Cancel Enter Touch=Normal Panic Touch=Low Cancel Touch=Fixed Data Contr Assign Panic Bank MSB Local On/Off Bank LSB Program Default Data Contr Assign Bank MSB Data=Tuning Bank LSB Data=Voice Sel Program Default Data=Channel Touch=High Touch=Normal Data=Bank MSB Touch=Low Touch=Fixed... -
Page 57: Piano Reset In Detail
Piano Reset in Detail As soon as the Piano Reset function is activated (by pressing the [ TRANSPOSE and [ OCTAVE ] buttons simultaneously), the device will perform the following functions: TRANSPOSE OCTAVE PIANO RESET 1. Turn Local On “ ”... -
Page 58: Factory Reset
Factory Reset Performing a Factory Reset will clear all battery backed memory and restore all functions to their factory defaults, just like they were when you used this piano for the first time. Please note that anything you have recorded in the Song Recorder will be erased by this procedure! 1. -
Page 59: Specifications
Specifications Keyboard: Midi: 88 weighted Transmit Settings hammer-action Local Control velocity-sensitive keys Connectors: Display: MIDI Out jack, USB to Host, Pedal socket, LED Display Line Out/IN jacks, Phones jack , Voice: DC 12V power socket Speakers: Polyphony: YDT816: 4Ù*10W*2 Dimensions(W x D x H) Voice Control: 1143mm x 515mm x 310 mm Layer, Touch, Trans, Split, Metro...
Need help?
Do you have a question about the DSP-388 and is the answer not in the manual?
Questions and answers