Table of Contents
Advertisement
Advertisement
Table of Contents

Related Manuals for Boss Phase Shifter PH-3


Summary of Contents for Boss Phase Shifter PH-3
- Page 1 Owner’s Manual AC & BATTERY POWERED...
- Page 2 Thank you, and congratulations on your choice of BOSS PH-3 Phase Shifter. Before using this unit, carefully read the sections entitled: “USING THE UNIT SAFE- LY” and “IMPORTANT NOTES” (Owner’s manual p. 25 – p. 31; p. 4 – p. 5). These sec- tions provide important information concerning the proper operation of the unit.
-
Page 3: Main Features
New RISE/FALL features give you continuous rising and falling effects unavailable with previous phasers. You can use the PH-3’s pedal to set the RATE to the tempo. This makes it easy to sync to songs (tempo and measure), formerly a difficult process. -
Page 4: Important Notes
IMPORTANT NOTES In addition to the items listed under “USING THE UNIT SAFELY” on p. 25, please read and observe the following: Power Supply: Use of Batteries • Do not use this unit on the same power cir- cuit with any device that will generate line noise (such as an electric motor or variable lighting system). -
Page 5: Maintenance
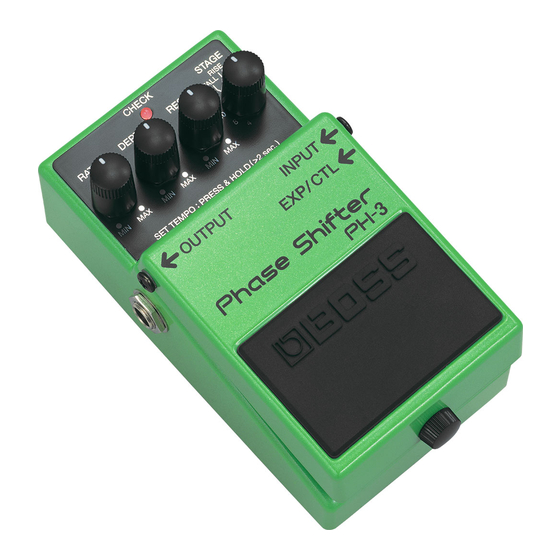
in the vicinity of such receivers. • To avoid possible breakdown, do not use the unit in a wet area, such as an area ex- posed to rain or other moisture. Maintenance • For everyday cleaning wipe the unit with a soft, dry cloth or one that has been slightly dampened with water. - Page 6 Feature Names and Functions 1. AC adaptor Jack An AC adaptor (BOSS PSA-series: sold separately) can be connected to this jack. If an AC adaptor is used, you will be able to play for extended periods without worrying about battery life. * As soon as you connect the AC adaptor, the unit is turned on.
- Page 7 2. CHECK Indicator Combination indicator that shows the ef- fect’s on/off status, tempo (in Tempo mode: p. 13), and Battery Check function. The indicator is lit when the effect is on, thereby allowing you to check whether the effect is on or off. * If the indicator dims when the effect is on or when the tempo is being displayed, it means that the battery is running out of...
-
Page 8: Pedal Switch
When the effect is on, be sure to start any changes with the filter at the lowest setting. * For inputting the tempo, refer to “Setting the Tempo with the PH-3’s Pedal Switch” (p. 13). 7. Thumbscrew When this screw is loosened, the pedal will open, allowing you to change the bat- tery. - Page 9 8. RATE Knob Adjusts the speed at which the filter chang- es. When set to MIN, the filter remains off. 9. DEPTH Knob Adjusts the depth of the filter change. The filter effect stops when this is set to MIN with the STAGE switch set to any- thing besides FALL or RISE.
- Page 10 Connections OUT 9V DC/200mA Amplifier AC adaptor PSA-series (option) Electric guitar Footswitch Expression Pedal BOSS FS-5U (option) Roland EV-5 (option) Polarity Switch...
- Page 11 (power blackout or power cord discon- nection). * Use only the specified expression pedal (Roland EV-5; sold separately). By connecting any other expression pedals, you risk causing malfunction and/or damage to the unit.
-
Page 12: Operation
Operation 1. When you have finished making the connections (p. 10), press the pedal switch to turn the effect on (the CHECK indicator is lit). 2. Set the RATE, DEPTH, and RES knobs at the center position. 3. Use the STAGE switch to select the stage type. - Page 13 Setting the Tempo with the PH-3’s Pedal Switch * RATE cycles for use with the tempo settings can be made in the range of 0.2–16 seconds. 1. Step on, and continue depressing the PH-3’s pedal switch for at least two seconds.
- Page 14 Setting the Tempo with the PH-3’s Pedal Switch Setting the RATE near the de- sired tempo beforehand allows you to make faster and more nat- ural tempo settings. 4. Press and continue holding the PH-3's pedal switch for two seconds or longer to finish setting the tempo.
- Page 15 The RATE settings can be adjusted with the EV-5. You can change from the minimum RATE value set by the EV-5’s Minimum Value to the value set with the PH-3’s RATE knob. 1. Connect the EV-5 to the EXP/CTL jack, and press the pedal completely forward.
- Page 16 The tempo can be set with the FS-5U. Concerning how to make the tempo set- tings, refer to steps 3 and 4 under “Setting the Tempo with the PH-3’s Pedal Switch” (p. 13). Simply substitute “FS-5U” where it says “PH-3’s pedal switch.”...
-
Page 17: Changing The Battery
Changing the Battery When the CH ECK indicator goes dim or no longer lights while an effect is on, it means that the battery is nearly dead and must be Replace the battery following replaced. the steps below. * For best results (i.e., longest usable life) use an alkaline type battery. -
Page 18: Troubleshooting
Sound is distorted: Is the battery low? As the battery is drained, the CHECK in- dicator dims, and the PH-3 may start to function incorrectly. Replace with a new battery (p. 17). Could the level of the sound being... - Page 19 Cannot adjust the RATE using (optional) external EV-5 pedal: Could the EV-5’s minimum volume be set to the maximum level (10)? Could the RATE knob be set to MIN? You cannot input the tempo with the external foot switch: Is the connector cord designed for stereo use? Have you connected a latch-type foot switch (such as the optional BOSS...
-
Page 20: Setting Samples
Setting samples Vintage Phase Shift 1 Standard Phase Shift Vintage Phase Shift 2 Deep Phase Shift... - Page 21 Setting samples Hard Resonance Sound Standard FALL/RISE Sound Random Step Sound Tremolo Sound...
-
Page 22: Setting Memo
Setting memo... -
Page 23: Specifications
Specifications PH-3: Phase Shifter Nominal Input Level ... -20 dBu Input Impedance ... 1 M Nominal Output Level ... -20 dBu Output Impedance ... 1 k Recommended Load Impedance ... 10 k or greater Residual Noise... -92 dBu (IHF-A, Type.) Controls ... - Page 24 * The battery that was supplied with the unit is for temporary use—intended primarily for testing its operation. We recommend that alkaline batteries be used when replacing the batteries. Expression pedal Roland EV-5 Footswitch (momentary-type) BOSS FS-5U Dry battery (9 V type) 6AM6/9 V (alkaline)
- Page 25 Used for instructions intended to alert the user to the risk of death or severe injury should unit improperly. Used for instructions intended to alert the user to the risk of injury or material damage should the unit be used improperly.
- Page 26 Refer all servicing to your retailer, the nearest Roland Service Center, or an authorized Roland distributor, as listed on the “Information” page. • Never use or store the unit in places that are: •...
- Page 27 008b • Use only the specified AC adaptor (PSA-series), and make sure the line voltage at the installation matches the input voltage specified on the AC adaptor’s body. Other AC adaptors may use a different polarity, or be designed for a different voltage, so their use could result in damage, malfunction, or electric shock.
- Page 28 AC adaptor from the outlet, and request servicing by your retailer, the nearest Roland Service Center, or an authorized Roland distributor, as listed on the “Information” page when: • The AC adaptor or the power- supply cord has been damaged;...
- Page 29 • Before using the unit in a foreign country, consult with your retailer, the nearest Roland Service Center, or an authorized Roland distributor, as listed on the “Information” page. • Batteries must never be recharged, heated, taken apart, or thrown into fire or water.
- Page 30 • Never climb on top of, nor place heavy objects on the unit. 107d • Never handle the AC adaptor body, or its plugs, with wet hands when plugging into, or unplugging from, an outlet or this unit. 108b • Before moving the unit, disconnect the AC adaptor and all cords coming from external devices.
- Page 31 • If a battery has leaked, use a soft piece of cloth or paper towel to wipe all remnants of the discharge from the battery compartment. Then install new batteries. To avoid inflammation of the skin, make sure that none of the battery discharge gets onto your hands or skin.
- Page 32 This product complies with the requirements of European Directive 89/336/EEC. FEDERAL COMMUNICATIONS COMMISSION RADIO FREQUENCY INTERFERENCE STATEMENT This equipment has been tested and found to comply with the limits for a Class B digital device, pursuant to Part 15 of the FCC Rules.
Need help?
Do you have a question about the Phase Shifter PH-3 and is the answer not in the manual?
Questions and answers