
Summary of Contents for HAMPBACK DSP-1201
- Page 1 Sound Module Owner’s Manual V1.0 DSP-1201 DSP-1301 CLICK TEMPO SET UP VOICE POWER SONG MUTE RETURN...
- Page 3 USING THE UNIT SAFELY Used for instructions intended to alert the user to the risk of death or severe injury should the unit be WARNING used improperly. CAUTION Used for instructions intended to alert the user to the risk of injury or material damage should the unit be used improperly.
- Page 4 Do not force the unit’s power-supply cord to share an outlet with an unreasonable number of other devices. Be especially careful when using extension cords-the total power used by all devices you have connected to the extension cord’s outlet must never exceed the power rating (watts/amperes) for the extension cord. Excessive loads can cause the insulation on the cord to heat up and eventually melt trough.
- Page 5 CAUTION Important Notes For everyday cleaning wipe the unit with a soft, dry cloth or one that has been slightly dampened with water. To remove stubborn dirt, use a cloth impregnated with a mild, nonabrasive detergent. Afterwards, be sure to wipe the unit thoroughly with a soft, dry cloth.
- Page 6 No sound of kick drum. A1: Check “KICK” type in UTIL and select relatively, refer to Page 13. The “Save” symbol appears in the lower right corner of main interface. A2: Factory Reset, refer to Page 13. Customizing the drum kit. A3:...
- Page 7 Sound Module Main Specifications DSP-1201 DSP-1301 Sound Module Song Preset Kit Use Kit 329 (GM:128) 329 (GM:128) Instruments DSP Effect Reverb, EQ, Pitch, PAN Reverb, EQ, Pitch, PAN Speed 20~260BPM 20~260BPM Display 128*64 LCD 128*64 LCD Power Supply DC-12V 1A...
-
Page 9: Table Of Contents
Contents 1. Sound Module User Guide ................. 1.1 Sound Module Components . - Page 10 Contents ........................3.2.2 Play Song 4.
-
Page 11: Sound Module User Guide
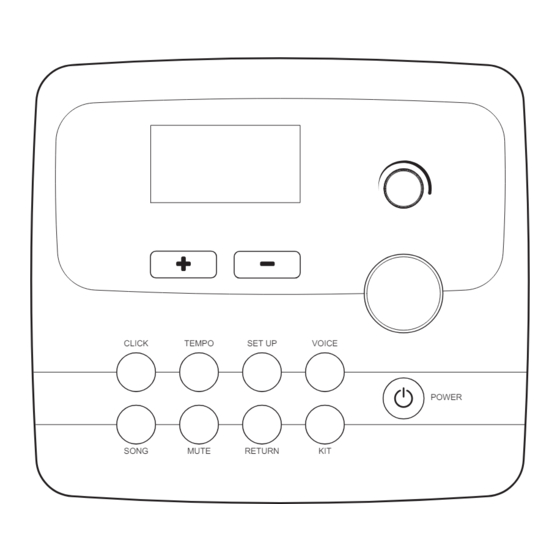
1. Sound Module User Guide 1.1 Sound Module Components 1.1.1 Top Panel CLICK TEMPO SET UP VOICE POWER SONG MUTE RETURN [+][-] buttons [POWER] button Turn the power on/off. Move the cursor in the interface or to edit setting value. [EDITOR] rotary [CLICK] button Move the cursor in display... -
Page 12: Jack Panel
[VOICE] button [RETURN] button Enter function option interface; Edit the sound and volume of drum kit. Enter specific parameter value setting; [SONG] button Confirm the modified parameters, Edit the setting relate to song. and back to the previous screen. [MUTE] button [KIT] button Mute the drum sounds in song. -
Page 13: Sound Module Operating Guide
1.2 Sound Module Operating Guide [RETURN] button is used to confirm current adjustment. 1.2.1 Viewing the Display Upon cursor on the function option, press [RETURN] button and confirm it. title bar Upon cursor on the parameter item, press Parameter Item cursor [RETURN] button and start specific parameter Current available... -
Page 14: Performing
2. Performing 2. Press [VOICE] button, 2.1 Selecting a Drum Kit CLICK TEMPO SET UP VOICE Serial number 1-20 are preset kits Serial number 21-25 are user kits. Strike the pad, the name of relative pad would show in title bar. Enter voice interface. -
Page 15: Playing Along With A Song
3. Playing Along with a Song 3.1.2 Mute the Drum Sound Press [MUTE] button and the icon of drum would 3.1 Performing Along with a Song Built-in disappear. The drum sounds would be muted. 10 perset songs built-in. Drum sounds could be muted. 3.1.1 Play Bulit-in Songs SONG MUTE... -
Page 16: Using The Metronome
4. Using the Metronome Enter metronome interface. Practicing with built-in metronome will help your perfect your tempo skill. 4.1 Using the Metronome Press [CLICK] button, the metronome starts. Metronome interface CLICK TEMPO SET UP VOICE Use [+][-] buttons or [EDITOR] rotary to select parameter. -
Page 17: Advanced Setting
5. Advanced Setting Use [+][-] buttons or [EDITOR] rotary to choose “TRIG”, Press [RETURN] button to enter trigger 5.1 Pad Setting——TRIG interface. 1. Press [SET UP] button, CLICK TEMPO SET UP VOICE Trigger Interface Enter setting interface. Strike the pad that you want to edit. The corresponding name will be displayed on the left side of the title bar, and the pad icon will also be displayed on the left side of the... - Page 18 Parameter Value Description This setting allows a trigger signal to be received only when Response threshold the pad is above a determined dynamic level (velocity). This can be used to prevent a pad from sounding because of vibrations from other pad. In the following example, B will sound but A and C will not Threshold 0-31...
- Page 19 Description Parameter Value Specifies the detection time of the trigger signal. Scan Time Due to the different characteristics of each pad or acoustic drum trigger, the rise time of the trigger signal waveform may be slightly different, and the same striking force may sound at different volumes. If this happens, adjust the "scan time"...
- Page 20 Parameter Value Description Same as "sensitivity", the higher the value, the higher the sensitivity of the rim/edge. Rim Gain 5-20 When the sensitivity is high, even if the tap is lightly hit, a large volume is generated. When the sensitivity is low, even if the intensity is hit hard, the volume is small. When you hit the drumhead hard, you may hear the drums.
-
Page 21: Effects Setting--Eff
5.3 Effects Setting——EFF Strike the pad that you want to edit. The corresponding name will be displayed on Press [SET UP] button to enter setting interface. the left side of the title bar, and the pad icon will also be displayed on the left side of the interface. -
Page 22: Mix Setting--Mix
5.4 Mix Setting——MIX Use [+][-] buttons or [EDITOR] rotary to select parameter option, press [RETURN] button. Press [SET UP] button to enter mix interface. Use [+][-] buttons or [EDITOR]rotary to edit specific value. Press [RETURN] button again and save the modified value. -
Page 23: System Setting--Util
5.5 System Setting——UTIL 5.5.2 Kick Drum Setting 5.5.1 Adjust the Brightness The hardware of kick drum could be selected: Kick drum or pedal. Press [SET UP] button to enter setting interface. According to purchase item, the setting of kick drum would preset. If the hardware of kick drum changed, setting in sound module need changed as well. -
Page 24: Information Of Sound Module
5.5.4 Information of Sound Module Press [SET UP] button to enter the setting interface. Use [+][-] buttons or [EDITOR] rotary to choose “UTIL”, then press [RETURN] to enter the system interface. Use [+][-] buttons or [EDITOR] rotary to choose “INFO”,then press [RETURN] to see the sound module information. -
Page 25: Appendix 6.1 Song List
6.Appendix SONG: 10 Preset Kit: 15 User Kit: 10 VOICE: 329 6.1 SONG List NAME NAME Ragtime Rockin-Robin Moonlight Spanish Flea It's All Right Love Me Do Hello My Baby I Love You Rising Sun Yankee Doodle 6.2 KIT List NAME NAME NAME... -
Page 26: Voice List
6.3 VOICE List NAME NAME NAME Kick (1) Kick Concrete 1 Sn-Fiesta-1-R Kick-Rock-1 Kick Concrete 2 Clap-Electro9 Kick-Pop-1 Kick Dakeat 1 Sn-Electro9-RS Kick-Pop-2 Snare(2) Kick Dakeat 2 Kick-Metal-1 Kick Ganja 1 Snare Absynth 1 Kick-Metal-2 Kick Ganja 2 Snare Absynth 2 Kick-Jazz-1 Kick Jack 1 Snare Absynth 3... - Page 27 NAME NAME NAME Snare Dakeat 4 Tom-Metal2-R Djembe AfroS 5 Snare Concrete 1 Tom-Jungle1-1 Djembe AfroS 6 Snare Concrete 2 Tom-Jungle1-2 Djembe AfroS 7 Snare Concrete 3 Tom-Jungle1-3 Djembe AfroS 8 Snare Jack 1 Tom-Electro1-1 Djembe AfroS 9 Snare Jack 2 Tom-Electro1-2 Dununba AfroS 1 Snare Jack 3...
- Page 28 NAME NAME NAME Tom Bouncin 2 RD-Brush2-edge Bongo Bouncin Tom Bouncin 3 RD-Brush2-top Ride Ganja Tom Bouncin 4 RD-Jungle1-bell Ride Orgami Tom Dakeat 1 RD-Jungle1-top Ride Overtime Tom Dakeat 2 RD-Vintage1-Bell Ride Rare 1 Perc Jack 1 RD-Vintage1-shoulder Ride Rare 2 Perc Jack 2 RD-Fiesta1-top Ride Shooter...
- Page 29 NAME NAME NAME Cr-Jungle-3 HH-Rock-closed ClosedHH Absyn 1 China-Vintage-1 HH-Rock-chick ClosedHH Absyn 2 Cr-Vintage-2 HH-Rock-splash ClosedHH Afro 1 Cr-Vintage-3 HH-Brush-open ClosedHH Afro 2 Crash(2) HH-Brush-half2 ClosedHH Alph 1 Balafon AfroS 1 HH-Brush-closed ClosedHH Alph 2 Balafon AfroS 2 HH-Brush-chick ClosedHH Arena 1 Balafon AfroS 3 HH-Brush-splash ClosedHH Arena 2...
- Page 30 NAME NAME NAME ClosedHH Jack 2 OpenHH Bounc 3 Clap AfroShop 2 ClosedHH Jack 3 OpenHH Concr 1 Clap Arena 1 OpenHH Absynth 1 OpenHH Concr 2 Clap Arena 2 OpenHH Absynth 2 OpenHH Dakeat Clap BottleP 1 OpenHH AfroShop 1 OpenHH Jack 1 Clap BottleP 2 OpenHH AfroShop 2...