Advertisement
OPERATING INSTRUCTIONS
FOR 120-VOLT MARKETS ONLY
To reduce the risk of electrical shock, this appliance has a polarized plug (one blade is wider than the other). This plug fits a polarized outlet only one way. This is a safety feature intended to help reduce the risk of electrical shock. If the plug does not fit fully into the outlet, reverse the plug. If it still does not fit, contact a qualified electrician. Do not attempt to defeat this safety feature.
These Tips Help Make Your Job Easier:
- Wash hair first; it can reduce blade damage and improveblade efficiency.
- Oil blades before and after each use. Apply 1-2 drops of oilto the blades that move and to the "contact" section of stationary blades.
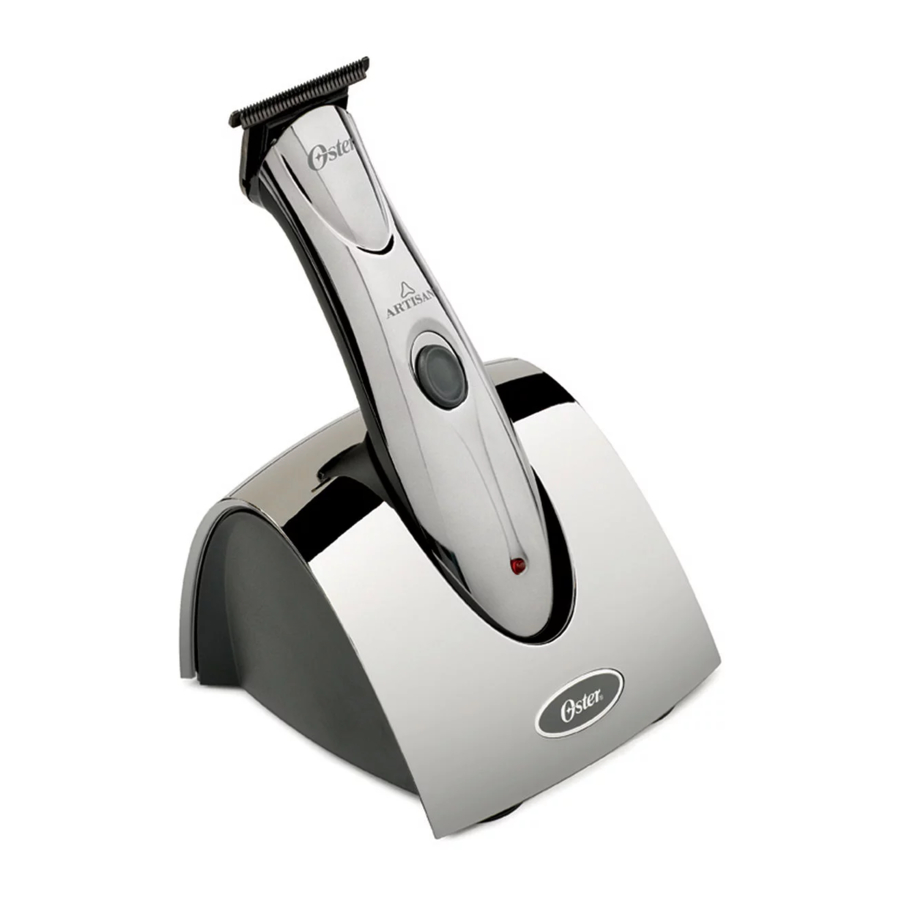
ABOUT THIS TRIMMER
Cord or cordless—it's your choice. Use the power cord when the batteries are not fully charged, or choose the cordless option.
HOW TO USE
Charging the Unit
Unit must be fully charged before operating. Otherwise damage to the battery and electrical components could result. Follow these directions and allow unit to charge for at least 16 hours before initial operation. Failure to follow these directions could result in your warranty being voided.
- Plug the power cord of the charging stand into an outlet with the rated voltage for your unit.
- Ensure that the switch on the unit is in the "Off" position.
- Insert the trimmer into the charging stand so that the top of unit is facing you and the contacts on the trimmer are aligned with the contacts on the charging stand. The top of the unit is the side with the switch and LED.

- The LED will turn on if the trimmer is inserted properly.
- If the LED will not turn on, then re-insert the trimmer into the charging stand and push down gently on the trimmer to engage the contacts. If the LED still fails to turn on, then plug one end of the auxiliary cord into the side of the charging stand and the other end into the trimmer. If the LED turns on, then there may be dirt or grease on the contacts of the charging stand. Clean the contacts and re-insert the trimmer into the charging stand. If the LED still fails to turn on then follow the return procedure under the warranty and service section.
- The LED will stay on as long as the unit is in the charging stand or if the auxiliary cord is being used. The LED will turn off when the unit is removed from either the auxiliary cord or the charging stand or the power plug is removed from the outlet.

Operating the Unit
The trimmer is designed to operate in either cordless or corded mode. The preferred method is cordless as it ensures a longer life for the battery.
Always apply one to two drops of the provided blade lubricant or other Oster approved lubricant to the blades before use.
Cutting efficiency may drop and the blades and motor may be damaged if hair is dirty or hair styling agents have been applied. Always ensure that hair is clean before using the trimmer.
Cordless Operation
- Remove the trimmer from the charging stand. (See section titled "Charging the Unit" before initial use.) The LED should turn off.
- Turn the trimmer on using the "On-Off" switch located on the top of the unit and use the trimmer.
- Turn the trimmer off when finished using.
- Cover the blades with the provided blade guard to protect the blades.
- Insert trimmer into charging stand or plug into the auxiliary power cord. (See section titled "Charging the Unit".)
Corded Operation
The trimmer has been designed to use the auxiliary power cord if the battery is low and the unit will not turn on as a result.

- If the battery is low and the unit has stopped working or you notice that the power has decreased, then you may still operate the unit by plugging in one end of the auxiliary cord into the unit and the other end into the charging stand.
- Turn the trimmer on using the "On-Off" switch and use the trimmer. If the trimmer does not turn on, then the battery may be fully depleted and may have to be partially charged prior to re-use. Follow the charging procedure and let the battery charge for approximately 10 minutes.
- Turn the unit off when finished using.
- Cover the blades with the provided blade guard to protect the blades.
- Insert trimmer into charging stand or plug into the auxiliary power cord. (See section titled "Charging the Unit".)
Recharging Precautions:
- Do not let trimmer recharge continuously for more than 3 full days. Overcharging can shorten battery life.
- Do not recharge or store trimmer when room temperature is under 0°C (32°F) or over 40°C (104°F), or in a damp, humid place. This can also shorten battery life.
- Do not recharge or store trimmer near radiators or other heat sources, or where it is exposed to strong sunlight.
- Always unplug the power supply when recharging is complete.
User-Maintenance Instructions
- The appliance has no user serviceable parts.
- The product is for commercial use.
- Keep cord straight while trimming. If cord becomes kinked or tangled, stop trimming and straighten it.
- Do not wrap cord around the trimmer when storing. This can damage the cord insulation.
- Always take care not to tangle the cord while using or storing the trimmer.
- We recommend storing the trimmer and cord in the original carton when not in use.
Changing Blades
This unit is designed with interchangeable blade attachments. It is not necessary to replace the actual blades.
REMOVING THE BLADES
- Turn the unit off. Unplug the unit from the accessory cord if in use.
- Push the upper part of the blade away from the unit. The blade and blade attachment will "snap" off.
REPLACING THE BLADES
- Turn the unit off. Unplug the unit from the accessory cord if in use.
- Align the blade attachment and the trimmer by inserting the small tab on the bottom of the blade attachment into the cut out receptacle on the bottom of the trimmer.
- Push the upper part of the blade towards the unit. The blade attachment will snap securely into the trimmer. Do not force the blade attachment. If properly aligned, the blade will snap into the trimmer with little force. Forcing the blade attachment will cause damage to your trimmer and will void the warranty.
Comb Attachments
Your unit comes with two (one 5mm and one 10mm) comb attachments. These are provided to increase the functionality and enjoyment of your unit. The 5mm attachment will leave hair approximately 3/16" long, while the 10mm attachment will leave hair approximately 3/8" long.
INSERTING THE COMB ATTACHMENT
- Insert the cutting edge of the blade into the comb attachment.
- Snap it tight at the back end of the blade by pushing down on the Guide Comb Attachment tab.
REMOVING THE COMB ATTACHMENT
- Push up on the Guide Comb Attachment tab until it releases from the metal blade.
- Continue lifting the Comb Attachment away from the cutting edge of the blade until the Comb Attachment is free.
Cleaning and Maintenance
Proper cleaning and care can extend the life and improve performance of your trimmer.
- Turn the trimmer's On/Off switch to OFF.
- Use the cleaning brush to sweep the trimmer body and blades clean of hair.
- Apply 1-2 drops of oil to the blades that move and to the "contact" section of stationary blades.

Documents / ResourcesDownload manual
Here you can download full pdf version of manual, it may contain additional safety instructions, warranty information, FCC rules, etc.
Advertisement


Need help?
Do you have a question about the 76997 and is the answer not in the manual?
Questions and answers