NAPCO RP1054e - Keypad Installation
- Manual (13 pages) ,
- Operating manual (13 pages) ,
- Installation instructions (2 pages)
Advertisement
DESCRIPTION
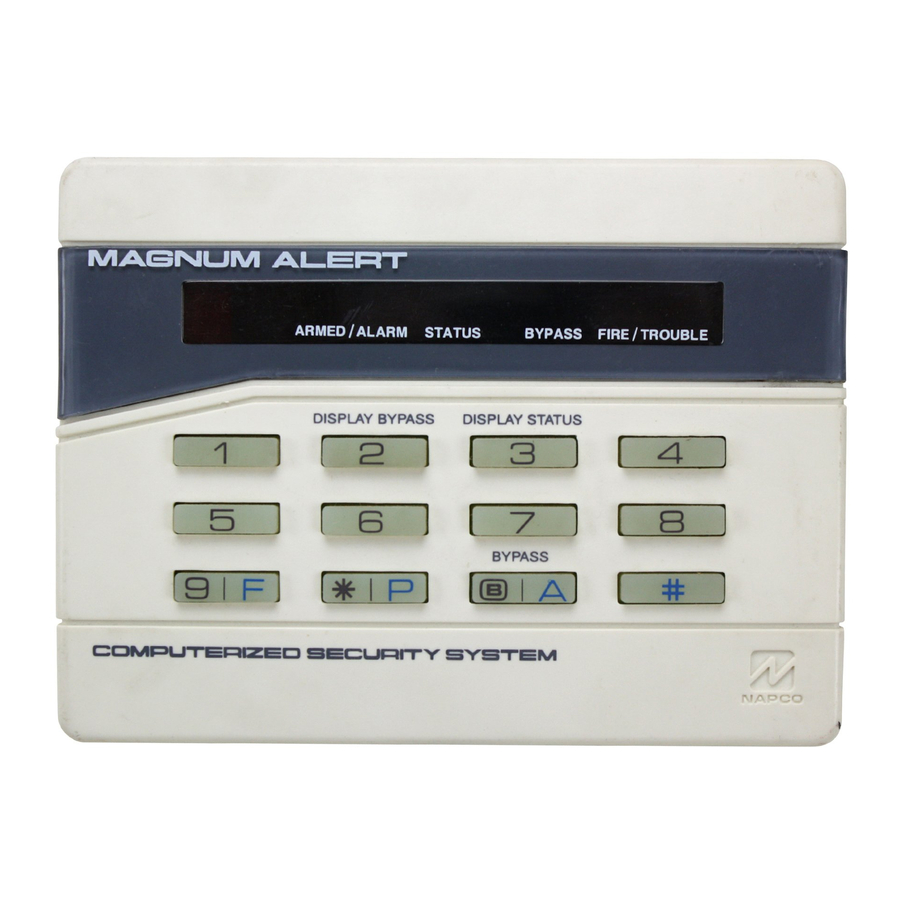
The RP1054e is a user-friendly backlit keypad designed for use with Napco MA1000e, MA1008e and MA1010 control panels, and for replacement purposes in MA854, MA1008-series and MA1010-series panels. A large 7-segment alphanumeric display functions as a readout for control-panel information and zone identification. Installation is quick and easy on only four wires.
This manual provides installation information only. Refer to the accompanying User's Guide (OI160) for keypad functions and operation, and to the installation manual furnished with the control panel for panel mounting, wiring, and programming information.
SPECIFICATIONS
Operating Voltage: 9.0--13.0Vdc (supplied by control panel)
Current: 40mA* typical
Wiring Length: 1 keypad, 1000' max.; 5 keypads, 300' max. using # 22AWG wire)
Dimensions: 43⁄8'' x 57⁄8'' x 11⁄16'' (HxWxD)
*Subtract from available combined standby current of control panel.
MOUNTING
Opening the Keypad. There are two slots along the bottom edge of the keypad about 1 inch from each side. To open, insert a medium screwdriver into either slot and push up with a slight twisting motion to release the retainer tab. Repeat for the other slot. Pull out at the bottom and lift off the two hooks at the top.
This keypad features a handy pull-up reference label. (This label must be used in UL installations.) Before mounting the keypad onto the wall, push the Sliding Label Plate (with label and felt backing affixed and handle facing forward) down the guides at the rear of the keypad until it snaps into place. Once installed, the Sliding Label Plate cannot be removed without first removing the keypad from the wall.
When installing the rear case, be sure that the words ''UP'' and ''TOP'' (molded into the case) are properly oriented. The rear case is provided with a variety of holes to accommodate virtually any mounting situation. The four angled elongated holes are for mounting directly into a wall using appropriate screws; these holes will allow levelling adjustment. The four corner holes may be used when replacing an RP854 Keypad with RPB-1 Backplate for surface mounting directly onto a wall. The RP1054e replaces both the keypad and the backplate. If installing into a double-gang box, insert mounting screws through the two vertical elongated holes on the left side of the case and into the box. If the box is visible when viewed from the front, adjust the keypad vertically, then tighten the screws. Then, using hardware suitable for the mounting surface, add one or two screws at the right side of the keypad case directly into the wall to ensure a secure installation.
WIRING
Wire the keypad to the control panel terminals shown in Table 1. Note: If using a soldering iron, be careful not to splash solder onto the keypad circuit board or components, as damage could result.
| Keypad Wire Color | MA854 | MA1000e/M A1008e | MA1008 | MA1010 |
| Yellow | 1 | 9 | 5 | 6 |
| Green | 2 | 10 | 6 | 7 |
| Red | 3 | 7 | 3 | 3 |
| Black | 4 | 8 | 4 | 4 |
| White | to normally-open momentary-contact remote panic switch(es) | |||
| White | ||||
Table 1. Keypad wiring to control-panel terminals.
Remote Panic. To connect a remote panic button, splice the two white wires to a normally-open momentary-contact pushbutton switch. Similarly, additional panic buttons may be wired in parallel with the first, as needed. If remote panic will not be used, insulate both white leads, as a short across them will cause a panic alarm. Note that in UL installations, remote panic buttons must be located in the same room as the keypad.
Keypad Panics. The RP1054e Keypad supports F/P/A (Fire/Police/Auxiliary) panics. To enable Fire and Auxiliary Panics, cut Jumper E (see JUMPER OPTIONS). If enabled, each is tripped by simultaneously pressing the following pairs of panic buttons:
- Fire Panic: press Keys [9/F] and [# ].
- Police Panic: press Keys [*/P] and [# ].
- Auxiliary Panic: press Keys [B/A] and [# ].
Note: If used as a replacement keypad in MA854 or MA1008 systems, which do not have the F/A/P-panic feature, or in MA1010 systems without F/P/A panic, Jumper E must remain intact.
Backlighting. Backlighting requires no additional wiring. In normal use, the keypad is always dimly backlit. To disable backlighting, see JUMPER OPTIONS.
JUMPER OPTIONS
Several jumpers provide a variety of options. Viewing the keypad from the front, they are conveniently located at the top edge (Jumper D) and along the right side (top to bottom: Jumpers C, B, A and E) for easy access. To further identify the location of the jumpers, refer to the label affixed to the fishpaper on the back of the board.
Disable Keypad Panic. Cut Jumper A to disable all three keypad-panic features and the two white remote-panic wires.
Disable Keypad Sounder. Cut Jumper B to completely disable the sounder. Do not disable the sounder in UL installations.
Disable Touchpad Backlight. Cut Jumper C to disable touchpad backlighting. (This will conserve of 15mA keypad current.)
Reduce Touchpad Backlight. Cut Jumper D to reduce backlight intensity. (This will conserve 6mA of keypad current.)
Activate Fire & Aux. Panics. Cut Jumper E to enable F/P/A keypad panics.
COMPLETING THE INSTALLATION
To reassemble the keypad after installation, hang the top of the front panel onto the hooks in the rear case and push in firmly at the bottom until the retainer tabs snap into place. (If difficulty is encountered, push the retainer tabs up slightly using a screwdriver, as when removing.)
HOLD-DOWN FUNCTIONS
The keypad functions listed in Table 2 are selected by holding down the indicated key for about 2 seconds (until a beep sounds).
| Key | Function |
| [1] | Bell/Battery Test |
| [2] | Display Bypass* |
| [3] | Display Status* |
| [4] | Instant Protection |
| [5] | Chime |
| [6] | Telco Test; Manual Download** |
| [7] | Fault Find |
| [8] | Program |
| [9] | Reset |
| [B] | Alarm History* |
* Keep button depressed until all zones have been displayed.
** Secondary hold-down function accessible only within 5 seconds after arming and disarming.
Table 2. Hold-Down Functions
To review the available functions at the keypad, pull up the Sliding Label Plate at the top of the keypad to expose the ''ready-reference'' list of both hold-down functions and zone descriptions.
System Trouble Indications (MA1000e-Series only)
(Not in MA854 or earlier MA1000-Series panels). The following system troubles will display at the keypad, whether armed or disarmed, accompanied by flashing LEDs. The indication may be temporarily reset by holding down Reset Key [9] in order to check zone status and/or arm the system. If the system trouble is not corrected, it will return after about 3 minutes.
- Ac Failure. Displays when ac power is restored after a lengthy power failure (and the backup battery is dead).
- Low Battery. Displays when battery terminal voltage drops below its specified level.
- Failure to Communicate. Indicates a transmission failure. Hold down Key [9] to reset the keypad, then hold down Key [6] to test the phone lines. If the test is successful, the display will clear; otherwise it will return, indicating a need for service.
- Auto-Download Failure. (Where available.) Indicates failure of a Function-6 Auto-Download from the PCD2000. Reset the display by holding down Key [9], then try again to download the program.
KEYPAD PROGRAMMING
(MA1000-Series only)
The following keypad functions are enabled only in the Dealer Program Mode. For programming instructions, refer to the installation manual furnished with the control panel.
Key [1] - PRIOR. Sequences backward to the previous location.
Key [2] - NEXT. Advances to the next location.
Key [3] - NEXT. Same as Key [2].
Key [4] - DATA UP. Selects the data for the chosen location: numbers 1--9, 0 and letters B, C, D, E, and F, in ascending order.
Key [5] - CLEAR. Clears the data from the selected location.
Key [6] - PRIOR. Same as Key [1].
Key [7] - DATA DOWN. Selects the data for the chosen location: numbers 1--9, 0, and letters B, C, D, E, and F, in descending order.
Key [8] - EXIT. All LEDs will light. Enter Dealer Program Code with 10 seconds to verify and exit.
Key [B] - SET LOCATION. Enter a 3-digit location number.
NAPCO SECURITY SYSTEMS, INC.
333 BAYVIEW AVENUE
AMITYVILLE, NEW YORK 11701
SALES REPAIRS & TECHNICAL SERVICE
TOLL FREE: (800) 645-9445
TECHNICAL SERVICE DIRECT LINE
TOLL FREE: (800) 645-9440

Documents / ResourcesDownload manual
Here you can download full pdf version of manual, it may contain additional safety instructions, warranty information, FCC rules, etc.
Advertisement


Need help?
Do you have a question about the RP1054e and is the answer not in the manual?
Questions and answers