Advertisement
Quick Links
Overhead Radiant Plaque Heaters
INSTALLATION, SERVICING AND OPERATING INSTRUCTIONS
OWNER / INSTALLER: For your safety this manual must be carefully and thoroughly read and understood
before installing, operating or servicing this heater. This heater is intended for use with either Natural Gas or
Propane Gas. It must be installed by a qualified service person or a licensed contractor in accordance with
state and local codes.
MODELS: 708AN, 716AN, 722AN, 731AN, 731ANHILO
INSTALLER: This manual is the property of the owner. Please present this manual to the owner when
you leave the job site.
WARNING:
Improper installation, adjustment, alteration, service, or maintenance
can cause property damage, injury or death. Read the installation,
operation and maintenance instructions thoroughly before installing or
servicing this equipment.
Before installation, check that the local distribution conditions, nature
of gas and pressure and adjustment of the appliance are compatible.
In locations used for the storage of combustible materials, signs must
be posted to specify the maximum permissible stacking height to
maintain the required clearances from the heater to the combustibles.
Signs must either be posted adjacent to the heater thermostats or in
the absence of such thermostats, in a conspicuous location.
NOT FOR RESIDENTIAL USE.
This heater is not approved in any residential application. This includes (but is not limited
to) the home, living quarters, attached garages, etc. Installation in residential indoor
spaces may result in property damage, asphyxiation, and serious injury or death.
Get In Touch
Call: 0845 6880112
Email: info@adremit.co.uk
700 (PILOT) SERIES
716AP, 731AP, 731APHILO
Infraglo Limited
Dannemora Drive
Greenland Road Industrial Park
Sheffield S9 5D UK
Tel: (0114) 249 5445
Email:
admin@infraglo.com
Country : GB, I
655
Our Address
Puravent, Adremit Limited, Unit 5a, Commercial Yard,
Settle, North Yorkshire, BD24 9RH
Form# 44201490
May 2020
Advertisement

Summary of Contents for Infraglo 700 Series
- Page 1 This heater is not approved in any residential application. This includes (but is not limited to) the home, living quarters, attached garages, etc. Installation in residential indoor spaces may result in property damage, asphyxiation, and serious injury or death. Infraglo Limited Dannemora Drive Greenland Road Industrial Park...
- Page 2 TABLE OF CONTENTS Section Title Starting Page Safety Installer Responsibility General Information Minimum Clearances to Combustion Technical Data Dimensions – Models 708A, 716A, 722A Dimensions – Models 731A Un-Packing Installation Suspension Gas Supply Electrical Supply Ventilation 11a. Ventilation by Thermal Evacuation 11b.
- Page 3 ! WHAT TO DO IF YOU SMELL GAS: DO NOT try to light any appliance. Extinguish any open flame. Open windows. DO NOT touch any electrical switch. DO NOT use any telephone in your building. Immediately call your gas supplier from a neighbor’s telephone. Follow the gas supplier's instructions.
- Page 4 Although these heaters may be used in many applications other than space heating (e.g., process heating), Infraglo will not recognize the warranty for any use other than space heating.
- Page 5 It is the responsibility of the qualified installer to supply the appropriate lifting equipment to safely installer the radiant tube heater. Tools required for the safe installation, startup and maintenance are various screwdrivers, wrenches, pipe wrenches, volt and multimeter, air and gas manometer and required tools to safely install the chosen hanging materials.
- Page 6 MINIMUM CLEARANCES TO COMBUSTIBLES For maximum safety the building must be evaluated for hazards before installing the heater system. Examples include, but are not limited to: Gas and electrical lines Vehicles parking areas Combustible and explosive materials Vehicles with lifts or cranes ...
- Page 7 NFPA 54 requires that the installer must post signs that will “specify the maximum permissible stacking height to maintain the required clearances from the heater to combustibles.” Infraglo recommends posting these signs adjacent to the heater thermostat or other suitable location that will provide enhanced visibility.
- Page 8 TECHNICAL DATA Table 2 MODEL 708AN Heat Input 7.6kW (Hs) 6.84kW (Hi) Appliance Type Appliance Cat. Adjusted for 2H G20 20mbar Setting Pressure 12.0mbar Injector (1 piece) Ø2.2mm NOx Class Electrical Supply 230v~50Hz 25W Fuse Externally Dimensions L = 0.645m W = 0.428m H= 0.325m Weight 6.0kg Gas Connection...
- Page 9 Table 5 MODEL 731AN 731AP Heat Input 30.4kW (Hs) 27.36kW (Hi) 30.0kW (Hs) 27kW (Hi) Appliance Type Appliance Cat Adjusted for 2H G20 20mbar 3+ G30/31 29/37mbar Setting Pressure 12.0mbar None Injector (2 pieces) 2 x Ø3.1mm 2 x Ø1.9mm NOx Class Electrical Supply 230V ~ 50Hz 25W...
- Page 10 Table 7 MODEL 708AN (PILOT) Heat Input 7.6kW (Hs) 6.84kW (Hi) Appliance Type Appliance Cat Adjusted for 2H G20 20mbar Setting Pressure 12.0mbar Injector (1 piece) Ø2.2mm NOx Class Pilot Injector TJ020 Dimensions L = 0.615m W = 0.428 H = 0.325m Weight 6.0kg Gas Connection...
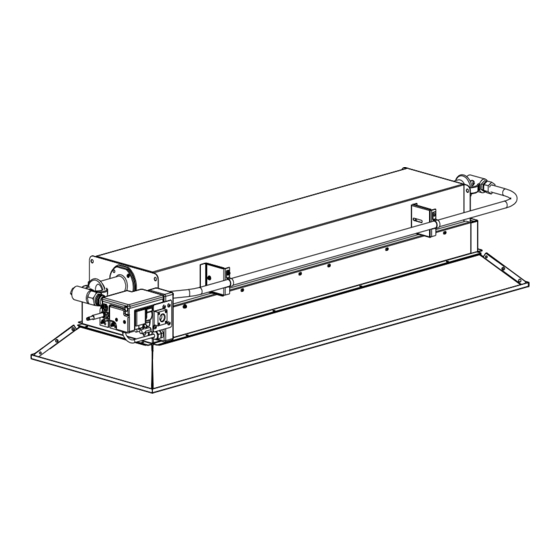
- Page 11 DIMENSIONS – Models 708A, 716A, 722A (DBI controls shown) Fig. 2 DIMENSIONS – Models 731A (DBI controls shown) 6.1) Fig. 3 Get In Touch Our Address Call: 0845 6880112 Puravent, Adremit Limited, Unit 5a, Commercial Yard, Settle, North Yorkshire, BD24 9RH Email: info@adremit.co.uk...
- Page 12 UN-PACKING The appliance is supplied in a carton, assembled complete and ready for installation. Any optional equipment supplied is packed inside the carton also. INSTALLATION Not withstanding their limited scope, the appliance should be installed in accordance with the relevant provisions of any National Gas Safety (Installation and Use Regulations).
- Page 13 Fig. 4 Exhaust Vent 2° Exhaust Vent Exhaust Vent Adjustable Wall Brackets 45° max 15°/22.5°/30°/37.5°/45° GAS SUPPLY Get In Touch Our Address Call: 0845 6880112 Puravent, Adremit Limited, Unit 5a, Commercial Yard, Settle, North Yorkshire, BD24 9RH Email: info@adremit.co.uk...
- Page 14 Natural Gas - G20 at 20mbar supply pressure (appliance cat 2H). Maximum supply pressure (Pmax) - 25 mbar Minimum supply pressure (Pmin) - 17mbar Setting Pressure 12.5 mbar Gas Connection Rp - ½ Gas pipe sizing must be calculated in accordance with local or National codes taking into account all gas appliances installed using the common gas supply.
- Page 15 ELECTRICAL SUPPLY Direct Burner Spark Ignition: the electrical wiring to the appliance must be installed in accordance with the latest or current National Regulations and any Local Regulations which apply. Electrical supply 230v ~ 50Hz 25W Current rating 0.11A Fuse externally Twin core and earth PVC covered flexible supply cable (0.5mm - to National or Local standard specification) must be used, with connections made as shown in Fig.
- Page 16 731AHILO SINGLE HEATER PER THERMOSTAT BLACK GREEN/YELLOW BLUE BROWN THERMOSTAT 1 SWITCH THERMOSTAT 1 SWITCH THERMOSTAT 2 SWITCH THERMOSTAT 2 SWITCH HEATER 1 HEATER 2 MULTIPLE HEATERS PER THERMOSTAT THERMOSTAT 2 BLACK GREEN/YELLOW BLUE BROWN SWITCH SWITCH THERMOSTAT 1 SWITCH HEATER 1 HEATER 2 Fig.
- Page 17 Internal Wiring Diagram (S.I.T. Controls) – Hi/LO Fig. 9 VENTILATION The installation room should have a volume of at least 10m /kW of installed nominal heat input of the radiant heater. The ventilation requirements and calculation methods for unflued appliances are set out in the European Standards EN 13410:2001 and must be applied.
- Page 18 A. Ventilation by Thermal Evacuation Ventilation by thermal evacuation is sufficient if 10m /kW of operating heat input are ventilated out of the installation room. The air/products of combustion mixture must be evacuated above the radiant heaters, if possible near the ridge, by means of exhaust mixture opening(s), (vents).
- Page 19 ASSEMBLY A. 708A, 716A, 722A, 731A (Direct Burner Spark Ignition) The appliance should be raised and suspended from chains or drop rods or from brackets fixed to vertical surfaces which have been previously installed in accordance with section 8a. - Suspension. Connect the gas supply in accordance with Section 9.
- Page 20 C. 708A, 716A, 722A (Standing Pilot Ignition) The appliance should be raised and suspended from chains or drop rods, or from brackets fixed to a vertical surface which have been previously installed in accordance with Section 8a. Suspension. Connect the gas supply in accordance with Section 9. - Gas Supply, of these Installation Instructions. IMPORTANT: THIS APPLIANCE MUST NOT BE CONNECTED TO ANY ELECTRICAL SUPPLY.
- Page 21 If the appliance has a thermostat fitted in the electrical supply circuit, ensure that it is set high enough to demand heat. 731AHILO: ensure that the second thermostat (T2 - see Fig. 7) is set high enough to call for heat also.
- Page 22 Switch off the electrical supply to the appliance and remove the manometer tube from the LEFT (Gas IN) Control Valve test nipple. Screw in the test nipple sealing screw. To check the burner setting pressure:- Unscrew the sealing screw (2 turns) of the RIGHT (Gas OUT) Control Valve test nipple and connect a manometer to this test nipple.
- Page 23 F. Shut Down To shut down the appliance for short periods of time, turn the thermostat setting to the lowest temperature or operate the ON/OFF switch (if no thermostat) to the OFF position. To shut down the appliances for a period of time in excess of one week press and turn the knob clockwise to the OFF position and turn off the gas supply at the gas isolation valve.
- Page 24 H. Flame Supervision To check the operation of the flame supervision equipment, run the appliance normally, unscrew the thermocouple nut and disconnect the thermocouple from the control valve. Observe that the appliance burner flame is extinguished within 60 seconds. Re-connect the thermocouple and re-ignite the appliance burner by following the procedure in section 13A of these commissioning instructions.
- Page 25 B. Flame Sensor Probe Disconnect the grey flame sensor lead from the sensor probe by gently pulling the connector, using pliers. Unscrew the two M4 screws, securing the sensor probe to the flue collar assembly and withdraw the probe. Remove any foreign matter from the sensor rod and check the condition of the ceramic insulator. If the rod is badly oxidised or the ceramic insulator cracked, replace the sensor probe.
- Page 26 Disconnect the electrical supply to the appliance by unscrewing the M3 screw securing the electrical supply socket to the 4 pin plug attached, to the junction box. (secured to the control valve). Disconnect the gas supply pipe from the control valve by unscrewing the four M4 screws securing the straight flange to the control valve inlet port.
- Page 27 O. Foreign Objects Check and remove any foreign objects that are logged between the reflector, ceramic plaque, etc. P. Labels Replace safety and all other labels if they are no longer visible. See section 17 and 17.1 for replacements REPLACING COMPONENTS IMPORTANT: Disconnect gas and electrical supplies to the appliance before carrying out any repair work.
- Page 28 D. Injector Using a ½” (12mm) A/F spanner, unscrew the injector from the venturi casting. E. Venturi Fabrication First unscrew the four M4 screws securing the elbow flange connector to the control valve outlet port and remove the control valve assembly complete. Unscrew the four M4 screws securing the venturi casting to the plenum body end panel and carefully withdraw the venturi fabrication from the plenum body.
- Page 29 I. Thermopile (Standing Pilot Ignition) Disconnect the two thermopile leads from the millivolt controller connections (marked TP) of the gas control valve. Release the spring latch securing the thermopile in the pilot frame and pull the thermopile from the bottom of the pilot frame.
- Page 30 Slide out the reverberatory screen. Remove the 1/4" UNC nuts and setscrews retaining the emitter assembly and reverberatory screen side rails and end baffles to the plenum body. Lift off the reverberatory screen side rails and end baffles and carefully lift our the emitter assembly.
- Page 31 OFF position and turn off the gas supply at the gas isolation valve. REPLACMENT PARTS GUIDE (Models 708A, 716A, 722A) Only use genuine Infraglo replacement parts. Parts are available from the factory for replacement by a qualified person. Item Part No.
- Page 32 Screw – ¼” x 5/8” SS (emitter) –not shown- 4267926 42849280 Label, Nameplate 43247140 Label, Clearances to Combustibles 42604200 Label, Warning 42604600 Label, Operating Instructions 44201490 Installation Manual (not shown) 4250583 Junction Box (includes lid) 4262146 Cable Gland (Qty. 2) 4262147 Cable Gland Nut (Qty.
- Page 33 17.1) REPLACMENT PARTS GUIDE (Models 731A) Item Part No. Description 40742000 Plenum Box Assembly 4262309 Emitter Kit 40446080 End Gasket (Qty. 2) 40446110 Side Gasket (Qty. 2) 40747000 Screen Retainer (Qty. 2) 41748020 Reverb Screen 41156000 Reverb Baffle Assembly (ignition end) 40710020 Reverb Baffle (back end) 40621000...
- Page 34 Get In Touch Our Address Call: 0845 6880112 Puravent, Adremit Limited, Unit 5a, Commercial Yard, Settle, North Yorkshire, BD24 9RH Email: info@adremit.co.uk...
- Page 35 NOTES: Get In Touch Our Address Call: 0845 6880112 Puravent, Adremit Limited, Unit 5a, Commercial Yard, Settle, North Yorkshire, BD24 9RH Email: info@adremit.co.uk...
Need help?
Do you have a question about the 700 Series and is the answer not in the manual?
Questions and answers