Table of Contents
Advertisement
Quick Links
Advertisement
Table of Contents

Related Manuals for Walsh WSCMS311BK-10

Summary of Contents for Walsh WSCMS311BK-10
- Page 1 Microwave Oven WSCMS311BK-10 User Manual...
-
Page 2: Table Of Contents
CONTENT PRECAUTIONS TO AVOID POSSIBLE EXPOSURE TO EXCESSIVE MICROWAVE ENERGY ....1 IMPORTANT SAFETY INSTRUCTIONS..................2 GROUNDING INSTRUCTIONS....................4 INSTALLATION GUIDE......................5 UTENSILS GUIDE........................5 COOKING TECHNIQUES ......................6 PART NAMES ........................7 CONTROL PANEL........................7 OPERATION INSTRUCTIONS....................8 10.1 Setting The Clock....................... 8 10.2 Setting The Timer ...................... -
Page 3: Important Safety Instructions
IMPORTANT SAFETY INSTRUCTIONS When using electrical appliances, basic safety precautions should be followed, including the following: WARNING - To reduce the risk of burns, electric shock, fire, and injury to persons or exposure to excessive microwave energy: 1. Read all instructions before using the appliance. 2. - Page 4 12.The contents of feeding bottles and baby jars should be stirred or shaken and the temperature should be checked before serving in order to avoid burns. 13.Cooking utensils may become hot because of heat transferred from the heated food. Potholders may be needed to handle the utensil. 14.Do not cover or block any openings on the appliance.
-
Page 5: Grounding Instructions
GROUNDING INSTRUCTIONS This appliance must be grounded. In the event of an electrical short circuit, grounding reduces risk of electric shock by providing an escape wire for the electric current. The appliance is equipped with a cord having a grounding wire with a grounding plug. The plug must be plugged into an outlet that is properly installed and grounded. -
Page 6: Installation Guide
INSTALLATION GUIDE 1. Make sure that all the packing materials are removed from the inside of the door. 2. Check the oven for any damage, such as misaligned or bent door, damaged door seals and sealing surface, broken or loose door hinges and latches and dents inside the cavity or on the door. If there is any damage, do not operate the oven and contact qualified service personnel. -
Page 7: Cooking Techniques
• Straw, wicker, and wood — Use only for short-term heating, such as warming dinner rolls for a few seconds. Baskets and bowls may be flammable. Not Recommended • Glass jars and bottles — Regular glass is too thin to be used in a microwave. It can shatter and cause damage and injury. -
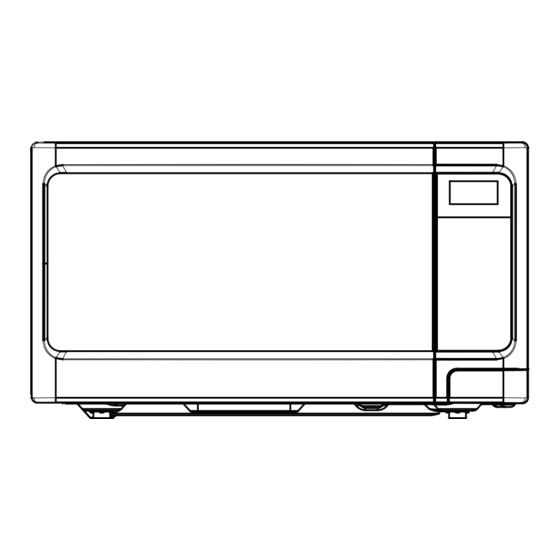
Page 8: Part Names
PART NAMES 1.Door Safety Lock System 2.Oven Window 3.Roller Ring 4.Shaft 5.Door Release Button 6.Control Panel 7.Wave Guide(Please do not remove the mica plate covering the wave guide) 8.Glass Tray CONTROL PANEL MENU ACTION SCREEN Cooking time, power, indicators and present time are displayed. QUICK COOK BUTTONS Instant settings to cook popular foods. -
Page 9: Operation Instructions
OPERATION INSTRUCTIONS 10.1 SETTING THE CLOCK 1.Touch CLOCK pad. 2.Use the number pads to enter the correct time. 3.Touch CLOCK pad again. NOTE: This is a 12 hour clock. When the oven is first plugged in or when power resumes after a power interruption, the display will show ENTER CLOCK TIME. -
Page 10: Cook By Weight
3.Touch START/STOP. NOTE: • After setting SPEED DEFROST, oven can be programmed to automatically switch to one or two-stage cooking. • For speed defrost and one stage cooking, follow steps above. Before touching START/STOP, touch PROGRAM, enter time and power level. Then touch START/STOP. •... -
Page 11: Quick Cook Settings
QUICK COOK SETTINGS The QUICK COOK settings allow you to cook or reheat food automatically without entering power level or time. For smaller portions, simply touch the applicable pad and start. For larger portions, push the pad twice. FROZEN DINNER, POTATO and BEVERAGE allow you to cook multiple amounts of the same food. Simply touch pad once, and ENTER AMT appears in the display. -
Page 12: Specifications
4. The outside surfaces should be cleaned with a damp cloth. To prevent damage to the operating parts inside the oven, water should not be allowed to seep into the ventilation openings. 5. Wipe the window on both sides with a damp cloth to remove any spills or spatters. 6.