Table of Contents
Advertisement
Quick Links
Instruction manual for Retractable Awning
Contents
Packinglist.....................................................................................
Description.............................................................................................
Safetyinstructions............................................................................
Preparation...................................................................................
Mounting..................................................................................................
Operation.................................................................................................
Adjusting pitch angle........................................................................
Extend and retract awning.....................................................
EngineSetting............................................................................................
General notes of theawningfabric..............................
Electricalconnectionguide .................................................................................... 13
Attention!
!
Read the operator's instruction before the mounting and use of the product. Keep
the instruction in a safe place for future reference.
Dear Customer,
Congratulations for buying an awning out from the electical awning. For your own and the safety of
other people please pay attention to the following leads and follow safety instructions.
Before you start mounting and using the awning, please get familiar with this product. Make sure
all parts listed up in below packing lists are delivered and intact. If you find that there are parts
missing or damaged please do not install the awning but contact your dealer.
(EM3430L-5.95x3.5m/3.95x2.5m)
1
2
3
3-4
4
5-8
8
8
9-10
11
12
Advertisement
Table of Contents

Subscribe to Our Youtube Channel
Related Manuals for Alutech Sun Shield EM3430L


Summary of Contents for Alutech Sun Shield EM3430L
-
Page 1: Table Of Contents
Instruction manual for Retractable Awning (EM3430L-5.95x3.5m/3.95x2.5m) Contents Packinglist..................Description..................... Safetyinstructions................Preparation................... Mounting....................Operation....................Adjusting pitch angle................ Extend and retract awning............. 9-10 EngineSetting.................... General notes of theawningfabric………………………… Electricalconnectionguide ..................13 Attention! Read the operator’s instruction before the mounting and use of the product. Keep the instruction in a safe place for future reference. -
Page 2: Packinglist
Packin ng list No matte er which typ pe of the awn ning series y you bought, the followin ng parts shou uld be in the package Part Quant Awning ≤ ≤5m ≤6m acket with h hexagon hea ad bolt and l ocknut for w wall and ceili crew... -
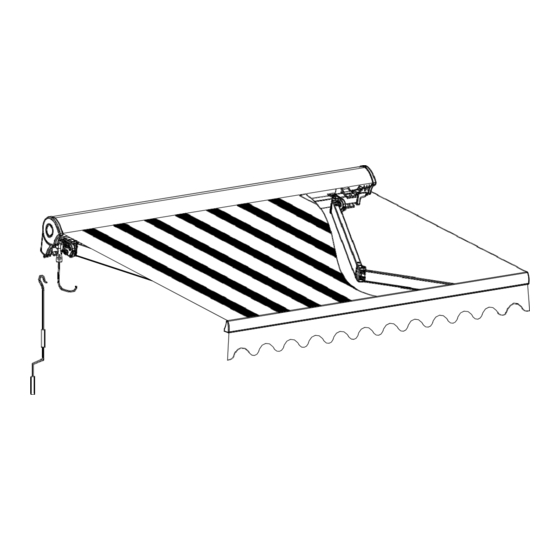
Page 3: Description
Descri ption Vala ance Gear b Front bar bric Angle adjustment 12 C Crank cket Torsio n bar n cover Roller Side e cover Import tant safety yinstructi ons! ARNING – I IT IS IMPOR RTANT FOR R SAFETY O OF PERSON NS TO FOL LOW THES... -
Page 4: Preparation
Do not install the awning when you find damage parts are that parts are missing. Do not allow children to play in the working area during assembly This product is only suitable for installation in the cement wall or ceiling. Nobody is allowed to change the products’... -
Page 5: Mounting
Mounting Mounting on concrete wall or ceiling The awnings must be installed at least at the height of 2.5 m on a reinforced concrete wall or ceiling. Please ask professionals for help if you are notsure. Make sure the wall/ceiling is plane, so that bracket seats solidly. WARNING Three healthy adults are needed to move and install the awning. - Page 6 Step 3: Drill holes Use 14-mm masonry drill to drill the holes for the brackets at the appropriate marks on the wall. The holes should be 9 cm deep in the wall and must be drilled through solid masonry or concrete. Do not bore through mortar because this does not offer the strong enough support that is required by the installation of awning.
- Page 7 Step 5: Fix xing the bra ackets Place the b bracket on t the screw p rotruding fro om the wall . Then add locking ring g and washe er and fix the bracket t with lock n uts. Tighten n themwell.
-
Page 8: Operation
Drawing 6: Insert awning to bracket as shown. Fix the awning with delivered safety screw and lock nut and tighten it properly. In case the square tube cannot be inserted into the wall brackets, you should slightly loosen the wall bracket screws and then try it once again. This time, move the awning slightly forward and backwards until the bearing tube slips into the brackets. -
Page 9: Extend And Retract Awning
Drawing 7: The pitch angle can be adjusted on all arms in the adjusting area (7.1). Take off the plastic caps, loosen the locking bolts 9 with a 14mm wrench. Turn the adjusting screw clockwise to decrease the pitch angle; turn counter- clockwise to increase the pitch angle. - Page 10 The awn ning can be extended a nd retracted d by a remot te control inc cluded in de elivery. Drawing g 8..2: ress the exte ension butto "EXT" f the awn ning extensio on. The role moves up a the awn ning will beex xtended.
-
Page 11: Enginesetting
Engine setting(off/on setting) Factory default setting is best for the engine . Larger settings before its use should therefore not be necessary. In the following cases, however, the engine should be a bit readjusted if: 1 Theawningdoesn`t close completely. 2 The cover isloose. 3 The engine is not running yet, although the awning is fully closed. -
Page 12: General Notes Of Theawningfabric
General notes of the awningfabric Awning fabrics are high performance products. Nevertheless, even given today's state of the art and the requirements imposed by environmental protection, there are limits to perfection. Certain appearances in the fabric that are sometimes objected to are still possible despite sophisticated production and processing technology. -
Page 13: Electricalconnectionguide
...
Need help?
Do you have a question about the Sun Shield EM3430L and is the answer not in the manual?
Questions and answers