Table of Contents
Advertisement
Quick Links
Please give us a chance to make it right and do better !
Contact our friendly customer service department for help first.
Replacements for missing or damaged parts will be shipped ASAP !
US office: Fontana
UK office: Ipswich
DE office: Hamburg
FR office: Saint Vigor d'Ymonville
Contact Us!
Do NOT return this item.
AU office: Truganina
PL office: Gdańsk
US:cs.us@costway.com
UK:cs.uk@costway.com
AU:cs.au@costway.com
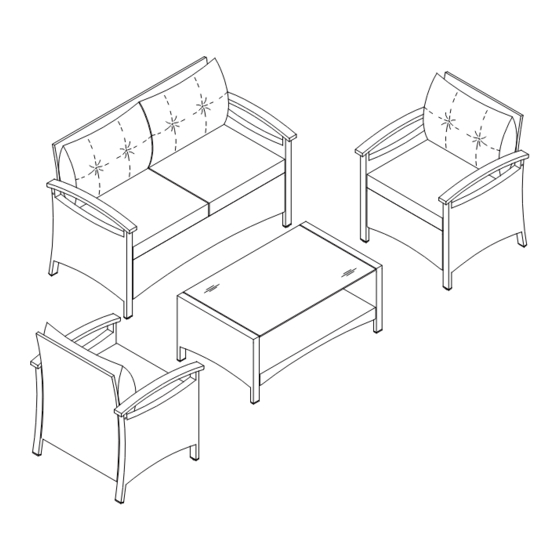
4-Piece Rattan Furniture Set
THIS INSTRUCTION BOOKLET CONTAINS IMPORTANT SAFETY INFORMATION. PLEASE READ AND KEEP FOR FUTURE REFERENCE.
USER'S MANUAL
HW69469
Advertisement
Table of Contents

Subscribe to Our Youtube Channel
Related Manuals for Costway HW69469


Summary of Contents for Costway HW69469
- Page 1 DE office: Hamburg FR office: Saint Vigor d'Ymonville PL office: Gdańsk USER’S MANUAL Contact Us! 4-Piece Rattan Furniture Set HW69469 US:cs.us@costway.com Do NOT return this item. UK:cs.uk@costway.com AU:cs.au@costway.com THIS INSTRUCTION BOOKLET CONTAINS IMPORTANT SAFETY INFORMATION. PLEASE READ AND KEEP FOR FUTURE REFERENCE.
- Page 2 (2 x Chair) (1 x Bench) Before You Start (1 x Table) Please read all instructions carefully. Retain instructions for future reference. Separate and count all parts and hardware. Read through each step carefully and follow the proper order. We recommend that, where possible, all items are assembled Notice 1.
- Page 3 STEP 1 Parts List (2 x Chair assembly) Connect Back Frame (D) &Seat Frame (C) with Bolt (1)& Washer (3) A x 3 B x 3 C x 2 D x 2 Right Frame Left Frame Seat Frame Back Frame G x 4 E x 1 F x 1...
- Page 4 STEP 3 STEP 5 Put on Seat Cushion Connect part from STEP 2 to Right Frame (A) with (G) & Back Pillow (H) to complete the assembly Bolts (1) & Washers (3) of Single chair STEP 4 Connect the parts of the Back Frame (D) to Right Frame (A) and Left Frame(B)
- Page 5 STEP 7 STEP 9 Connect part from STEP 6 Connect the parts of the to Right Frame (A) with Bench Back Frame (F) to Bolts (1) & Washers (3) Right Frame(A) and Left Frame (B) completed in STEP 8 with Bolts (2) STEP 10 Put on Seat Cushion (G) &...
- Page 6 STEP 11 Care and Maintenance (1 x Table assembly) Connect Table Leg Frame (I) & Table Shelf Frame (J) with Use a soft, clean cloth that will not scratch the surface when dusting. Bolts (1) & Washers (3) Use of furniture polish is not necessary. Should you choose to use polish, test first in an inconspicuous area.
Need help?
Do you have a question about the HW69469 and is the answer not in the manual?
Questions and answers