Table of Contents
Advertisement
Quick Links
The complete guide to the set up and operation of your new smart Wi-Fi® thermostat.
The smart Wi-Fi thermostat system learns your comfort preferences, then finds opportunities to
automatically save you energy and money. It also offers valuable energy-saving advice based on your
portal and thermostat usage. Although the system operates automatically, you can act on these
personalized tips to save even more —so you're always in control.
Installed by:__________________________________________
Date: __________________________________________
Number of Thermostats: ____________________________
Notes:________________________________________________
______________________________________________________________
______________________________________________________________
______________________________________________________________
______________________________________________________________
Lowering the demand for electricity helps to conserve resources and create a more sustainable energy future.
IT801 Thermostat
User's Manual
1-844-258-7761 • CenHubPeakPerks.com
CHUM1605
Advertisement
Table of Contents

Summary of Contents for Fortis CenHub IT801
- Page 1 IT801 Thermostat User’s Manual The complete guide to the set up and operation of your new smart Wi-Fi® thermostat. The smart Wi-Fi thermostat system learns your comfort preferences, then finds opportunities to automatically save you energy and money. It also offers valuable energy-saving advice based on your portal and thermostat usage.
-
Page 2: Table Of Contents
Table of Contents Step 1: Getting Started ......................................3-5 A. Thermostat Buttons and Indicators ..............................3 B. Thermostat Display ..................................4-5 Step 2: Main Menu and Thermostat Settings ............................6-14 ® A. Wi-Fi Settings Menu ..................................6-9 B. Filter Timer Settings Menu ................................10-11 C. Reset Filter Timer ....................................11 D. -
Page 3: Step 1: Getting Started
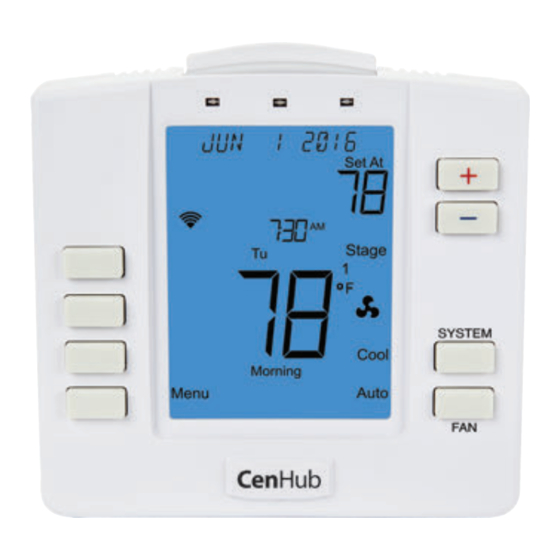
Step 1: Getting Started A. Thermostat Buttons and Indicators Enables or disables illumination. Provides night light function. Can be used to Nightlight activate the LCD back light. FAN Button Changes fan setting (Auto/On) SYSTEM Button Changes operating mode (Off, Cool, Off, Heat, Aux and Off) User Program Buttons Facilitate various operations in different menus Temperature Setpoint Buttons... -
Page 4: Thermostat Display
Step 1: Getting Started B. Thermostat Display ¿¿¿¿¿¿¿¿¿¿¿¿¿¿¿¿ Set At HOLD Stage MoTu WeThFr Next Clock Select Utility Sched Timed Prev Cool Other Heat Morning Perm Auto Evening Menu Night Done Energy Un Occupied Messaging Display Displays current date, HVAC system status, conservation event status, and CenHub Peak Perks-related messages. - Page 5 Step 1: Getting Started B. Thermostat Display (continued) ¿¿¿¿¿¿¿¿¿¿¿¿¿¿¿¿ Set At HOLD Stage MoTu WeThFr Next Clock Select Utility Sched Timed Prev Cool Other Heat Morning Perm Auto Evening Menu Night Done Energy Un Occupied Time Of Day Program Displays current programming interval setting Interval User Buttons Display Actions to be performed when corresponding user button is pressed...
-
Page 6: Step 2: Main Menu And Thermostat Settings
Step 2: Main Menu and Thermostat Settings The User Programming Menu table (next page) summarizes the configuration items that the user can adjust, and provides a convenient space to keep track of your settings. To enter the User Programming Menu: 1. - Page 7 Step 2: Main Menu and Thermostat Settings (continued) 5. Press the button to 6. As RESET WI-FI ® is flashing, press advance the display to the Select button. ® RESET WI-FI STEP 2: Connect to a Wireless Internet Network In the configuration mode, the CenHub Peak Perks thermostat acts like a wireless Internet access point. This allows the user ®...
- Page 8 Step 2: Main Menu and Thermostat Settings (continued) ® 5. Use a Wi-Fi -enabled smartphone, 6. You may receive a notification tablet, or computer to connect to that you are connected to a ® the thermostat. Open the Wi-Fi non-secure network. Select OK settings menu on your device and or CONTINUE.
- Page 9 Step 2: Main Menu and Thermostat Settings (continued) 13. The settings page will now show an overview of the settings you entered. If all settings are correct, click on Apply. If you need to correct any settings, click on Cancel. 14.
-
Page 10: Filter Timer Settings Menu
Step 2: Main Menu and Thermostat Settings (continued) B. Filter Timer Settings Menu The filter timer is an indicator to the user to check and/or replace the HVAC air filter. Filter Timer Menu allows you to set the number of days before the CHANGE FILTER alert appears in the thermostat display. -
Page 11: Reset Filter Timer
Step 2: Main Menu and Thermostat Settings (continued) 3. Press the Next button to 4. Press the button advance to the FILTER TIMER to reach Off. screen. 5. Press Done. C. Reset Filter Timer Filter Timer Reset The filter timer is an indicator to the user to check and/or replace their HVAC air filter. The filter timer can be reset at any time —whether there is an active CHECK FILTER message display or not. -
Page 12: Lcd Backlight Settings Menu
Step 2: Main Menu and Thermostat Settings (continued) D. LCD Backlight Settings Menu This menu allows you to choose when the LCD backlight illuminates. To choose when the backlight illuminates: 1. Press the Menu button. The 2. Press the Other button to menu screen title will appear in advance the menu screen to the ®... -
Page 13: Keypress Beep Confirmation Menu
Step 2: Main Menu and Thermostat Settings (continued) 3. Press the Next button to 4. Use the button to advance to the NIGHTLIGHT select from: screen. OFF (default) Always off. ON Always on. 5. Press Done. F. Keypress Beep Confirmation Menu This menu allows you to enable or disable an audio beep confirmation of every key press. -
Page 14: Time-Of-Day (Tod) Recovery
Step 2: Main Menu and Thermostat Settings (continued) G. Time-of-Day (TOD) Recovery This feature turns your system on before the TOD programming time to attempt to reach the set point at the start of the TOD period. 1. Press the Menu button. The 2. -
Page 15: Step 3: How To Set A Temperature "Hold
Step 3: How to Set a Temperature “Hold” You can override the thermostat’s programmed temperature setpoint at anytime by choosing one of three types of hold operations, explained below. The type you choose determines when the hold will end and the thermostat returns to its programmed schedule. -
Page 16: Permanent Hold
Step 3: How to Set a Temperature “Hold” (continued) 3. The current time display in the center of the screen will begin flashing. Press the button to set the time you want the temperature hold to end. You may adjust the time in 15-minute increments and set a timed temporary hold for up to 24 hours. -
Page 17: Step 4: Using The Keypad Lock
Step 4: Using the Keypad Lock The CenHub Peak Perks thermostat enables you to limit user access through its keypad lockout feature. This security prevents unwanted changes to the thermostat settings and programming. You may select your level of security from two types of lockouts: A. -
Page 18: Full (Full) Lockout
Step 4: Using the Keypad Lock (continued) B. Full (FULL) Lockout Prevents any type of user activity through the keypad except for turning on the backlight (if it was previously enabled). The user cannot change program settings, mode of operation, fan mode of operation or set/end a hold. To set a full lockout: 1. -
Page 19: Unlocking The Keypad
Step 4: Using the Keypad Lock (continued) C. Unlocking the Keypad 1. At the main operating screen, 2. The display will change to the press and hold the ENTER LOCK CODE screen with buttons simultaneously for “5555” flashing. Enter your 4-digit 3 seconds. -
Page 20: Step 5: Conservation Events
Step 5: Conservation Events A CenHub Peak Perks conservation event may occur for up to 4 hours during summer weekday afternoons when electricity use is at its highest. During these times, your cooling system’s compressor cycles during part of each hour relative to the hour prior to the event. - Page 21 Step 5: Conservation Events (continued) IMPORTANT: During a conservation event, you may access the CenHub Peak Perks Portal to follow the status of the event and monitor your home’s temperature. However, you are not able to manually or remotely change the temperature or make any changes to your programming schedule until the conservation event has ended.
-
Page 22: Troubleshooting
Troubleshooting Power Loss The CenHub Peak Perks thermostat is designed to withstand a power loss without the need of a battery backup. The thermostat responds to a power loss as follows: • All Thermostat Settings and Schedule Programming are stored to permanent memory and retained throughout the power loss. •... - Page 23 Troubleshooting (continued) No Heat Possible Cause Corrective Action Pilot light not lit. If it will not stay lit, call for service from your HVAC contractor. System switch not set to HEAT. Press the thermostat’s SYSTEM button one or more times to select HEAT and press to raise the temperature setpoint above room temperature.
- Page 24 Troubleshooting (continued) No Cool Possible Cause Corrective Action System switch not set to COOL. Press SYSTEM button to select COOL and press to lower the temperature setpoint below room temperature. Outdoor unit disconnect or breaker tripped. Verify the outdoor unit disconnect or breaker has not been tripped.
- Page 25 Notes __________________________________________________________________________________________ __________________________________________________________________________________________ __________________________________________________________________________________________ __________________________________________________________________________________________ __________________________________________________________________________________________ __________________________________________________________________________________________ __________________________________________________________________________________________ __________________________________________________________________________________________ __________________________________________________________________________________________ __________________________________________________________________________________________ __________________________________________________________________________________________ __________________________________________________________________________________________ __________________________________________________________________________________________ __________________________________________________________________________________________ __________________________________________________________________________________________ __________________________________________________________________________________________ __________________________________________________________________________________________ __________________________________________________________________________________________ __________________________________________________________________________________________ __________________________________________________________________________________________ __________________________________________________________________________________________ __________________________________________________________________________________________...
- Page 26 Notes __________________________________________________________________________________________ __________________________________________________________________________________________ __________________________________________________________________________________________ __________________________________________________________________________________________ __________________________________________________________________________________________ __________________________________________________________________________________________ __________________________________________________________________________________________ __________________________________________________________________________________________ __________________________________________________________________________________________ __________________________________________________________________________________________ __________________________________________________________________________________________ __________________________________________________________________________________________ __________________________________________________________________________________________ __________________________________________________________________________________________ __________________________________________________________________________________________ __________________________________________________________________________________________ __________________________________________________________________________________________ __________________________________________________________________________________________ __________________________________________________________________________________________ __________________________________________________________________________________________ __________________________________________________________________________________________ __________________________________________________________________________________________...
- Page 27 Notes __________________________________________________________________________________________ __________________________________________________________________________________________ __________________________________________________________________________________________ __________________________________________________________________________________________ __________________________________________________________________________________________ __________________________________________________________________________________________ __________________________________________________________________________________________ __________________________________________________________________________________________ __________________________________________________________________________________________ __________________________________________________________________________________________ __________________________________________________________________________________________ __________________________________________________________________________________________ __________________________________________________________________________________________ __________________________________________________________________________________________ __________________________________________________________________________________________ __________________________________________________________________________________________ __________________________________________________________________________________________ __________________________________________________________________________________________ __________________________________________________________________________________________ __________________________________________________________________________________________ __________________________________________________________________________________________ __________________________________________________________________________________________...
- Page 28 Notes __________________________________________________________________________________________ __________________________________________________________________________________________ __________________________________________________________________________________________ __________________________________________________________________________________________ __________________________________________________________________________________________ __________________________________________________________________________________________ __________________________________________________________________________________________ __________________________________________________________________________________________ __________________________________________________________________________________________ __________________________________________________________________________________________ __________________________________________________________________________________________ __________________________________________________________________________________________ __________________________________________________________________________________________ __________________________________________________________________________________________ __________________________________________________________________________________________ __________________________________________________________________________________________ 1-844-258-7761 • CenHubPeakPerks.com CHUM1605...
Need help?
Do you have a question about the CenHub IT801 and is the answer not in the manual?
Questions and answers