Advertisement
GETTING STARTED
Congratulations on purchasing your LEGO Alarm Clock! The LEGO Alarm Clock gives you a fun way to wake up in the morning. To get started, you will need to use a Philips/ Cross head screwdriver (not included) to remove item from packaging.
POWER SUPPLY
Your new LEGO Alarm Clock operates on 3 AA batteries (not included).
- Do not mix old and new batteries.
- Do not mix alkaline, standard (carbon-zinc), or rechargeable (nickel-cadmium) batteries.
- Only use the batteries specified by the manufacturer.
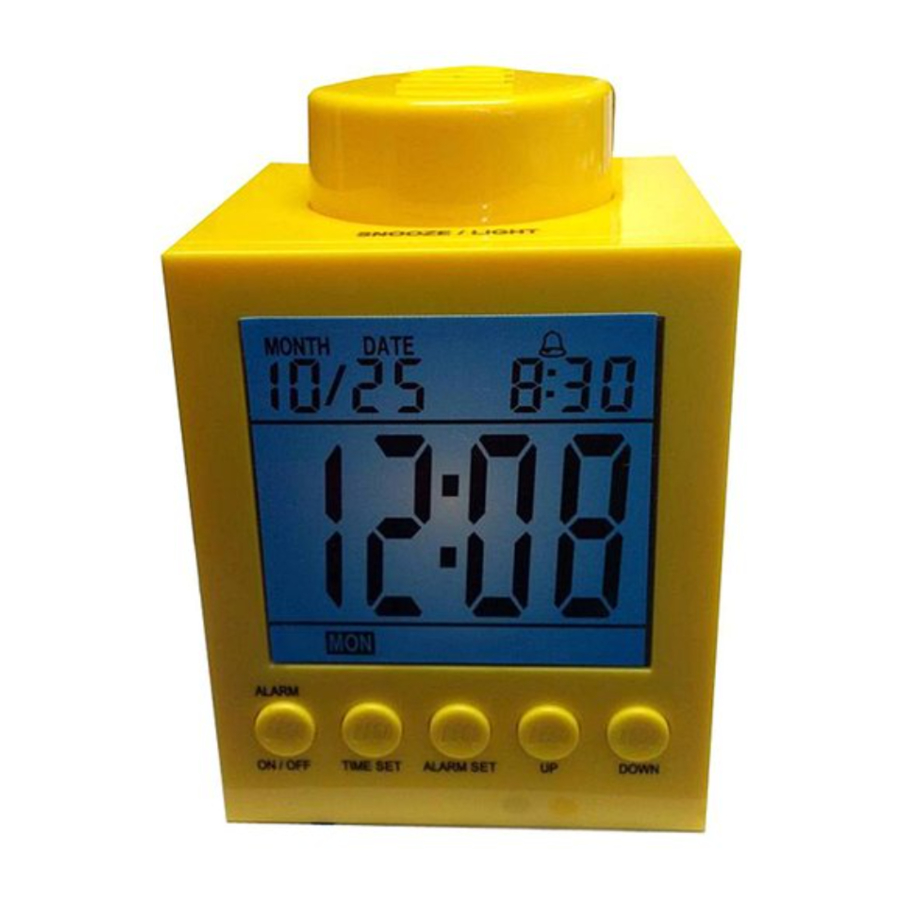
CLOCK RADIO COMPONENTS

- SNOOZE/LIGHT FUNCTION - Press down on knob to snooze your alarm or activate backlight of LCD Display screen.
- DATE FUNCTION - Displays the current Month and Date.
- TIME/YEAR - Set the TIME and the YEAR. Only the TIME will display. The YEAR feature displays only when setting the current MONTH, DATE, and YEAR.
- DAYS OF THE WEEK - Displays the current DAY of the WEEK.
- ALARM ON/OFF - Use this button to turn ALARM ON or OFF.
- TIME SET - Press and hold this button when setting the TIME and DATE functions.
- ALARM SET - Press and hold this button when setting the ALARM time and functions.
- UP - Use this button to scroll UP through numerical digits when setting the TIME or ALARM.
- DOWN - Use this button to scroll DOWN through numerical digits when setting the TIME or ALARM.
- ALARM - Displays the ALARM time when User has set ALARM. If ALARM time is not set it will automatically default to 12:00.
- BELL ICON- This icon indicates that the set alarm is on.
- Zz ICON - This icon indicates that the SNOOZE function has been activated.
This icon indicates that the set alarm is on.
USING YOUR ALARM CLOCK
To operate your LEGO Alarm Clock, place 3 AA batteries in the battery compartment of the device. The battery compartment is located in the back panel. Once the batteries are placed correctly in the battery compartment the icons, functions, and numerical digits will display on the LCD screen.
TO SET THE TIME:
To start, press and hold the "TIME SET" button located on the front panel of the device, in order to enter into the TIME setting mode. Continuously press the "TIME SET" button to complete the TIME setting feature cycle.
- Press and hold the TIME SET button, the display will show flashing "12H" or "24H" hour modes. Use the UP and DOWN buttons to set the hour mode (12 or 24 hour mode).
NOTE: The default setting is 12 hour mode. - Once the 12/24 hour mode to selected, press the TIME SET button again and the HOUR digits will begin to flash. While pressing down the TIME SET button, use the UP and DOWN buttons to set the correct time. When in 12 hour mode the PM indicates afternoon hours.
- After the correct hour is set press the TIME SET button again to set the MINUTE. Like the hour digits, the minute digits will begin to flash. Use the UP and DOWN button to set the correct MINUTE. To fast forward or backward when setting the time, press the UP or DOWN button for one second.
TO SET THE DATE:
- Before setting the DATE, the three steps to set the TIME must be completed. In order to set the correct DATE, press the TIME SET button again and the YEAR will begin to flash in the same location as the time on the LCD screen. Use the UP and DOWN button to set.
NOTE: The default setting is 2008 and is limited to 2099. - Press the TIME SET and the UP and DOWN buttons to set the correct MONTH in the upper left hand corner of the Alarm Clock.
- Continue on by setting the DATE by pressing down the TIME SET and UP and DOWN buttons. Once the YEAR, MONTH, and DATE are set the DAY OF THE WEEK will automatially set and display on the LCD screen.
When all the above TIME and DATE settings are completed, press the TIME SET button to return to normal TIME display. Leaving the unit for 30 seconds will automatically return to the correct TIME and DATE display.
TO SET THE ALARM:
- Press and hold the ALARM SET button. The ALARM HOUR flash, use the UP and DOWN buttons to set the correct ALARM HOUR.
- Continue pressing the ALARM SET button again for the ALARM MINUTE to flash. Use the UP and DOWN buttons to set the correct ALARM MINUTE.
- Press the ALARM SET button one more like to complete the setting and return to the normal ALARM TIME display.
NOTE: Alarm time will default to 12:00 (00:00) if not set. The alarm time corresponds with the same 12/24 hour mode as the mode set for the time. PM will appear on the display screen if you are using the 12 hour mode.
TO TURN ALARM ON/OFF:
- Press the ALARM ON/OFF button to turn the ALARM ON. The bell icon
![]() will appear above the ALARM TIME indicating that the ALARM is ON. Press the ALARM ON/ OFF button once more to turn the ALARM OFF. The bell icon
will appear above the ALARM TIME indicating that the ALARM is ON. Press the ALARM ON/ OFF button once more to turn the ALARM OFF. The bell icon ![]() will disappear.
will disappear.
 will appear above the ALARM TIME indicating that the ALARM is ON. Press the ALARM ON/ OFF button once more to turn the ALARM OFF. The bell icon
 WHAT TO DO WHEN ALARM GOES OFF:
NOTE: The alarm clock has a built in power saving mode, which will automatically turn off the alarm if the User does not press the SNOOZE or ALARM OFF button. When the set alarm goes off, the User may do one of the following...
- When the alarm goes off and the User takes no action to turn the alarm off, the alarm will automatically go off after 1 minute, but continue to stay set so that the alarm goes off at the same time the next day. The bell icon
![]() will continue to display indicating that the alarm is still set.
will continue to display indicating that the alarm is still set. - When the alarm goes off you can press down on the SNOOZE button located on top of the device. When the SNOOZE button is pressed the alarm will snooze for 5 minutes before going off again. When SNOOZE is activated, the Zz icon will display.
- You can also turn the alarm off by pressing any button on the LEGO Alarm Clock, including the ALARM ON/OFF button. This will stop the current alarm and keep the same set alarm set for the next day. The bell icon
![]() will continue to display also.
will continue to display also.
TO ACTIVATE THE BACKLIGHT:
- Press the SNOOZE/LIGHT button on top of the LEGO Alarm Clock to turn the backlight of the display screen. The light will turn on for 5 seconds and then automatically turn off until pressed again.
NEED ADDITIONAL HELP?
For additional product support, visit www.digiblue.com and select Customer Service. If you are still having problems with the product, contact Customer Support at 888-800-0502.
© 2010 The LEGO Group.
LEGO, the LEGO logo, and the Brick and Knob configurations are trademarks of the LEGO Group. Produced by Digital Blue under license from the LEGO Group.
TM and © 2010 Digital Blue, Inc. All rights reserved.
Distributed in the U.S. by Digital Blue, Inc. 1517 Johnson Ferry Road, Marietta, GA 30062
Distributed in the U.K. by Digital Blue, Inc.
Richmond Hill Farm Chiselhampton Oxford OX44 7XF

Documents / Resources
References

Download manual
Here you can download full pdf version of manual, it may contain additional safety instructions, warranty information, FCC rules, etc.
Advertisement
Need help?
Do you have a question about the ALARM CLOCK and is the answer not in the manual?
Questions and answers