Table of Contents
Advertisement
Quick Links
Advertisement
Table of Contents

Summary of Contents for R3Di FR150
- Page 1 Bright Flip User Manual R3Di FR150 V3.6...
-
Page 2: Table Of Contents
Table of Contents Before Using Your Phone ................. 6 Descriptions in the User Guide ................. 6 Screenshots and Key Labels ................6 Other Notes ....................... 6 Set Up Your Phone .................... 6 Phone Layout ..................7 Removable Battery ................8 Insert the Battery ................. - Page 3 Optional Calling Services ..............28 Call Settings Menu ..................28 Call Waiting ..................29 Conference Calling ................29 Call Forwarding ................... 30 TTY Mode ......................30 Contacts ......................31 Add a Contact ..................31 View Contacts ..................33 Contacts Screen Layout ..............33 Edit a Contact ..................
- Page 4 Browser Options ................46 Camera and Video ..................47 Camera Overview ................47 Capturing Pictures/Videos ..............47 Take a Picture ..................47 Record Videos ..................48 View Pictures and Videos Using Gallery ............48 Share Pictures and Videos ..............49 Switch between Camera and Video Mode .........
- Page 5 Notices Settings ................... 64 Date & Time ..................64 Language Settings ................65 Input Methods Settings ..............65 Privacy & Security Settings ................66 App Permissions Settings ..............66 Do Not Track Settings ................. 66 Browsing Privacy Settings ..............67 Storage Settings ....................
-
Page 6: Before Using Your Phone
The Spanish version of this User Manual is available and can be found on our website, www.R3Di.com. La versión en español de este Manual del usuario está disponible y se puede encontrar en nuestro sitio web, www.R3Di.com Before Using Your Phone Read the Quick Start Guide that was packaged with your phone thoroughly for proper usage. -
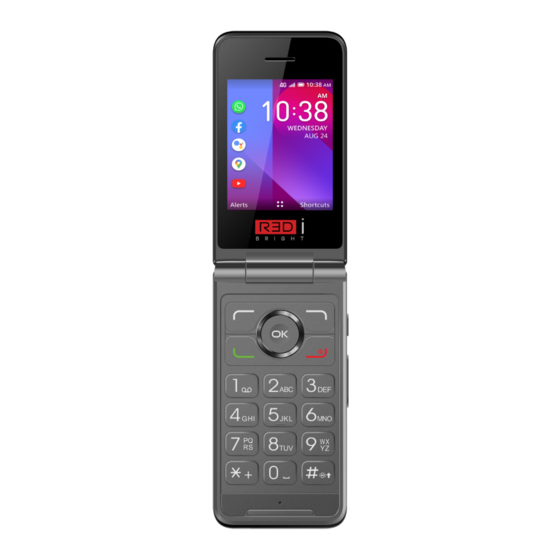
Page 7: Phone Layout
Phone Layout The following illustration outlines your phone’s primary external features and keys. Part Description Camera Takes pictures and records videos. Receiver Let you hear the caller and automated prompts. Displays all the information needed to operate your phone, such as Main Screen the call status, the Contacts list, and the date and time. -
Page 8: Removable Battery
Removable Battery Battery Cautions Storage: Avoid storing or leaving battery with no charge remaining. Saved information and settings may become lost or changed, or battery may become unusable. Charge once every six months before storing or leaving unused for a long period. -
Page 9: Remove The Battery
3. Attach the battery cover. Make sure all the tabs are secure and there are no gaps around the cover. Remove the Battery Follow these instructions to remove your phone’s battery. Always power the phone off before removing the battery. Remove the battery cover by gently lifting in the direction shown below. -
Page 10: Charge The Battery
Charge the Battery Follow these instructions to charge your phone’s battery using the included AC adapter. Charge Using the AC Adapter: Plug the charger into the charging port of your phone. 2. Plug the AC adapter into an electrical outlet. 3. -
Page 11: Sd Card
Remove the battery cover and battery. (See Remove the Battery.) Gently insert the SIM card with the gold IC chip facing downward. (See the Quick Start Guide for additional instructions). Insert the battery and replace the battery cover. (See Insert the Battery.) Make sure all the tabs are secure and there are no gaps around the cover. -
Page 12: Remove An Sd Card
Insert the battery and replace the battery cover. (See Insert the Battery.) 4 Make sure all the tabs are secure and there are no gaps around the cover. Remove an SD Card Follow these instructions to remove an SD card. Note: Always power off before inserting or removing an SD card. -
Page 13: Turn Your Phone On And Off
Insert the battery. Align the battery with the battery outline in the phone. 4 Attach the battery cover. Make sure all components are secure and there are no gaps around the cover. Turn Your Phone On and Off The instructions below explain how to turn your phone on and off. Turn Your Phone On Press and hold the End/power key Your phone will power on. -
Page 14: Complete The Setup Screens
Note: Your screen remains blank while your phone is off (unless the battery is charging). Complete the Setup Screens The setup screens help you set up certain features and preferences on your phone. Once your phone has been turned on, you will see a Welcome message. You can then complete the setup process. -
Page 15: Basic Operations
Your phone is now set up for use. If you skipped any part of the setup, you can access additional options from the Apps screen or through Settings. Basic Operations The section outlines the basic features and operations of your phone. Home Screen and Applications (Apps) List Most of your phone’s operations originate from the home screen or the apps list. -
Page 16: Apps List
Use the Navigation key to select an application and then press to launch the corresponding application. The application opens. Apps List The following table outlines some of the primary apps that might be preinstalled on your phone. Function/Service Perform basic mathematical calculations. Calculator Create and manage events, meetings, and appointments, organize your time, and reminds you of important events. -
Page 17: Phone Number
Your Phone Number Follow the instructions below to display your phone’s wireless phone number. From the apps list, select Settings >Device>Device Information. 2. Select Phone Number. 3. You will see the number listed under Phone Number. Airplane Mode Turning on Airplane mode would disable all functions that emit or receive cellular signals. -
Page 18: Text Input
To turn off airplane mode: From the apps list, select Settings > Network & Connectivity. 2. Select Airplane mode. 3. Select Off to disable airplane mode. Your phone’s cellular wireless connection feature is now restored. Text Input You can enter text using your phone’s T9 keyboard. There are different ways to enter text to create contacts, write emails or send messages. -
Page 19: Software Update Your Phone
Turn the Screen Lock On or Off From the apps list, select Settings >Privacy & Security>Screen Lock. Select On to enable screen lock You will be prompted to enter the passcode. See Screen Lock Settings. Note: You will need to wait for 60 seconds to retry after 5 continuous failed attempts. Software Update Your Phone From time to time, updates may become available for your phone. -
Page 20: Home Screen
Note: During the Software Update process, the phone cannot be used until the software update is complete. It may take time to update your phone’s software. Confirm Your Current Phone Software From the apps list, select Settings >Device>Device Information. 2. Locate the Software version read-only field. Home Screen The following describes how to use your phone’s home screen and understand the status bar. - Page 21 Tip: Press the End/power key to return to the main home screen. Notification Icons Connected to 4G mobile network Vibrate mode Battery indicator, battery is full H/Ev Connected to 3G mobile network Battery is charging Connected to GPRS mobile network Roaming Airplane mode SIM Mobile network signal...
-
Page 22: Change The Home Screen Wallpaper
Change the Home Screen Wallpaper Select and assign your phone’s background wallpaper. From the apps list, select Settings >Personalization>Display>Wallpaper. 2. Select Wallpaper and use the Navigation key to select from Gallery, Wallpaper, or Camera. 3. Select a wallpaper and then press the Right soft key to set the wallpaper. -
Page 23: International Call
2. Select the key or select to call the number. The phone dials the number. The call begins when the other party answers. 3. To end the call, press the End/power key . The call ends. 4. From the apps list, select Call Log to View your call log. -
Page 24: Enhanced 9-1-1 (E 9-1-1) Information
B. Dial 9-1-1 on the keypad, press “ ” “OK”? or select to call. C. As long as you are in an area covered by wireless service, the emergency call will be placed. 2. To call the 9-1-1 emergency number normally or when your account is restricted: A. - Page 25 When you receive a phone call from a contact, the sub screen appears and displays the caller’s name. When you receive a phone call from someone who is not stored in Contacts, the phone number may appear on the Incoming call screen. Note: If your phone is turned off, all calls automatically go to voicemail.
-
Page 26: Place A Call From Contacts
• Mute: Mute the microphone during an active call. o Press the Center soft key to mute the microphone. o Press the Center soft key again to open the microphone. • Options: Press the Right soft key to display the Options details as below. •... -
Page 27: Voicemail
2. Press the Right soft key to display the Options details. 3. Press the Center soft key or the Call key to place a call. The phone dials the number. The call begins when the other party answers. 4. To end the call, press the End/power key . -
Page 28: Optional Calling Services
All settings are finished. Return to home screen and hold to start the voicemail. Important: Voicemail Passcode – It is strongly recommended that you create a passcode when setting up your voicemail to protect against unauthorized access. Without a passcode, anyone who has access to your phone is able to access your voicemail messages. -
Page 29: Call Waiting
o Fixed dialing numbers o DTMF tones 3. Select a menu item to display its options. 4. Select your options and follow the prompts to set them. 5. Your call settings options are set. Call Waiting When you’re on a call, your phone’s screen informs you that another call is coming in and displays the caller’s phone number (if it is available). -
Page 30: Call Forwarding
Call Forwarding Call Forwarding lets you forward all your incoming calls to another phone number – even when your phone is turned off. You can continue to make calls from your phone when you have activated Call Forwarding. Note: You may be charged at a higher rate for the calls you have forwarded. Check with your service carrier. -
Page 31: Contacts
Note: When enabled, TTY mode may impair the audio quality of non-TTY devices connected to the headset jack. Warning: 9-1-1 Emergency Calling It is recommended that TTY users make emergency calls by other means, including Telecommunications Relay Services (TRS), analog cellular, and landline communications. - Page 32 You will see the Contacts list. 2. Press the Left soft key to add a new contact. Choose your storage location (Phone or SIM memory). The New Contact screen appears. 3. Use the keyboard to enter as much information as you want. •...
-
Page 33: View Contacts
2. For a new contact, select Phone memory or SIM memory, then enter the name and any additional information. Choose Save. The contact is added. View Contacts View a contact’s details by displaying a contact entry. You will see the Contacts list Select a contact to view its details. -
Page 34: Edit A Contact
Edit a Contact Once you’ve added a contact, you can add or edit any of the information in the entry, assign a caller ID picture, customize with a unique ringtone, and more. From the apps list, select Contacts . You will see the Contacts list. 2. -
Page 35: Share A Contact
Share a Contact You can quickly share contacts using Bluetooth, Gmail, text messaging, or the WhatsApp app. From the apps list, select Contacts . You will see the Contacts list. 2. Select a contact to display it, and then press the Right soft key and select Share. -
Page 36: Back Up Contacts
3. Select Import Contacts or Export Contacts. 4. Follow the onscreen instructions to complete the import. 5. The contacts are imported and stored in the selected account. Back Up Contacts If you are saving contacts to an account that does not automatically back them up via the Cloud, you can manually back them up to an optional installed SD card for re- import if needed. -
Page 37: Send A Text Message
messages, or MMS, can contain text, pictures, music, audio, or video files, and contact cards. See your service plan for applicable charges for messaging. Send a Text Message Quickly compose and send text messages on your phone. From the apps list, select Messages 2. -
Page 38: Save And Resume A Draft Message
6. In the Attach window, select from the following file attachments: • Gallery. Select a photo from Gallery. • Video. Select a video and attach it. • Camera. Select Camera to take a photo or a video. • Music. Select a track from your phone or memory card. •... -
Page 39: Read A Text Message
Read a Text Message On the Messages screen, press the text message or conversation to open and read it. press End/power key return to the Messaging screen from a conversation. Note: To view the details of a particular message; in the conversation, press the Right soft key to open the options menu, and then choose View message report. -
Page 40: Text And Mms Options
Tip: You can also delete a conversation while you're viewing it. While viewing a conversation, press the Right soft key and then select Delete to confirm. Text and MMS Options The messages settings menu lets you control options for your text and MMS messages including message limits, size settings, and notifications. - Page 41 3. Set the SOS contacts, you can set up to 5 contacts as SOS contacts. a. From the apps list, select “Contacts”. b. Go to the contact you’d like to add so that their name is highlighted and select “Options” from the Contact List display page. c.
-
Page 42: E-Mail
How to Use the SOS Button: Open the flip phone, long press the SOS button on the back of phone, continue to hold it down for 3 seconds while the phone is vibrating. 2. A 911 call is initiated. Note that: The phone must be opened, and the SOS key must be long pressed while vibrating to initiate a 911 call. -
Page 43: Add Another Email Account
Add Another Email Account If you have multiple email accounts that you wish to view on your phone, you can add several types of personal email accounts, such as POP3 and IMAP accounts on your phone. From the apps list, select E-Mail 2. -
Page 44: Open Email Messages
Email Composition Options • Add Cc/Bcc: In the mail subject or composition box, press the Right soft to add recipients. • Add Attachment: In the mail composition box, press the Right soft key > Add Attachment. Locate and then choose the picture or video you want to attach. -
Page 45: View Your Email Inbox
3. Select the account(s) to delete, and then press the Left soft key confirm. 4. The account is deleted from your phone. View Your Email Inbox From the apps list, select E-Mail . The email inbox opens. 2. Press the Right soft key >View Folders>Inbox to see all your email in boxes at once. -
Page 46: Browser
Browser Your phone’s Web browser gives you full access to both mobile and traditional websites on the go, using 2G, 3G, 4G, or Wi-Fi data connections. SSL/TLS SSL (Secure Sockets Layer) and TLS (Transport Layer Security) are protocols for encrypting sent/received data. While in a screen connected by SSL/TLS, data is encrypted to safely send/receive private information, credit card numbers, corporate secrets, etc., and provide protection against online threats (eavesdropping, falsification, impersonation, etc.). -
Page 47: Camera And Video
Camera and Video You can use the camera or video camera to take and share pictures and videos. Your phone comes with a 2 mega pixel camera that lets you capture pictures and videos. Camera Overview The camera's viewfinder screen lets you view your subject and access camera controls and options. -
Page 48: Record Videos
2. Press to take the picture. The shutter clicks and the picture is captured and saved to your phone or SD card. Record Videos You can record videos with your phone’s video camera From the apps list, select Camera . The camera viewfinder appears. 2. -
Page 49: Share Pictures And Videos
3. When done editing, press the Right soft key to save the changes to the picture. The modified picture is saved in the album as a copy. The original picture remains unedited. Share Pictures and Videos The Gallery application lets you send pictures using email, Bluetooth, or multimedia messages. -
Page 50: Set Camera Functions
Set Camera Functions You can configure your camera’s settings to fit any situation and event. From the apps list, select Camera . The camera view finder appears. 2. Press the Right soft key to open options menu. The camera settings menu opens. -
Page 51: Calendar Operations
Calendar Operations • View Today’s Calendar: From the Calendar, press the Right soft key > Today. • Change Calendar View: From the Calendar, press the Right soft key choose Weekly View or Day View to change the current view. • View Particular Day/Month/Year: From the Calendar, press the Right soft >... -
Page 52: Sync Calendars
The event details appear. In event details, press the Right soft key to edit the event. In event details, press the Left soft key to delete the event. Sync Calendars You can select which calendars you’d like to sync on your phone, along with what types of information you want to sync. -
Page 53: Clock
Clock Your phone has a clock app that lets you set alarms, use a stopwatch, and set a timer. Check the Time You can check the clock any time on your phone. The current time displays in the front and the flip home screen. Set Alarms Set multiple alarms using your phone’s Clock app. -
Page 54: Additional Clock Features
Additional Clock Features Your phone’s clock app provides additional useful features including stopwatch and timer functions. These features are available from the clock app display. Timer The Timer lets you time events down to the hundredth of a second. From the clock app, press the Navigation key to enter Timer screen. -
Page 55: Play Music
Play Music Use the Music app to listen to all your music on your phone. Compatible music file formats include: mp3, wma, wav, mod, etc. From the apps list, select Music . The Music app opens. 2. Use the Navigation key to select a library category such as Artist or Albums. 3. - Page 56 Messaging Set messaging ringer, messaging vibrate, etc. Settings Internet Sharing Enable Wi-Fi hotspot options. Wireless Set Emergency alert options. Emergency Alerts Cell broadcast Enable cell broadcast message options. message Sound Set ringtone, operation tones, etc. Display Set wallpaper, brightness, etc. Set search engine and enable search Search suggestions.
-
Page 57: Network & Connectivity
Network & Connectivity The following addresses your phone’s connectivity options, including Wi-Fi and Bluetooth. Airplane Mode The option allows to you enable and disable the Airplane Mode. Mobile Network & Data From the apps list, select Settings > Network & Connectivity > Mobile Network & Data. -
Page 58: Wi-Fi Settings
2. Select the On icon to turn Wi-Fi on . Wi-Fi is enabled. You will see the names and security settings of in-range Wi-Fi networks. To disable Wi-Fi, select the Off icon 3. Choose Available Networks, select a Wi-Fi network to connect, enter the password (if it’s not an open network), and then press the Right soft key to connect. -
Page 59: Disconnect Wi-Fi
Disconnect Wi-Fi You may wish to disconnect from a connected Wi-Fi network without turning Wi-Fi off. You can use the “Forget” option to do so. From the apps list, select Settings >Network & Connectivity>WLAN > Available Networks. 2. Choose the access point you are connected to and press the Left soft key to “Forget”... -
Page 60: Pair Bluetooth Devices
Function Description Audio output Connect to a Bluetooth speaker to listen to music wirelessly. Hands-free Call hands-free, using Bluetooth-capable hands-free devices and calls headsets. Data exchange Exchange data with Bluetooth devices. 3. Select the On icon to turn Bluetooth on . -
Page 61: Unpair Bluetooth Devices
2. Select the target device from the “Nearby Devices” list and follow the onscreen instructions to pair with the device. The target Bluetooth device is now paired to your phone and can be found in the “Paired Devices” list. 3. The Bluetooth paired icon is now displayed in the status bar. -
Page 62: Personalization Settings
• Media files and documents are usually opened directly in a compatible application. For example, if you open a music track, it starts playing in the Music application. • For a vCard contact file, if there are multiple vCard files on your storage card, you can choose to import one, several, or all those contacts to your contacts list. -
Page 63: Search Settings
Set screen timeout duration. Screen Note: Longer durations discharge the battery more Timeout quickly. From the apps list, select Settings >Personalization>Display. The display window opens. 2. Set your display options. Your display settings are saved and applied. Search Settings The search settings menu allows you to configure the search engine and enable the search suggestions. -
Page 64: Notices Settings
Notices Settings The notices settings menu allows you to configure the lock screen or after reboot. From the apps list, select Settings >Personalization>Notices. Notices Setting Description Show on lock Set to enable notices shown on lock screen. screen App Notices Set the notifications that display for individual apps. -
Page 65: Language Settings
2. Set available date and time options. Your date and time settings are applied and saved. Language Settings You can set the following options in the Language settings menu: Language Description Setting Language Set the language for your display and menus. Sample Format Check language sample format. -
Page 66: Privacy & Security Settings
Next Word Automatic prediction gives hints Suggestion Input languages Set the input language. From the apps list, select Settings > Personalization > Input Methods. The input settings menu opens. 2. Set options. The input settings are applied and saved. Privacy & Security Settings The following topics cover your phone’s privacy &... -
Page 67: Browsing Privacy Settings
Browsing Privacy Settings Set your browsing privacy settings. From the apps list, select Settings > Privacy & Security > Browsing Privacy. 2. Select options. The browsing privacy settings are applied and saved. Storage Settings The storage settings menu lets you manage internal storage on your phone and provides menu choices for an optional SD card (not included). -
Page 68: Media Storage Settings
Media Storage Settings View the total space/free space of media files in your phone memory and in an optional installed SD card. • From the apps list, select Settings > Storage > Media Storage. The media storage window opens. External Media:... -
Page 69: Device Menu
Device Menu Device Information The device information menu lets you access important phone information and view legal and safety information. The following device information items may be reviewed or set: Device Information Description Item Phone Number Check your phone number. Model Check the phone’s model. -
Page 70: Battery Settings
Battery Settings Monitor your phone’s battery usage through this settings menu. Check the battery consumption and percentage. From the apps list, select Settings >Device>Battery. The Battery window opens. 2. Select items to view details. Check your battery condition and access additional options. -
Page 71: Developer
The following accessibility options may be configured: Accessibility Option Description Invert Colors Set color inversion (may affect performance). Backlight Set to enable backlight. Large text Set to enlarge the screen text. Captions Set to enable captions settings. Readout Set to enable readout mode. Mono Audio Set to enable mono audio. -
Page 72: Troubleshooting
Troubleshooting + Frequently Asked Questions Check the following for some frequently asked questions: Problem 1: Phone freezes/operation is unstable Answer: Power cycle your phone by turning it off and on again. If you are unable to turn the phone off, remove and replace the Battery, and then turn the phone on again. - Page 73 Answer 1: Check your wireless signal to make sure you are in a strong signal area. Answer 2: Adjust you call volume if using the speaker phone. Answer 3: If you are using hearing aids, confirm they are compatible with this FR150 Flip Phone. Note that this device is M4/T3 rated.
-
Page 74: Specifications
Specifications The following table lists your phone’s specifications. ITEM SPECIFICATIONS Operating System KaiOS V2.5.4 Processor Qualcomm MSM8909 Quad cores 512MB RAM Memory 4GB ROM (Expandable via microSD card to 32GB) Bands Supported: • LTE Bands: 2,4,5,12,13,25,26,41,66,71 • Cellular Network 3G Bands: 2,4,5 •... -
Page 75: Regulatory Statements
Regulatory Statements FCC Equipment Authorization ID: 2AXKS-FR150. This device complies with Part 15 of the FCC Rules. Operation is subject to the following two conditions: This device may not cause harmful interference. This device must accept any interference received, including interference that may cause undesired operation. -
Page 76: Hearing Devices
Follow Safety Guidelines Always follow the applicable rules and regulations in the area in which you are using your device. Turn your device off in areas where its use is not allowed or when its use may cause interference or other problems. Electronic Devices Most modern electronic equipment is shielded from radio frequency (RF) signals. - Page 77 T-Ratings: Wireless devices rated T3 or T4 meet FCC requirements and are likely to be more usable with a hearing device’s telecoil (“T Switch” or “Telephone Switch”) than unrated wireless devices. T4 is the better or higher of the two ratings. (Note that not all hearing devices have telecoils in them.) For more information on FCC’s Hearing Aid Compatibility requirements for wireless phones, please visit, https://www.fcc.gov/hearing-aid-compatibility-wireless-...
-
Page 78: Conditions Of Use
Conditions of Use You should treat your device with care. The following suggestions can help extend the life of your device. Keep the mobile phone and its parts and components out of reach of small children. 2. Keep the phone dry. Rain, humidity, and all types of liquids which contain minerals will corrode electronic circuits. -
Page 79: Disclaimer
R3Di.com . Note that some actions such as, but not limited to, using sharp objects to open the device, may void the warranty. For any questions related to your FR150, you can contact ATEL Support at support@ R3Di.com or 1-866-4-GETR3D (866-443-8733).
Need help?
Do you have a question about the FR150 and is the answer not in the manual?
Questions and answers