Advertisement
Purpose
The RT-825 temperature controller is designed for direct control of heating devices powered by 230 V with maximum current no higher than 16 A.
Functioning
The controller can operate in one of four operating modes:
- operation with an internal temperature sensor
- operation with an external temperature sensor (included)
- operation with two temperature sensors
- operation in "timer" mode
When the room temperature falls below 2°C from the temperature set in the controller, the heating device switches on (  symbol on the display). When the room temperature is higher than the set temperature, the heating device will be disconnected. If the controller operates in "0" mode, with two external and internal temperature sensors (parameter F3) and the temperature in the room exceeds the value set in parameter F5, the heating device will be disconnected. On the other hand, if the temperature falls below the value set in parameter F6 (antifreeze mode), the heating device will be switched on, whether the controller is on or off.
"Timer mode operation"
The "timer" function operates in a cyclic mode starting from switching on the controller for the set time (parameter F1), and then the controller will be switched off for the set time (parameter F2) etc. on all days of the week. The activation time of the controller starts when the number of hours is accepted with the ON/OFF key. When the "timer" function is activated, the temperature control is maintained depending on the settings.
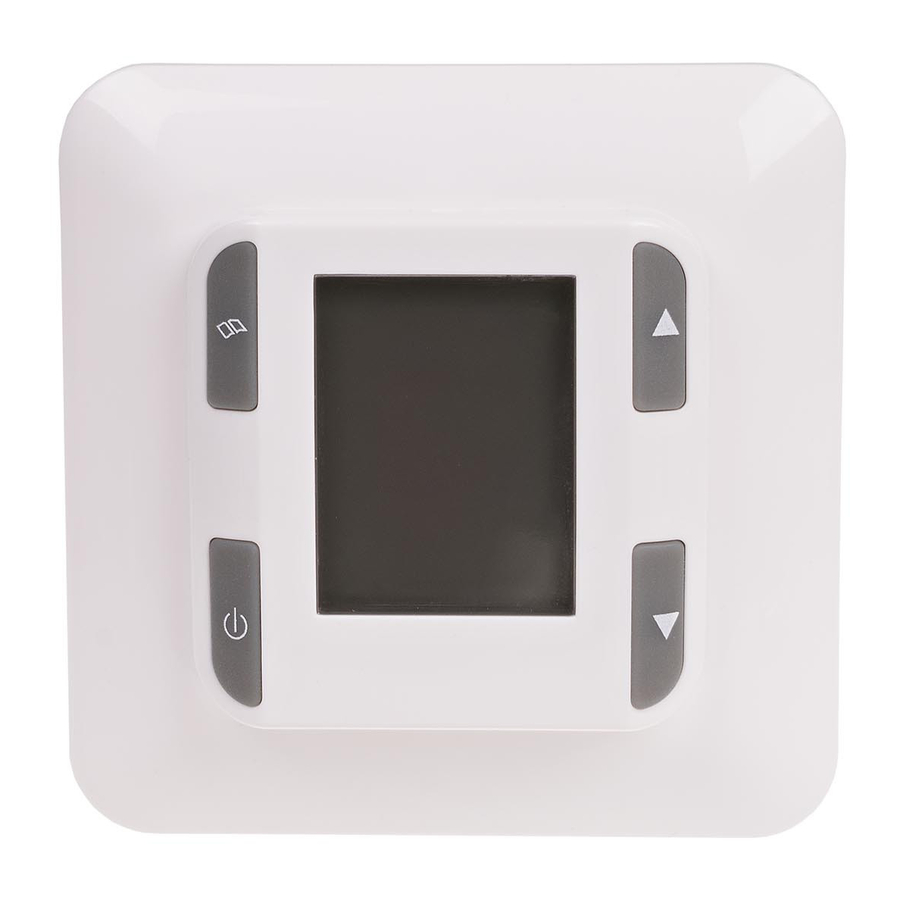
Description of the external panel
 ON/OFF button
Long press of the button switches the controller on or off (about 2 seconds).
UP/DOWN button
Short press of the button during normal operation decreases or increases the value of set temperature by one degree.
MENU button
Short press of the button switches the device to the programming mode.
Programming
Press the MENU button to enter the programming mode. In the programming mode you can set 8 parameters. Use the UP/DOWN buttons to choose one of the parameters. Press ON/OFF button to edit a parameter. Change the value of the parameter in the parameter edit mode using the UP/DOWN buttons. Confirm setting with the ON/OFF button.
Parameters
- F1 - set the time for automatic switching-on of the controller. Minimum setting - 1 h.
- F2 - set the time for automatic switching-off of the controller. Minimum setting - 1 h
- F3 - set the operating mode for the temperature sensors:
- operation with an internal temperature sensor
- operation with an external temperature sensor (included)
- operation with two temperature sensors (default setting)
- F4 - set the time: week, hour, minute
- F5 - set the upper threshold of the temperature protection in the range of 40°C to 70°C with increments of 1°C (factory setting: 50°C). It works only in the mode of operation with two temperature sensors.
- F6 - set the antifreeze protection in the range of 2°C to 10°C with increments of 1°C (factory setting: 3°C).
- F7 - set temperature correction in case there is a difference between temperature indication from the controller and actual temperature in room. The correction can be adjusted within ±5°C with increments of 0.1°C.
- F8 - set the weekly program of temperature regulation in a room according to the time of day and divided into working days, Saturday and Sunday.
Set the weekly program of controller operation (F8)
Every day in the controller program is divided into four parts marked with icons:
 morning
 forenoon (leaving the house)
 afternoon, evening (coming back)
 night
night
It is necessary to set the start time for each of these periods (the hour of the end of the given period is the starting time of the next). The start times for each time of the day should be set separately for business days, Saturdays and Sundays. Temperature value is programmed for each time of day.
The following weekly program of the controller operation is set:
| Time of day | Time of day start | Value of the set temperature | |
| MON-FRI | SAT, SUN | ||
 06:00 - 08:00 06:00 - 08:00 | 06:00 | 25 | 25 |
 08:00 - 16:00 08:00 - 16:00 | 08:00 | 10 | 10 |
 16:00 - 22:00 16:00 - 22:00 | 16:00 | 25 | 25 |
 22:00 - 06:00 22:00 - 06:00 | 22:00 | 15 | 15 |
Setting up a weekly operation program:
- Press the MENU button to enter the programming mode.
- Use the UP/DOWN buttons to select parameter F8 and confirm with the ON/OFF button.
- Use the UP/DOWN button to select the day of the week: MON- FRI, Saturday or Sunday (SAT, SUN).
Example: Select MON-FRI and confirm with the ON / OFF button. - Use the UP / DOWN buttons to select the time of day.
Example: Select in the morning, confirm with the ON/OFF button. - Use the UP/DOWN buttons to set the start time of the "morning" time of day.
Example: Select 06:00 (change with increments of 15 minutes), confirm with ON/OFF button.
![]()
The start time of the next period is the end of the previous one, so there is no option to set the ending time of the given period). - Use the UP/DOWN buttons to set the desired temperature for this time of day - morning. The temperature can be changed every 1°C in the range of 5÷55°C. Confirm with the ON/OFF button.
- Once the temperature value has been confirmed, the program automatically returns to step 4, allowing to set the parameters of the next time of day.
- After setting the start times and temperature values, the program will automatically switch to setting the time for Saturday, and then for Sunday. After entering the last parameter for Sunday and confirming it with the ON/OFF button, the program will return to the selection of parameters F1÷F8.
- To exit the programming mode press the MENU button or wait 5 seconds and then the controller automatically returns to normal operation.

Controller reset
Keep the UP button pressed for a controller to reset itself and disconnect heating device.
Press the ON/OFF button to return to operation.
Protection
To protect the controller from unauthorized access, press the UP/DOWN button for a longer time. Activation of the protection is signaled by a padlock symbol on the display. Unlocking is done in the same way.
Automatic/manual operation
Longer press of the DOWN button changes the controller mode of operation from automatic to manual and vice versa (day time icon goes off). Manual operation - room temperature control is based on the current setting. Use the UP/DOWN buttons to change the temperature. Automatic operation - the temperature is maintained on the basis of the pre-programmed cycles of the controller.
Temperature readout
If the controller is set to operate with two temperature sensors by short press of the ON/OFF button, the readout source changes from the internal sensor to the external.
Controller operation errors indication
Er1 - damage to internal temperature probe
Er2 - damage of external temperature probe
Er3 - damage to internal and external probe
Connection scheme

Take special care when installing the controller. Incorrect connection may result in electric shock and/or damage to the controller and the powered device.

1/4 - output for heater connection
2 - L power supply of the controller
3 - N power supply of the controller
5/6 - output for temperature probe connection
Mounting

Do not install a device that is damaged or incomplete.
Do not install the device in rooms with high humidity, such as bathrooms.

- Disconnect the power supply from the circuit to which the controller will be connected.
- Using a narrow, flat-blade driver, gently press the catch (marked with the arrow on the drawing) to lock the controller housing.
- Remove the cover and the frame of the controller, taking care not to damage the electronics of the controller.
- Connect according to the scheme.
- Place the bottom part of the controller in the flush-mounted box and fix it with the screws.
- Put the frame back on and press the cover.
Technical data
| power supply | 230 V AC |
| current load heating circuit | <16 A |
| temperature adjustment range | 5÷55°C |
| histeresis | 2°C |
| setting accuracy | 1°C |
| measurement accuracy | ±0,1°C |
| power consumption | 1 W |
| working temperature | 0÷65°C |
| terminal | 2.5mm² screw terminals |
| dimensions | |
| front | 86×86 mm; D= 22 mm |
| back | Ø 0; D= 6 27.5 mm |
| mounting | in Ø60 flush mounted |
| ingress protection | IP20 |
| external temperature sensor | NTC |
| sensor dimensions | Ø7 ; h=25 mm |
| sensor isolation | PC muff |
| wire | PC 2×0,34 mm²; l= 3 m |
F&F Filipowski sp. j.
Konstantynowska 79/81 95-200 Pabianice
phone/fax: (+48 42) 215 23 83 / 227 09 71 POLAND
http://www.fif.com.pl
e-mail: biuro@fif.com.pl

Documents / Resources
References
Download manual
Here you can download full pdf version of manual, it may contain additional safety instructions, warranty information, FCC rules, etc.
Advertisement

Need help?
Do you have a question about the RT-825 and is the answer not in the manual?
Questions and answers