Advertisement
OVERVIEW

BATTERY POWER
Your GPS 1.0 watch is equipped with a rechargeable battery. It is recommended that you fully charge your watch prior to the initial use using only the charging cable that accompanied your watch.
Note: although the battery charging cable charges via a USB connection, the charging cable does not transfer data between the watch and a computer. When the watch is fully charged and the GPS function is operating continuously, the watch has an 8 hour power reserve.
The current battery power icon is displayed on all screens. Battery power is also displayed when you enter RUN or CHRO mode as a percentage (within a range of 10 - 100%, in 10% increments).
The battery icon will blink when the battery is low and needs re-charging.
LIGHT ACTIVATION
To activate the light press the LIGHT button. The light will stay illuminated for 10 seconds.
If the Night option is set to On any button will activate the light from 6:00PM to 7:00AM daily based on the T1 time zone.
Note: see "Set Mode" for instructions on how to turn the Night option On and Off.
GPS ACTIVATION/DEACTIVATION
From any mode you can activate the GPS function by pressing the GPS button.
To start the Satellite search:
- Press the GPS button.
- The watch will immediately start searching for satellite signal. During the search, the satellite icon will blink, the bar graph will cycle and the screen will display "SEARCH GPS".
To stop the search:
- Press the GPS button while the watch is searching, "GPS" will blink.
- Press the + or – button, "Indoor" will blink.
- "Indoor" will blink for 5 seconds and the search will stop or press the ENTER button to immediately stop the search.
Once satellite signal is established:
- The satellite icon will stop blinking and the bar graph will stop on the representative satellite signal strength.
- The watch will auto-cycle through current battery power and remaining hours of memory and then auto-change to Run mode.
To turn the GPS off (in any mode at any time): Press and hold the GPS button for 5 seconds.
MODES
The GPS 1.0 watch has 6 modes. Modes appear in the following sequence: TIME, RUN, CHRO (chronograph), RUN DATA, ALARM, SET To change modes press the MODE button repeatedly.
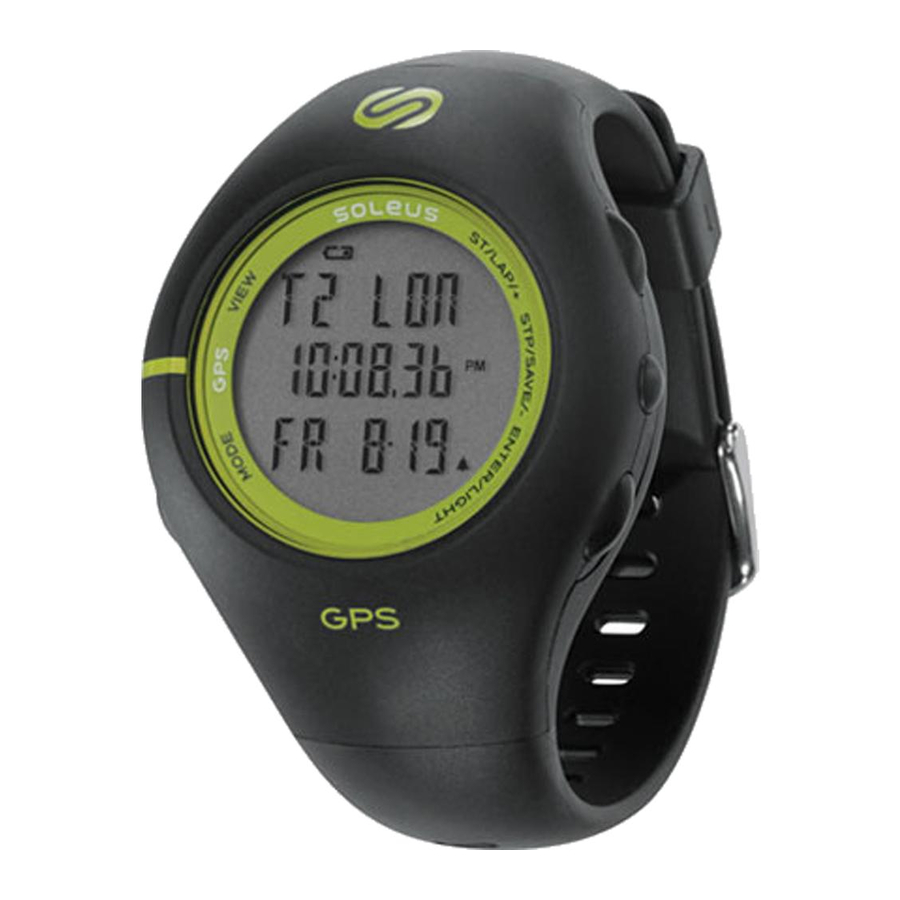
TIME MODE
In Time mode you can view time and calendar information for 2 time zones, in 12 or 24 hour format, which can be set manually or selected from 106 programmed world time codes which will automatically update with the current time when the GPS function is on.
Using Time mode:
- Press the MODE button until you reach TIME mode.
- Press the VIEW button to toggle between time zone 1 (T1) and time zone 2 (T2). Note: See "Set Mode" for time setting instructions.
RUN MODE
Run mode is used to view total time, lap splits, distance, speed, pace and calories burned during exercise in 4 different viewing options.
The Speed range is 0-999.9 mi/h or km/h. The Distance range is 0-6209.99 mi / 0-9999.99 km. The Calories range is 0-99999 kcal.
The timer and data memory is shared between Run Mode and Chronograph Mode. Note: see "Set Mode" for user setting instructions
Using Run mode with GPS Function ON:
- Press the MODE button until you reach RUN mode.
- At the GPS on/off screen, the watch will default to GPS On ("GPS" will be blinking).
- "GPS" will blink for 5 seconds and the watch will automatically start searching for satellites or press the ENTER button to immediately start the search.
- During the search, the satellite icon will blink, the bar graph will cycle and the screen will display "SEARCH GPS".
- Once a satellite link has been established, the satellite icon will stop blinking and the bar graph will stop on the representative satellite signal strength, the watch will auto-cycle through current battery power and remaining hours of memory, and then auto-change to one of the 4 Run view option screens.
- Viewing options appear in the following order: chronograph/distance/clock, chronograph/distance/pace, chronograph/distance/speed, chronograph/distance/calories
- Press the VIEW button to toggle between and select each view.
- Press ST (start) button to start the timer.
- Press the LAP button to take a lap split. The lap-split and total time will show for 10 seconds then current total run time will resume (this step is eliminated if the Auto Lap feature is being used).
- Press the STP (stop) button to stop the timer.
- Press the ST button to re-start the timer OR Press and hold the SAVE button to save the run.
Auto Lap
The Auto Lap feature will allow the watch to automatically take lap splits in increments of 0.5, 1, 2, 3, 4 or 5 miles or kilometers (it eliminates step 9 in the instruction list above). This function will only work if Run mode is being used with the GPS function ON. See Setting Mode for instruction on how to activate Auto Lap.
Using Run mode with GPS Function OFF:
- Press the MODE button until you reach RUN mode.
- At the GPS on/off screen, the watch will default to GPS On ("GPS" will be blinking).
- Press the + or – button ("Indoor" will be blinking).
- "Indoor" will blink for 5 seconds or press the ENTER button and the GPS will be turned Off.
- The watch will auto change to one of the 4 Run view option screens.
- Follow steps 6 through 11 above.
Note: When using Run mode with the GPS Off, Distance, Pace, Speed, Calories and Auto Lap will not calculate.
CHRONOGRAPH MODE
The chronograph is used to view total and lap split time as well as distance information of your workout. The chronograph can save splits for a maximum of 100 laps.
The timer and data memory is shared between Run Mode and Chronograph Mode.
Note: See "Set Mode" for user setting instructions
Using Chronograph mode with GPS Function ON:
- Press the MODE button until you reach CHRO mode.
- At the GPS on/off screen, the watch will default to GPS On ("GPS" will be blinking).
- "GPS" will blink for 5 seconds and the watch will automatically start searching for satellites or press the ENTER button to immediately start the search.
- During the search, the satellite icon will blink, the bar graph will cycle and the screen will display "SEARCH GPS".
- Once a satellite link has been established, the satellite icon will stop blinking and the bar graph will stop on the representative satellite signal strength, the watch will auto-cycle through current battery power and remaining hours of memory, and then auto-change to the chronograph screen.
- Press ST (start) button to start the chronograph.
- Press the LAP button to take a lap split. The lap-split and total time will show for 10 seconds then current total run time will resume (this step is eliminated if the Auto Lap feature is being used).
- Press the STP (stop) button to stop the chronograph.
- Press the ST button to re-start the chronograph OR Press and hold the SAVE button to save the run.
Auto Lap
See Auto Lap in Run Mode section
Using Chronograph mode with GPS Function OFF:
- Press the MODE button until you reach CHRO mode.
- At the GPS on/off screen, the watch will default to GPS On ("GPS" will be blinking).
- Press the + or – button ("Indoor" will be blinking).
- "Indoor" will blink for 5 seconds and will deactivate the GPS or press the ENTER button and the GPS will be immediately turned off.
- The watch will auto change to the chronograph screen.
- Follow steps 6 through 9 above.
Note: When using Chronograph mode with the GPS Off, Distance and Auto Lap will not calculate.
RUN DATA MODE
Run Data mode allows you to store and review data from your workouts. The maximum data storage capacity is 30 hours, 30 files and 100 laps.
Using Run Data mode
- Press the MODE button until you reach RUN DATA mode.
- The screen will show the data file number screen: data file number (D - 1 thru 30), date (month, day-T1 or T2), and GPS on (G) or GPS off (H) distinction.
- Press the + or - button to cycle through your saved runs (the watch will default to your last save file).
- Stop on the file you would like to review.
- Press the ENTER button once to review the saved data for the selected data file.
(from this position press the MODE button to back out of the selected data file) - For each data file the following information will be saved and can be reviewed in the following sequence: start time/end time, total time/total distance/average speed, average pace/total calories burned, average speed/average pace, lap split/total distance.
- Press the + or VIEW button to advance forward through the information.
- Press the – button to advance backward through the information.
Deleting an individual run data file:
- While you are in an individual data file:
- Press the ENTER button once or twice (depending on the light being on or off) to access the data file menu screen.
- When the menu screen has been accessed you have the option to view or delete the individual data file.
- Press the + or – button to toggle between "view" and "delete".
- While "VIEW" is blinking, press the ENTER button to return to the view screens.
- While "DELETE" is blinking, press the ENTER button to delete the current data file.
- After the file is deleted you will return to the data file number screen.
Deleting all stored run data files:
- While you are on the data file number screen:
- Press the + or – button to scroll through the saved data files until "DELETE ALL" appears on the screen.
- Press the ENTER or VIEW button to delete all the data files.
- When all data files have been deleted "----" will appear on the Data screen.
ALARM MODE
Alarm mode has 5 alarms. Each alarm will sound daily if the alarm is set to On. Pressing any button will disable the alarm when it is sounding or it will automatically stop after 20 seconds.
Using Alarm mode:
- Press the MODE button until you reach ALARM mode.
- Press the - button to cycle through each alarm. Stop on the alarm you would like to view.
- Press the + button to turn the alarm ON or OFF. When an alarm is turned ON the alarm icon "•))" will appear on the all screens.
Note: See "Set Mode" for alarm time setting instructions.
Turning the key tone on and off:
- In Alarm mode press the VIEW button to access the Key Tone screen.
- Press the + or – button to turn the button tone ON or OFF. When the button tone is turned ON the bell icon will appear on all screens.
SET MODE
Set mode is where all specific settings for each mode are adjusted.
Using Set mode:
- Press the MODE button until you reach Set Mode.
- In each setting menu press the + button to advance forward or the – button to advance backward through the menu's in the order identified below (Auto Lap, Alarm, Key Tone, Contrast, Night, User, Unit, Time).
- At each setting menu press the ENTER button to enter the setting category.
- Press the + button to advance the setting item forward or the – button to advance the setting item backward.
- Press the ENTER button to confirm the changes and advance to the next step.
- Press the Mode button to back out of any setting screen.
Set Auto Lap Menu
- Set the distance (OFF, 0.5, 1, 2, 3, 4, 5).
- Turn the lap alert ON or OFF.
Set Alarm Menu
- Choose the alarm (AL – 1, 2, 3, 4, 5).
- Set the alarm time (hour, minute).
- Set the alarm to time zone 1 (T1) or time zone 2 (T2).
- Turn the alarm ON or OFF.
- Turn the key tone ON or OFF.
Set Key Tone Menu
- Turn the key tone ON or OFF.
Set Contrast Menu
- Set display contrast (1 – 19).
Set Night Menu
- Turn Night option for light ON or OFF.
Set User Menu
- Set gender (male, female).
- Set age (7 – 99).
- Set weight (44-561 LBS / 20-255 KG).
- Set height (2'11"-7'10" ft'inch" / 91-241 cm).
Set Unit Menu
- Choose MI (mile - all units of measurement are displayed in standard format) or KM (kilometer - all units of measurement are displayed in metric format).
Set Time Menu
- Choose time zone 1 or time zone 2.
- Choose Auto or Manual time setting.
If Auto time setting is selected:
- Select world time code.
- Turn daylight savings on/off.
- Set 12/24-hour time format.
- Set date format (MM-DD or DD-MM).
Note: in Auto time setting, the time will automatically update when the GPS is turned on.
If Manual time setting is selected:
- Set the hour, minute, second.
- Set the year, month, day.
- Set 12/24-hour time format.
- Set date format (MM-DD or DD-MM).
WATCH RESET
Press and hold the VIEW, MODE, ST/LAP/+, ENTER/LIGHT buttons simultaneously for 2 seconds to reset all functions to default settings.

Documents / ResourcesDownload manual
Here you can download full pdf version of manual, it may contain additional safety instructions, warranty information, FCC rules, etc.
Advertisement


Need help?
Do you have a question about the GPS 1.0 and is the answer not in the manual?
Questions and answers