Advertisement
Box Contents

Note:
To complete installation, you will need two AA batteries and a small Phillips head screwdriver. We recommend pairing with the WiFi Hub shortly after inserting batteries into a valve.
Getting Started
Setting up your Rachio Smart Hose Timer is quick and easy. Just follow the instructions on the following pages and you'll be watering smarter in under 10 minutes.
Note:
This Smart Hose Timer works with a 2.4 GHz WiFi network only. A 2.4 GHz connection travels farther at lower speeds and is the optimal frequency for this product.
Existing Rachio User - Start Here
Already a Rachio customer? Simply open your Rachio app and add the Smart Hose Timer to your account.
- From your Home Screen, tap "Devices"

- Tap "Add Device"
- Follow the in-app instructions to set up your Smart Hose Timer

New Rachio User - Start Here
New to Rachio? Download the Rachio app and follow the in-app instructions to set up a new account.


Once your account is set up:
- From your Home Screen, tap "Devices"
- Tap "Add Device"
- Follow the in-app instructions to set up your Smart Hose Timer
WiFi Hub
To use all the smart features of the Smart Hose Timer, you need to use the WiFi Hub.

The Hub is:
- Installed indoors
- Less than 200 feet from the Smart Hose Timer / outdoor faucet


Pair WiFi Hub, Install Batteries
Follow the in-app instructions to power on your Wifi Hub and connect your Smart Hose Timer.
Make sure you install the batteries before connecting the timer to a faucet.
Do not mix Alkaline, Standard (Carbon-Zinc), or Rechargeable (Nickel Cadmium) batteries Batteries. Used up or dead batteries must be removed from the timer and disposed of properly. Do not dispose of batteries in fire. Batteries may explode or leak.

Connect Valve
Once paired, your Smart Hose Timer is ready to start watering! First, check to make sure there are no leaks in your hose and/or faucet.

Next, connect the valve to your outdoor faucet and hose, and you're ready to go. Your water must remain on for the timer to work properly.
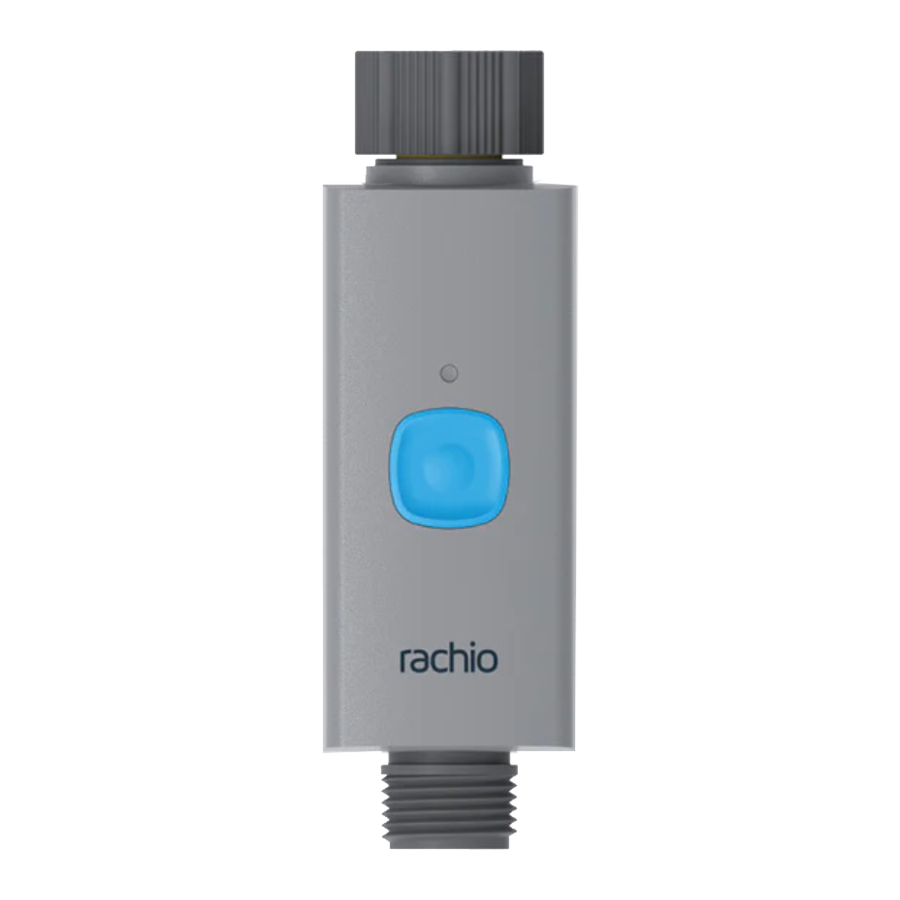
Manual Quick Run
Looking to do a manual quick run?
- Press the blue on/off button on the top of your Smart Hose Timer valve to activate manual watering.

- The valve will water for 10 minutes, or for the duration you set as the quick run default in the Rachio app.
- To stop watering sooner, press the button to end the watering session.

Need Help?

If you encounter any issues setting up your Rachio Smart Hose Timer, email our customer support team and we'll get you up and running:
support@rachio.com
Device Specifications
Smart Hose Timer Valve
- Range: 200 ft without interference.
- Pressure Operating Range: 10-100 PSI.
- Temperature Operating Range: 32°F-158°F (0-70°C).
- Not For Use With Appliances.
- 2 AA batteries required.
- Do Not Mix Alkaline, Standard (Carbon-Zinc), or Rechargeable (Nickel Cadmium) Batteries. Used up or dead batteries must be removed from the timer and disposed of properly. Do not dispose of batteries in fire. Batteries may explode or leak.
- For Outdoor Use With Cold Water Only.
WiFi Hub
- WiFi: 2.4GHz Only
- Range: 200 ft. to valve, without interference
- Temperature Operating Range: 32°F-104°F (0-40°C).
- Storage Temperature: -4°F to 140°F (-20°C to 60°C).
- Humidity Operating Range: 0-90%.
- Input: 100-240V - 50/60Hz 0.3A
- Output: 5V-1,000mA
- For Indoor Use Only

Documents / Resources
References
Download manual
Here you can download full pdf version of manual, it may contain additional safety instructions, warranty information, FCC rules, etc.
Advertisement
Need help?
Do you have a question about the Smart Hose and is the answer not in the manual?
Questions and answers