Table of Contents
Advertisement
Advertisement
Table of Contents

Summary of Contents for Rintuf NPE-12HR
- Page 1 Portable Air Conditioner Model No. NPE-12HR User Manual Customer Service: rintuf.de@afterservice.vip * Thank you very much for choosing our product! Please read this user manual carefully before installing and using this product. Please keep it properly for future reference.
-
Page 2: Table Of Contents
Contents Safety Warnings ................................1 1. Before Use ................................1 2. During Use ................................1 3. For Maintenance ..............................2 Product Features ................................2 Technical Specifications ..............................2 Product Overview ................................3 Control Panel and Remote Control Display ........................4 1. -
Page 3: Safety Warnings
The refrigerant used in this portable air conditioner is the environmental-friendly hydrocarbon R290, which is odorless, and compared to the alternative refrigerant. The R290 is an ozone-free refrigerant. Please read the instructions before assembly and use. The drawings provided in this user manual may not be the same as the physical objects. Please refer to the physical objects. -
Page 4: For Maintenance
All working procedure that affects personal safety shall only be carried by competent persons. If any repair is needed, contact the after-sales service via email rintuf.de@afterservice.vip and strictly follow the instructions of the after-sales service. Product Features This product is with compact design, more luxury and upscale. -
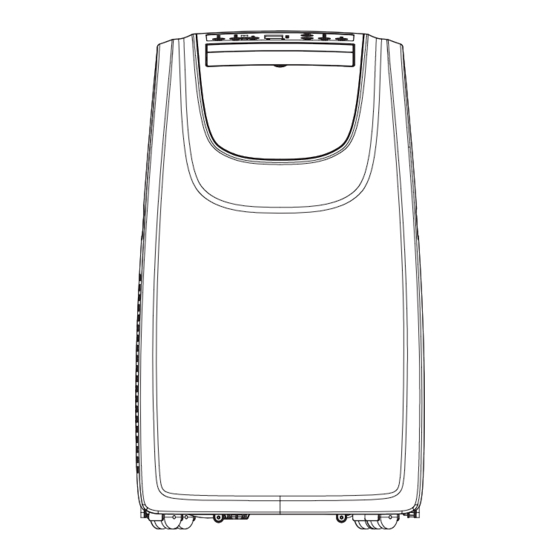
Page 5: Product Overview
Product Overview ① Control Panel ② Horizontal Louver ③ Caster Front Shell ④ Universal Wheel ⑤ Back Shell ⑥ Handle ⑦ Filter ⑧ Universal Socket ⑨ Wire Winding Pillar... -
Page 6: Control Panel And Remote Control Display
⑩ Drainage Port and Plug ⑪ Upper Filter Assembly ⑫ Lower Filter Assembly ⑬ Chassis ⑭ Remote Control ⑮ Hose Connector ⑯ Exhaust Hose ⑰ Hose Adapter ⑱ Window Kits ⑲ Window Kits Screw (Butterfly Nut) Control Panel and Remote Control Display 1. -
Page 7: Remote Control Operation
E. UP and DOWN Buttons: Adjust the temperature or hours in the time delay. To set the temperature: The temperature can be set between 62℉ 86℉ (17℃ and 30℃) when the air conditioner is in the COOL mode. Press the MODE button until the COOL mode is selected. ... -
Page 8: Battery Assembly Of The Remote Control
3. Battery Assembly of the Remote Control Notes: Press and glide the battery cover on the back of the remote control to remove the cover. Insert two new AAA batteries into the battery compartment. Please note the proper polarity. ... -
Page 9: Installation Of Window Seal-Plate
2. Installation of Window Seal-plate Depending on the size of the window opening, use the main panel and one or both of the extension panels. ① Open the window and place the main window panel into the window. Note: The window assembly is designed to accommodate either a vertical slide or horizontal slide window. Vertical Slide Window Horizontal Slide Window ②... -
Page 10: Installation Of The Product
⑤ Fasten the butterfly nut to fix the window slide set. 3. Installation of the Product ① Move the product together with its exhaust hose assembly in front of the window and keep the product at least 19.6 inches (50 cm) away from the walls or other objects. ②... -
Page 11: Drainage Descriptions
Drainage Descriptions This portable air conditioner has two drainage ports, higher one and lower one, which are designed for two drainage methods: manual drainage and continuous drainage. 1. Manual Drainage This product is designed with the high efficient self-evaporative system. It is suggested to use the manual drainage in the COOL mode. -
Page 12: Protection Functions
Notes: The drain hose must be installed before the product starts working. Put the drain hose in an inaccessible place, not higher than the drainage hole and keep the drain hose straight without any flexure. Keep the drainage cover and drainage port plug properly when the continuous drainage is adopted. -
Page 13: Cleaning And Storage
Cleaning and Storage Note: Be sure to turn off the product and unplug it before maintain or return it. 1. Cleaning the Surface Clean the product surface with a wet soft cloth and do not use chemical solvents, such as alcohol and gasoline, to avoid any damage to the product. -
Page 14: Troubleshooting
④ Remove the heat exhaust hose, and then clean and keep it properly. Notes: Hold the exhaust hose assembly with both hands when removal. Push the fasteners aside on the exhaust air outlet by using your thumbs, and then pull out the exhaust hose assembly. -
Page 15: Maintenance And Servicing
Where electrical components are being changed, they shall be fit for the purpose and to the correct specification. At all times the manufacturer’s maintenance and service guidelines shall be followed. If in doubt, please contact the after-sales service via email rintuf.de@afterservice.vip for assistance. The following checks shall be applied to installations using flammable refrigerants: ... - Page 16 ⑨ Checks to electrical devices Repair and maintenance to electrical components shall include initial safety checks and component inspection procedures. If a fault exists that could compromise safety, then no electrical supply shall be connected to the circuit until it is satisfactorily dealt with. If the fault cannot be corrected immediately but it is necessary to continue operation, an adequate temporary solution shall be used.
- Page 17 7. Removal and Evacuation When breaking into the refrigerant circuit to make repairs - or for any other purpose - conventional procedures shall be used. However, it is important that best practice is followed since flammability is a consideration. The following procedure shall be adhered to: ①...
-
Page 18: Disclaimer
11. Recovery When removing refrigerant from a system, either for servicing or decommissioning, it is recommended good practice that all refrigerants are removed safely. When transferring refrigerant into cylinders, ensure that only appropriate refrigerant recovery cylinders are employed. Ensure that the correct number of cylinders for holding the total system charge is available. All cylinders to be used are designated for the recovered refrigerant and labeled for that refrigerant (i.e. -
Page 19: Product Disposal
If the product needs warranty, please contact the customer after-sales service through the email address rintuf.de@afterservice.vip, and the after-sales staff will provide you with the return address after confirmation, then you can take or send the product to the return address along with the original sales receipt, as proof of purchase. -
Page 20: Contact Us
Amazon Message or the email address: rintuf.de@afterservice.vip. Manufacturer: Nantong Ningpu Electrical Appliance CO., Ltd. Address: No. 139, Huanghe Road, Rudong Economic Development Zone, Nantong, Jiangsu, China Email: rintuf.de@afterservice.vip...
Need help?
Do you have a question about the NPE-12HR and is the answer not in the manual?
Questions and answers