Table of Contents
Advertisement
Advertisement
Table of Contents

Related Manuals for RCA F25442


Summary of Contents for RCA F25442
- Page 1 Television User’s Guide Changing Entertainment. Again.
-
Page 2: Important Information
This damage is not covered by your warranty. Extended viewing of channels displaying these images should be avoided. Cable TV Installer: This reminder is provided to call your attention to Article 820-40 of the National Electrical Code (Section 54 of the Canadian... -
Page 3: Introduction
Key Features Overview Your TV is equipped with features that will add to your TV watching experience. The following information summarizes a few of these features. Chapter 2 provides more information about the rest of the TV’s features and how to use them. - Page 4 Introduction (This page intentionally left blank)
-
Page 5: Table Of Contents
Choose Your Connection ... 7 Connection: TV + VCR ... 8 Connection: TV Only... 9 Connection: TV + VCR + Satellite Receiver ... 11 The Front of Your TV ... 12 Why You Should Connect This G-LINK Cable ... 13 How to Find the Remote Sensor ... - Page 6 Picture Quality Menu ... 42 Screen Menu ... 43 Using Closed Captioning... 43 Channel Menu ... 44 Time Menu ... 44 Chapter 4: Other Information Troubleshooting... 46 Care and Cleaning ... 49 RCA TV Limited Warranty ... 49 Index ... 53...
-
Page 7: Connections And Setup
Chapter Overview: • Things to Consider Before You Connect • Choose Your Connection • Connections • The Front of Your TV • Why You Should Connect This G-LINK Cable • Plug in the TV • Put Batteries in the Remote •... -
Page 8: Things To Consider Before You Connect
Important Stand and Base Safety Information Choose the location for your TV carefully. Place the TV on a stand or base that is of adequate size and strength to prevent the TV from being accidentally tipped over, pushed off, or pulled off. -
Page 9: Choose Your Connection
Note: Please locate the G-LINK cable (provided) when you’re getting ready to set up your TV. You need to connect this cable to your TV, and to your VCR and/or cable box in order for all of the features of the program guide to work properly. -
Page 10: Connection: Tv + Vcr
A. If you haven’t already done so, remove the Demo Pin from the G-LINK jack. B. Connect the G-LINK cable to the G-LINK jack on the TV. Next step, place the wands of the G- LINK cable to work with your VCR (instructions are on p. 13). -
Page 11: Connection: Tv Only
A. If you haven’t already done so, remove the Demo Pin from the G-LINK jack. B. Connect the G-LINK cable to the G-LINK jack on the TV. Next step, place the wands of the G-LINK cable to the cable box (instructions are on p. 13). - Page 12 Connections & Setup SATELLITE RECEIVER VIDEO S-VIDEO VIDEO AUDIO TV (back panel) G-LINK IN FROM ANT OUT TO TV SATELLITE Satellite Signal IN FROM ANT OUT TO TV CABLE/ ANTENNA Chapter 1...
-
Page 13: Connection: Tv + Vcr + Satellite Receiver
A. If you haven’t done so, remove the Demo Pin from the G-LINK jack. B. Connect the G-LINK cable to the G-LINK jack on the TV. Next step, place the wands of the G-LINK cable to work with your VCR (instructions are on p. 13). -
Page 14: The Front Of Your Tv
The Front of Your TV Front Panel If you cannot locate your remote you can use the buttons of your TV to operate many of the TV’s features. MENU Brings up the Main menu. When in the menu system, it selects highlighted items. -
Page 15: Why You Should Connect This G-Link Cable
VCR and/or cable box. Cable Box – If your TV is connected to a cable box you must connect the G-LINK cable to receive TV program listings for your area, and to tune directly to a channel when the program guide is on your TV screen. -
Page 16: Put Batteries In The Remote
Turn on the TV Press the POWER button on the remote control or the TV (the first screen of the Interactive Setup appears). The menu screens “time out” after a period of time if you don’t make a selection. The tips in this section tell you how to access the Setup menu screens manually. -
Page 17: Complete The Interactive Setup
2. Press OK to select that language. Complete Auto Channel Search The next part of the SETUP asks you if you want the TV to search for all channels viewable through your antenna or cable TV system. This is sometimes called “auto programming.”... - Page 18 If your TV isn’t connected to cable, highlight No and press OK (STEP 3: Configuring for a VCR appears). 2. If you have a cable box connected to this TV, highlight Yes and press OK on your remote control. Note: The next series of screens are very important because GUIDE Plus+ system must find the correct cable box information in order for the program schedule to be correct in your TV’s program guide.
- Page 19 Chapter 1 Connections & Setup 3. Highlight the channel to which you have to tune your TV in order to see cable programming, and press OK (a screen appears reminding you to connect your G-LINK cable to your TV and cable box).
- Page 20 If your VCR didn’t change to channel 09, you can either choose No or Test this code again. If you think your TV or remotes might have been touched during the test, tune your VCR to channel 02, turn off your VCR and highlight Test this code again.
-
Page 21: What To Expect
If you don’t want to see the demo right now, press OK to watch TV. What to Expect The next time you turn on your TV, the GUIDE Plus+ system will appear on the screen. The following examples explain what you might see: •... -
Page 22: The Buttons On The Remote Control
INPUT Changes your TV to its video input channel. The Video Input Channel is the channel your TV must tune to in order for you to access a component that’s connected to your TV’s VIDEO IN and AUDIO IN jacks. Example: to view a tape from your camcorder, connect the camcorder to the TV’s AUDIO and... -
Page 23: Chapter 2: Using The Tv's Features
Chapter 2 Using the TV’s Features Chapter Overview: • All About the GUIDE Plus+ System • The Channel Banner • Parental Controls and V-Chip Changing Entertainment. Again. -
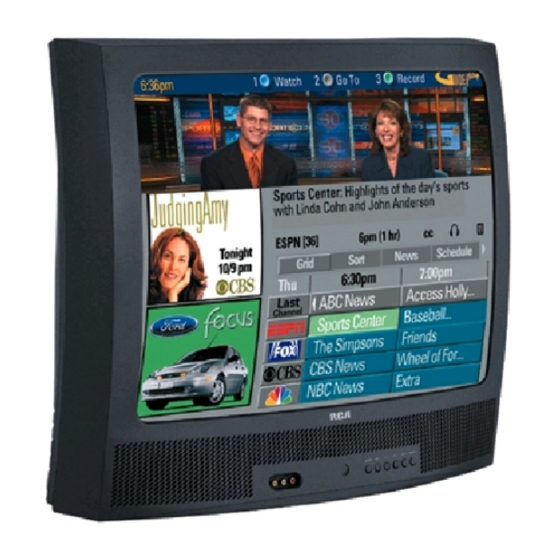
Page 24: About The Guide Plus+ System
The GUIDE Plus+ system is an interactive on-screen program guide that lists TV schedules for your area and allows your TV direct control of a cable box and VCR. You must first set up the GUIDE Plus+ Menu system in order to view this on-screen program guide (see Chapter 1 for details). -
Page 25: Getting In & Out Of The Guide Plus+ System
GUIDE Plus+ system. To remove the program guide from the screen, press OK, GUIDE, or CLEAR. Chapter 2 Using the TV’s Features Getting In & Out of the GUIDE Plus+ System To enter the GUIDE Plus+ system: • Press GUIDE on the remote. - Page 26 When highlighting the program, the following Action buttons appear: • Watch Press 1 on the remote to place a timer in the Schedule for the TV to turn on and tune to the program highlighted in the channel listing. When the TV turns on, the GUIDE Plus+ system will automatically appear with the scheduled program highlighted and tuned in the video window.
-
Page 27: Sort
Watch Press 1 on the remote to place a timer in the Schedule, and then follow the on-line help for further options. Placing a timer in the Schedule will cause the TV to turn on and tune to the program highlighted in the channel listing at the predetermined time. -
Page 28: News
2. Press MENU on the remote control to select the Menu bar. 3. Use the arrows to highlight News (if MSNBC is available on your TV, it will appear in the video window). 4. Use the up and down arrows to highlight a story. -
Page 29: Messages
Messages menu selection Chapter 2 Using the TV’s Features To remove or change the frequency (daily, once, or weekly) of a scheduled event, access the Schedule menu from the Menu bar. 1. Press GUIDE to bring up the GUIDE Plus+ system. -
Page 30: Channels
Using the TV’s Features Channels menu Channels menu action buttons selection Setup The Setup menu allows you to access the GUIDE Plus+ system setup information. To access the Setup option: 1. If the Guide Plus+ system isn’t on your screen, press GUIDE on your remote control. -
Page 31: How To Get More Information About An Advertisement Or A Program
Off The station name isn’t displayed when you change channels. Continuous Demo Runs the GUIDE Plus+ demonstration until it is turned off. To turn off the demonstration you must turn off the TV. Note: If you have not completed your GUIDE Plus+ system setup, these options will not be available. -
Page 32: Channel Banner
TV (referred to as V-Chip) which allows you to block TV programs and movies based on violence, sex, or other content you may believe children should not view. In other words, it lets you program your TV so it won’t display certain programs. -
Page 33: How V-Chip Works
“Not Rated,” and programs that are considered “unrated” because no code has been sent by the broadcaster. The TV age-based ratings and content themes you can block are listed in the following table. -
Page 34: V-Chip Tv Rating Limit
2. Press MENU to continue. 3. Highlight and select V-Chip TV Rating Limit. 4. Once you get to the V-Chip TV Rating Limit screen, use the arrow buttons and OK on your remote to change the status of a TV program rating or content theme from View to Block. -
Page 35: Blocking Age-Based Ratings
For example, if you only want your child to watch programs that have a TV-G rating and lower (in other words, you want the child to watch TV-G, TV-Y7, and TV-Y), then you need to block out other programming with higher ratings. -
Page 36: Viewing Age-Based Ratings
You can block programs based on their content. (Content is represented by the D, L, S, V, FV and TV-Y on your screen. See the beginning of this section for details.) When you block a content theme for a particular rating, you automatically block that content theme for higher rated programs as well. -
Page 37: Viewing Specific Content Themes
TV-14. 4. Press the up or down arrow button to change its status back to V. Your child would then be able to watch programs with TV-14 adult language content, but not programs with TV-PG or TV-MA language content. Note: Only the content theme status corresponding to TV-14 (L) language changes to (V) View. -
Page 38: Blocking Movie Ratings
Using the TV’s Features Rating Rating field status field Rating Rating field status field Blocking Movie Ratings If you only want your child to watch movies that have a PG rating and lower (in other words, movies rated PG and G), then you could automatically block out all other movies with higher ratings. -
Page 39: V-Chip Unrated Program Block
Note: If you have a digital cable box channels 126-999 can be blocked but will not be removable from your scan list. Front Panel Block Selecting this option lets you block (disable) or unblock (enable) the TV’s front panel. The remote still tunes to any channel. Front Panel Block can: •... -
Page 40: Lock/Unlock Parental Controls
Using the TV’s Features Lock/Unlock Parental Controls Selecting this option lets you lock and unlock parental controls settings using a password. If you do not lock parental controls, none of the settings for V-Chip, Channel Block, or Front Panel Block will take effect. -
Page 41: Chapter 3: Using The Tv's Menu System
Using the TV’s Menu System Chapter Overview: • How to Use the Different Types of Menus and Control Panels • Audio Menu • Picture Quality Menu • Screen Menu • Using Closed Captioning • Channel Menu • Time Menu Changing Entertainment. Again. -
Page 42: How To Use The Different Types Of Menus And Control Panels
How to Use the Different Types of Menus and Control Panels The TV’s menu system has three types of screens: menus, control panels, and choice lists. You use the buttons on the remote or the front panel to access the menu system and make changes to the settings. -
Page 43: Numeric Entry
You can also enter numbers by using the up and down arrows on the remote. Chapter 3 Using the TV’s Menu System Sliders Sliders are used to make adjustments to a particular control. To use a Slider in a menu: 1. -
Page 44: Audio Menu
Using the TV’s Menu System Audio Menu Mute Press OK to reduce the TV’s volume to its minimum level. Press OK again to restore the volume. Audio Processor Displays a choice list of available audio modes, which control the way the sound comes through your speakers. You can also access the AUDIO PROCESSOR menu by pressing the SOUND button on the remote. -
Page 45: Screen Menu
Using Closed Captioning Many programs are encoded with closed-captioning information, which lets you display the audio portion of a program as text on the TV screen. Closed captioning is not available on all channels at all times. Only specific programs encoded with closed-captioning information are applicable. When a program is closed captioned, the CC icon is displayed in the channel banner. -
Page 46: Channel Menu
UHF/VHF Antenna Choose this if you are currently using an off-air antenna for TV signals. Cable TV Choose this if you are currently using cable or a cable box for TV signals. Auto Channel Search Tells the TV to search automatically for all the channels available through the antenna input. -
Page 47: Chapter 4: Other Information
Chapter 4 Other Information Chapter Overview: • Troubleshooting • Care and Cleaning • Limited Warranty • Accessory Order Form • Index Changing Entertainment. Again. -
Page 48: Troubleshooting
Check the wall receptacle (or extension cord) to make sure it is “live” by plugging in something else. • Something might be wrong with your remote control. Press the POWER button on the front of the TV. If the TV turns on, check the remote control solutions on p. 48. - Page 49 You may have an incorrect GUIDE Plus+ Channel Lineup. The guide may get out of sync with the cable provider. Use the GUIDE Plus+ Setup in the GUIDE Plus+ Menu to change the zip code to 99999. Turn the TV off for 10 minutes. Use Setup again to change the zip code back to the correct value.
-
Page 50: Problems With V-Chip/Parental Controls
Record option won’t be available. Go to p. 18 for detailed instructions. • If a cable box is attached to your TV, make sure you set it up correctly in the GUIDE Plus+ Setup menus. Go to page 16-17 for detailed instructions. -
Page 51: Care And Cleaning
While cleaning do not spray liquid directly on the screen, or allow liquid to run down the screen and inside the TV. Also, avoid placing drinks or vases with water on top of the TV. This could increase the risk of fire or shock hazard or damage to the TV. - Page 52 Product registration: • Please complete and mail the Product Registration Card packed with your TV. It will make it easier to contact you should it ever be necessary. The return of the card is not required for warranty coverage. How state law relates to this warranty: •...
- Page 53 VCRs to duplicate tapes. Can also be used to connect a VCR to your TV. Cable is color-coded and shielded. Gold-Tipped cable Has RCA-type phono plugs on each end. VH83 (6-ft) Stereo VCR Dubbing Cable Triple cable that lets you connect the jacks of stereo components.
- Page 54 US currency (made payable to Thomson Consumer Electronics, Inc.) to the following Zip: address: 2-way Signal Splitter Helps you connect a second TV or VCR. Splitter VH47 Amplified Antenna Allows you to quickly switch from the antenna signal to the cable or satellite signal without disconnecting the antenna.
-
Page 55: Index
Index TV + VCR 8 TV Only 9 Content Themes 30 Contrast 42 Control Panels 40 Accessories 51 Demo Pin 6, 8, 9, 11 Advanced connections 11 Age-Based Ratings 30 Arrow buttons 20 Audio Finding the sensor 13 Menu 42... - Page 56 (This page intentionally left blank)
- Page 57 (This page intentionally left blank)
- Page 58 (This page intentionally left blank)
- Page 59 (This page intentionally left blank)
- Page 60 (This page intentionally left blank)
- Page 61 (This page intentionally left blank)
- Page 62 (This page intentionally left blank)
- Page 63 (This page intentionally left blank)
- Page 64 Please do not send any products to the Indianapolis address listed in this manual or on the carton. This will only add delays in service for your product. Thomson multimedia Inc. 10330 North Meridian Street Indianapolis, IN 46290 ©2000 Thomson multimedia Inc. Trademark(s)®...
Need help?
Do you have a question about the F25442 and is the answer not in the manual?
Questions and answers