Table of Contents
Advertisement
Available languages
Available languages
Quick Links
Bedienungsanleitung
Instruction manual
Mode d'emploi
Istruzioni per l'uso
Instrukcja obsługi
Gebruiksaanwijzing
Art.-Nr. 25873
Elektrischer Kamin / Electric fireplace / Cheminée électrique/ Camino elettrico / Elektrische open haard
220-240V ~50Hz, 900/1800W
LED 4W
Fernbedienung / Remote control / Télécommande / Controllo remoto / Afstandsbediening
1 x Knopfzellenbatterie / Button cell battery / Pile bouton / Batteria a bottone / Knoopcel batterij
IMPORTEUR: SCHWARTINSKY GMBH, HOEHENBURGSTR. 29, D-75038 OBERDERDINGEN, GERMANY
Advertisement
Table of Contents

Related Manuals for abc home living 25873


Summary of Contents for abc home living 25873
- Page 1 Mode d'emploi Istruzioni per l'uso Instrukcja obsługi Gebruiksaanwijzing Art.-Nr. 25873 Elektrischer Kamin / Electric fireplace / Cheminée électrique/ Camino elettrico / Elektrische open haard 220-240V ~50Hz, 900/1800W LED 4W Fernbedienung / Remote control / Télécommande / Controllo remoto / Afstandsbediening 1 x Knopfzellenbatterie / Button cell battery / Pile bouton / Batteria a bottone / Knoopcel batterij IMPORTEUR: SCHWARTINSKY GMBH, HOEHENBURGSTR.
-
Page 2: Table Of Contents
Inhaltsverzeichnis Inhaltsverzeichnis ................................1 Bedienungsanleitung (D) ..............................3 Wichtige Sicherheitshinweise ............................ 3 Aufstellung des Kamins ............................. 3 Benutzung des Kamins ............................. 4 Uhrzeit einstellen ............................... 4 Hauptschalter (A): ..............................4 An/Aus-Schalter (B): ..............................4 Sperren der Tasten (C): ............................5 Heizfunktion AN/AUS: ............................... - Page 3 Verrouillage des boutons (C) ..........................20 Chauffage ON / OFF: .............................. 20 Régulage de la température: ........................... 20 Celcius / Fahrenheit Cadre: ............................ 20 Réglage de la luminosité: ............................20 Minuterie régulière: ..............................21 3.10 Sélection de mode: ..............................21 3.11 Restaurer les paramètres par défaut: ........................
-
Page 4: Bedienungsanleitung (D)
Bedienungsanleitung (D) Wichtige Sicherheitshinweise Um die Gefahr von Feuer, elektrischem Schock und Personenschaden zu vermeiden, sollten Sie diese wichtigen Sicherheitshinweise aufmerksam durchlesen und befolgen. 1. Bevor Sie den elektrischen Kamin das erste Mal benutzen, lesen Sie die Gebrauchsanweisung bitte sorgfältig durch und bewahren Sie diese auf. -
Page 5: Benutzung Des Kamins
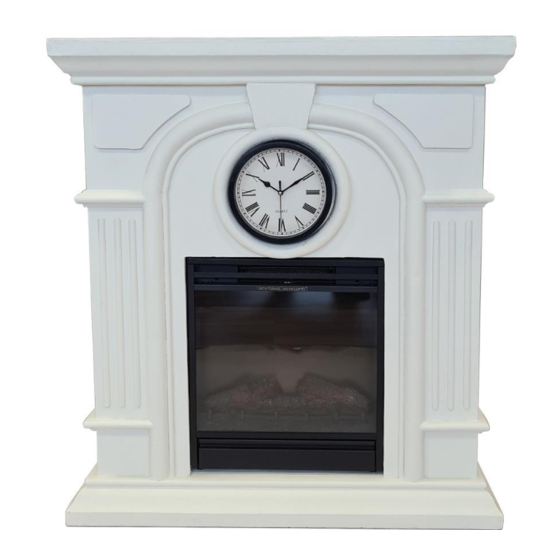
Benutzung des Kamins Uhrzeit einstellen Die Uhr in der Front des Kamins ist batteriebetrieben. Um die Uhr in Betrieb zu nehmen, muss über die Rückseite des Kamins eine Batterie des Typs 1xAA 1,5V eingelegt werden (ist nicht im Lieferumfang enthalten). Danach können Sie mittels der Krone die aktuelle Uhrzeit einstellen, in dem sie diese entweder mit oder gegen den Uhrzeigersinn drehen. -
Page 6: Sperren Der Tasten (C)
Sperren der Tasten (C): Halten Sie die Taste C für mindestens 6 Sekunden gedrückt, um die Tasten zu sperren oder zu entsperren. Tun Sie das, erscheint „LOC“ auf dem Display und zeigt an, dass die Knöpfe nun gesperrt sind. Die Anzeige bleibt für 6 Sekunden und erlischt dann. -
Page 7: Timer-Funktion
Drücken Sie die Taste C, um die Einstellungen zu starten. Drücken Sie die Taste E oder F, um die Helligkeitsstufen auszuwählen. Es gibt 5 verschiedene Helligkeitsstufen. Die Standardeinstellung ist bei Stufe 3 eingestellt. Stufe 5 ist die höchste einzustellende Stufe und wird wie folgt angezeigt: Timer-Funktion: Um die Timer-Funktion zu starten, drücken Sie Taste D. -
Page 8: Modus-Auswahl
3.10 Modus-Auswahl: Drücken Sie Taste D und wählen Sie die Modus-Auswahl aus. Das Dispaly zeigt Ihnen „MODE“ an: Drücken Sie Taste C, um ins Modus-Menü zu gelangen. Drücken Sie Taste E oder F, um den gewünschten Modus einzustellen. Es gibt drei verschiedene Modi. 1) Offene-Fenster-Erkennungs-Modus: Wenn Sie sich im Modus-Menü... -
Page 9: Werkseinstellungen Wiederherstellen
Um nun die Heizstufe festzulegen, drücken Sie Taste E oder F. H steht für die hohe Heizstufe und L für die niedrige Heizstufe. Bestätigen Sie mit Taste C. Wählen Sie dann die gewünschte Temperatur aus und bestätigen Sie erneut mit Taste C. Jetzt können Sie die gewünschte Startzeit festzulegen. -
Page 10: Benutzung Der Fernbedienung
3.12 Benutzung der Fernbedienung: Diesem Kamin ist eine Fernbedienung beigelegt. Vor dem ersten Gebrauch müssen Sie die Schutzfolie am Batteriefach entfernen, um den Kontakt herzustellen. Eine Knopfzellenbatterie (CR2025 3V) ist bereits eingelegt. Um die Fernbedienung zu benutzen, muss der Schalter A des Gerätes auf die ON-Position geschaltet sein. -
Page 11: Garantieanspruch
Garantieanspruch Für dieses Gerät leisten wir zwei Jahre Garantie für alle Mängel, die auf Fertigungs- oder Materialfehler zurückzuführen sind, gemäß unseren Bedingungen. Die Garantiezeit beginnt mit dem Tag der Übergabe und wird nur bei Vorlage der Rechnung mit Kaufdatum gewährt. Weitergehende Ansprüche bestehen nicht. Es gelten folgende Bedingungen: 1. -
Page 12: Manual (Gb)
Manual (GB) Important Instructions You should read and always follow the important instructions below to reduce the risk of fire, electric shock, and injury to persons. 1. Read all instructions before using this fireplace. 2. This fireplace is hot when in use. To avoid burns, do not let bare skin touch hot surfaces, such as surfaces near the heater outlet or light bulbs. -
Page 13: Operating Instructions
Operating Instructions Set time The clock in the front of the electric fireplace is battery-operated. To put the clock into operation, a 1xAA 1.5V battery must be inserted via the back of the fireplace (not included). Then you can set the current time by turning the crown either clockwise or anticlockwise. -
Page 14: Locking The Buttons (C)
Locking the Buttons (C): Press and hold button C for more than 6 seconds to lock or unlock the buttons, LOC is displayed and indicated that the buttons are locked. Once it’s locked LOC will be flashing for 6 seconds then disappear, press any button LOC will flash again. Long press button C for 6 seconds to unlock the buttons. -
Page 15: Timer Function
Timer function: At default interface, keep pressing button D to select the regular timer, it’s displayed “HOUR” and flashing timer icon as following: Press button C to start the timer setting. Press button E or F to set the desired time. You can select the following time sequences: 30min, 1H, 2H, 3H, 4H, 5H, 6H, 7H, 8H and 9H. - Page 16 Press button E or F to select “ON” or “OFF” to turn on or turn off the weekly program. Press button C to validate and then press button D to select Mode menu. And go on as mentioned in the following steps.
-
Page 17: Restore Factory Defaults
3.11 Restore Factory Defaults: Unplug the appliance for not less than 5 seconds then plug in to restore the factory defaults. 3.12 Using the Remote Control: A remote control is included with this fireplace. Before using it for the first time, you must remove the protective film from the battery compartment to make contact. -
Page 18: Guarantee Claim
Guarantee claim We provide a two-year guarantee for this appliance for all defects that are due to manufacturing or material faults, in accordance with our terms and conditions. The guarantee period begins on the day of handover and is only granted on presentation of the invoice with the date of purchase. -
Page 19: Mode D'emploi (F)
Mode d'emploi (F) Importantes consignes de securite Lisez ces importantes consignes de sécurité avec attention et respectez-les pour éviter tout risque dû au feu ou à un choc électrique ou tout risque de blessure. 1. Avant d'utiliser le foyer électrique pour la première fois, veuillez lire attentivement le mode d'emploi et le conserver. -
Page 20: Mode D'emploi
Mode d'emploi Régler l'heure L'horloge située à l'avant du foyer fonctionne sur pile. Pour mettre l'horloge en service, il faut insérer une pile de type 1xAA 1,5V à l'arrière du foyer (non fournie). Ensuite, vous pouvez régler l'heure actuelle à l'aide de la couronne en la tournant dans le sens des aiguilles d'une montre ou dans le sens inverse. -
Page 21: Verrouillage Des Boutons (C)
Verrouillage des boutons (C) Appuyez sur le bouton C et maintenez-le enfoncé pendant plus de 6 secondes pour verrouiller ou déverrouiller les boutons. LOC s'affiche et indique que les boutons sont verrouillés. Une fois qu'il est verrouillé, le LOC clignotera pendant 6 secondes puis disparaîtra, appuyez sur n'importe quel bouton LOC clignotera à... -
Page 22: Minuterie Régulière
À l'interface par défaut, continuez à appuyer sur le bouton D pour sélectionner le contrôle de luminosité, l'icône «bri» et l'icône de l'ampoule clignotante clignotent comme suit: Appuyez sur le bouton C pour démarrer le réglage de la luminosité. Appuyez sur le bouton E ou F pour sélectionner le niveau de luminosité. 5 niveaux de luminosité... - Page 23 Si l'icône clignote en permanence, cela indique que l'heure est décalée après une coupure de courant. Il clignote comme un temps n'a pas été défini. 3) Réglage manuel pour la programmation hebdomadaire: Avant de régler ce programme, sélectionnez le programme "ProG" Appuyez sur le bouton E ou F pour sélectionner "ON"...
-
Page 24: Restaurer Les Paramètres Par Défaut
Pour terminer le réglage, appuyez sur le bouton E ou F pour trouver "FINISH", puis appuyez sur le bouton C pour terminer le réglage. Vous pouvez régler au maximum 8 périodes de temps. Il est possible de définir plusieurs périodes de temps différentes pour un jour. -
Page 25: Droit À La Garantie
Droit à la garantie Pour cet appareil, nous accordons une garantie de deux ans pour tous les défauts dus à des vices de fabrication ou de matériel, conformément à nos conditions. La période de garantie commence le jour de la remise et n'est accordée que sur présentation de la facture avec la date d'achat. -
Page 26: Istruzioni Per L'uso (I)
Istruzioni per l'uso (I) Le Intrusion Importanti Lei dovrebbe leggere e dovrebbe seguire sempre le istruzioni importanti sotto ridurre il rischio di fuoco, la scossa, e la ferita alle persone. 1. Leggere tutte le istruzioni prima di usare questo caminetto. 2. -
Page 27: Istruzioni Per L'uso
Istruzioni per l'uso Impostazione dell'ora L'orologio nella parte anteriore del riscaldatore è alimentato a batteria. Per avviare l'orologio, inserire una batteria 1xAA 1.5V nella parte posteriore del camino (non inclusa). Poi si può impostare l'ora corrente girando la corona in senso orario o antiorario. Interruttore di alimentazione principale (A): Aprire il coperchio sul fondo del riscaldatore. -
Page 28: Bloccare I Pulsanti (C)
Bloccare i pulsanti (C): Tenere premuto il pulsante C per più di 6 secondi per bloccare o sbloccare i pulsanti, LOC viene visualizzato e indica che i pulsanti sono bloccati. Una volta bloccato, LOC lampeggerà per 6 secondi, quindi scomparirà, premere qualsiasi pulsante LOC lampeggerà... -
Page 29: Controllo Della Luminosità
Controllo della luminosità Controllo luminosità serve per selezionare il livello di luminosità della fiamma desiderato. All'interfaccia predefinita, tenere premuto il pulsante D per selezionare il controllo della luminosità, viene visualizzata l'icona "bri" e la lampadina lampeggiante come segue: Premere il pulsante C per avviare l'impostazione della luminosità. Premere il pulsante E o F per selezionare il livello di luminosità. - Page 30 Premere il pulsante C per confermare l'ora, quindi il tasto E o F per impostare l'ora (minuti). Premere il pulsante C per confermare l'impostazione dell'ora. Per uscire dall'impostazione durante il funzionamento, premere il pulsante D. Se l'icona lampeggia permanentemente, questo indica che l'ora è sfalsata a seguito di un'interruzione di corrente.
-
Page 31: Ripristina Impostazioni Di Fabbrica
Premere il pulsante E o F per selezionare la durata del tempo (ora). Premere il pulsante C per confermare. Fino ad ora il 1 ° periodo di tempo del programma è completato. Viene visualizzato "CON" (conferma). Per continuare l'impostazione per il 2 ° periodo, premere il pulsante C per continuare. -
Page 32: Richiesta Di Garanzia
Richiesta di garanzia Forniamo una garanzia di due anni per questo apparecchio per tutti i difetti attribuibili a difetti di fabbricazione o di materiale in conformità con i nostri termini e condizioni. Il periodo di garanzia inizia il giorno della consegna e viene concesso solo su presentazione della fattura con la data di acquisto. -
Page 33: Gebruiksaanwijzing (Nl)
Gebruiksaanwijzing (NL) Belangrijke Instructies Zou U de belangrijke instructies moeten lezen en altijd moeten volgen om onder het risico van vuur, elektroshock te verminderen en verwonding naar personen. 1. Les alle instructies voor met deze open haard. 2. Deze open haard is heet wanneer in gebruik. Om brandwonden te vermijden, verhuurt naakte huidaanraking hete oppervlakten, zoals oppervlakten nabij het verwarmerafzetgebied niet of steek bollen aan. -
Page 34: Gebruiksaanwijzing
Gebruiksaanwijzing De tijd instellen De klok aan de voorkant van de kachel werkt op batterijen. Om de klok te starten, plaatst u een 1xAA 1,5V batterij in de achterkant van de haard (niet meegeleverd). Vervolgens kunt u de huidige tijd instellen door de kroon met de klok mee of tegen de klok in te draaien. -
Page 35: De Knoppen Vergrendelen (C)
De knoppen vergrendelen (C): Houd knop C langer dan 6 seconden ingedrukt om de knoppen te vergrendelen of ontgrendelen, LOC wordt weergegeven en geeft aan dat de knoppen zijn vergrendeld. Als het eenmaal is vergrendeld, knippert LOC gedurende 6 seconden en verdwijnt dan. Druk op een willekeurige knop. LOC knippert opnieuw. -
Page 36: Normale Timer
Druk op de knop C om de instelling voor de helderheid te starten. Druk op knop E of F om het helderheidsniveau te selecteren. 5 helderheidsniveaus kunnen worden geselecteerd. De standaardinstelling is 3. 5 is het hoogste niveau zoals hieronder getoond: Normale timer: Bij de standaard interface blijf je op knop D drukken om de reguliere timer te selecteren. - Page 37 Druk op knop D om de instelling tijdens het gebruik te verlaten. Als het pictogram permanent knippert, betekent dit dat de tijd verschoven is na een stroomuitval. Het knippert als een tijd niet is ingesteld. 3) Handmatige instelling voor weekprogrammering: Voordat u dit programma instelt, moet u het programma "ProG"...
-
Page 38: Herstel Fabrieksinstellingen
Om de instelling te voltooien, drukt u op knop E of F om "FINISH" te zoeken en drukt u vervolgens op C om de instelling te voltooien. U kunt maximaal 8 tijdsperioden instellen.Voor één dag kunnen verschillende tijdsperioden worden ingesteld. Eén periode kan voor verschillende dagen worden ingesteld. -
Page 39: Garantieclaim
Garantieclaim Wij geven twee jaar garantie op dit toestel voor alle defecten die te wijten zijn aan fabricage- of materiaalfouten, in overeenstemming met onze algemene voorwaarden. De garantieperiode begint op de dag van de overhandiging en wordt alleen verleend op vertoon van de factuur met de datum van aankoop. Er zijn geen verdere claims. De volgende voorwaarden zijn van toepassing: 1.
Need help?
Do you have a question about the 25873 and is the answer not in the manual?
Questions and answers