Table of Contents
Advertisement
Quick Links
Advertisement
Table of Contents

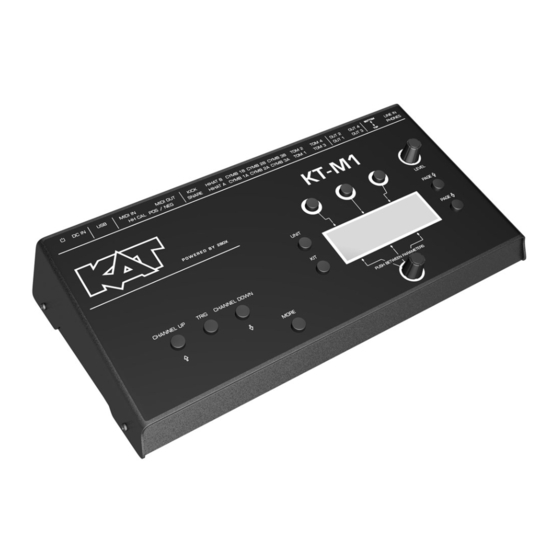
Summary of Contents for KAT Percussion KT-M1
- Page 1 KT-M1 Quick Start Guide (English)
-
Page 3: Table Of Contents
Contents 1First Steps........................3 1.1Connecting Pads....................3 1.2Connecting the Hi-Hat..................3 2Operation......................... 4 3Menu Structure......................5 4Saving Your Settings....................7 5Setting Up and Calibrating the Hi-Hat..............9 6KAT eHAT2 Settings....................12 7Connections......................12 8USB........................13 9File System......................14 10KIT Bank......................17 11Editor Software.....................18 12User Manual......................18 13Sound Downloads....................18 14Connecting FSR Pads..................19 15Compatibility List....................21 16Connection Options and Trigger Types...............22 17Important Safety Precautions ................25... -
Page 4: 1First Steps
Version 3.3 Thank you… for choosing a KAT Percussion KT-M1 module. You have chosen wisely. Your new sound module comes with an open sound architecture and a universal trigger interface. To get up and running with your KT-M1 module, we recommend taking the time to read this Quick Start manual. -
Page 5: 2Operation
Operation The module’s user interface is highly intuitive and based on two menu items (UNIT and KIT), each with a number of parameter pages. The parameter pages can be selected sequentially using the PAGE UP and PAGE DOWN buttons. There are no secondary levels or hidden menu items. -
Page 6: 3Menu Structure
Which dynamics curve best matches your playing style? It would be a good idea to take some time to familiarize yourself with these settings. We are confident you will be impressed by the KT-M1 module’s responsiveness once all settings are in place. HCAL*: This is where you set up your hi-hat and calibrate the corresponding pad. - Page 7 PREF: This page is used to manage the SAVE function and to reset the module to its factory defaults. MEM: This is where you can check the remaining memory capacity for additional sounds. INFO: This page displays the firmware’s version number. * (only available after selecting the hi-hat channel) KIT Menu The KIT menu allows you to manage and edit the internal memory slots.
-
Page 8: 4Saving Your Settings
ACMP: This page contains the built-in player. Use it to specify whether you wish to play to a song or the built-in metronome. The metronome’s settings and the tempo can be customized and saved. 4 Saving Your Settings Any changes you make can be saved internally. Important: Your settings can only be saved after unlocking the SAVE function in the UNIT-PREF menu (you only need to do so once). - Page 9 Renaming a KIT To rename a KIT, press the button above SAVE on the KIT home page. You can use uppercase and lowercase letters, numbers as well as several special characters for the names you enter. Use the knob to select the desired character (KEY flashes) or hold down the MORE button while pressing the knob to insert a space.
-
Page 10: 5Setting Up And Calibrating The Hi-Hat
This flexibility, however, also means that there are a number of parameters that need to be set to take advantage of the KT-M1’s full potential. In most instances, these setup and calibration steps only need to be performed once. - Page 11 4.1. Press the leftmost DATA button once. A closed hi-hat icon appears in the display and starts flashing. 4.2. Close the hi-hat pad or press the controller’s pedal with your foot. 4.3. Press the leftmost DATA button a second time. An open hi-hat icon appears in the display and starts flashing.
-
Page 12: 6Kat Ehat2 Settings
POFF This parameter allows you to change the size of the the hi-hat’s calibration range: higher values extend the range, while lower values narrow it down. Bear in mind that changing this setting also affects the PFACT setting. We recommend editing this parameter only once you are thoroughly familiar with the system. -
Page 13: 7Connections
LINE IN This is where you can connect an external signal source. You can use a stereo cable (for your smartphone, for instance) or a mono cable (e.g. to listen to the monitor signal via the KT-M1 in a live setting). -
Page 14: 9File System
8 USB When the KT-M1 module is connected to a USB port on your computer (PC or Mac) and booted in USB mode, the computer will consider it a “regular” storage device. In this case, the module behaves exactly like a USB hard disk or an SD card (in a card slot). - Page 15 KT-M1 memory card are for those who wish to keep their current trapKAT version, but still use the 6.0 KT-M1 KITs. Only one .syx file can be loaded into the trapKAT at a time. Each .syx file contains 24 KITs that can be loaded into...
- Page 16 Note: By pressing the MORE and the KIT button for 2 seconds you will enter a menu where you are able to switch to another KIT Bank. At next power up, KT-M1 will start with the last chosen KIT Bank.
- Page 17 KT-M1, and due to the open sound architecture, the operating system, Sound Bank and KITs for the 2 BOX Drumit 3 can also be used with the KT-M1. For those who wish to use the 2 BOX Drumit 3 sounds and KITs, simply download the Drumit 3 card content on the 2 BOX website, connect the module to your computer, and replace the entire KT-M1 card content with the Drumit3 card files.
-
Page 18: 11Editor Software
Download the desired ZIP archives and extract the sound files onto your computer. Those sound files can now be copied to the KT-M1 module via USB and used just like the original factory sounds. -
Page 19: 14Connecting Fsr Pads
FTB can accommodate up to 12 single zone heads or 6 dual zone heads, as well as multi-zone FSR instruments such as Alternate Mode's jamKAT™ and hybriKIT™. The outputs of the KTB or FTB can then be connected directly to the KT-M1. Compatible products for the KTB and FTB include: Alternate Mode's hybriHEAD™, hybriPAD™... - Page 20 Note: The KT-M1 has 10 trigger inputs. If using a multi-zone instrument with more than 10 zones, a "Y" cable must be used on any of the KT-M1's dual channel inputs. The Snare and Tom channels are all dual channel inputs. This will create an additional input for the instrument.
-
Page 21: 15Compatibility List
If you don’t see the type or manufacturer of (one of) your pads, please do not conclude that your pad(s) won’t work with the KT-M1. Rather, compare the technical specifications of your pads with the requirements listed in the table below. -
Page 22: 16Connection Options And Trigger Types
16 Connection Options and Trigger Types Zones – Configuration Instru Type Brands (examples) Information Kick Head/ Rim/ Cross-stick/ Choke Edge Bell PadP 2box, Roland,KAT Piezo Piezo PaPSS Huaxin Piezo Switch Switch PaPSY Yamaha Piezo Switch Switch PadPS Roland, Alesis Piezo Switch Various Piezo... - Page 23 Instrument Snare Cymbal Acoustic 1 zone 2 zones 3 zones 1 zone 2 zones 1 zone 2 zones 3 zones Trigger...
-
Page 24: 17Important Safety Precautions
In short: be sure to handle the KT-M1 module with the same care as any other electronic device you own. This will ensure maximum enjoyment for years to come.