Table of Contents
Advertisement
Available languages
Available languages
Quick Links
v04
Model: 6000
oWNeR'S MANUAl
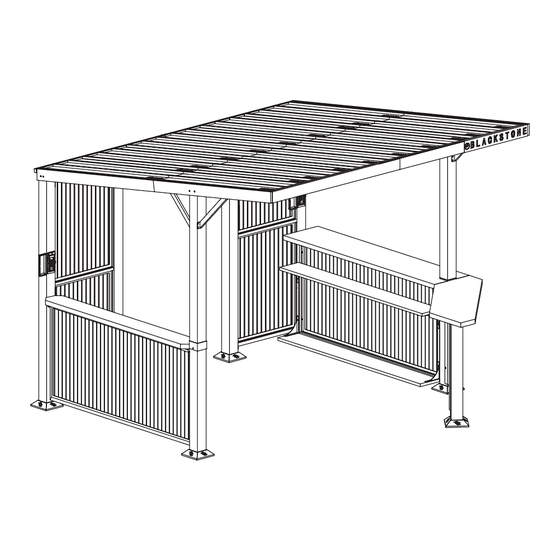
10' x 10' BAR & GRILL
TABLE OF CONTENTS
ASSeMBlY GUIde
� � � � � � � � � � � � � � � � � � � � � � � � � � � � � � � � � � � � � � � � � � � � � � �
USING YoUR BlACKSToNe
IMPORTANT:
This instruction manual contains important
information necessary for the proper assembly and safe
use of the appliance.
Read and follow all warnings and instructions before
assembling and using the appliance.
Follow all warnings and instructions when using
the appliance.
Keep this manual for future reference.
Installer/Assembler: leave these instructions with the consumer�
BLACKSTONEPRODUCTS.COM/SUPPORT
� � � � � � � � � � � � � � � � � � � � � � � � � � � � � � � � � � �
| CoNTACT CUSToMeR SUPPoRT BeFoRe ReTURNING APPlIANCe To ReTAIleR�
For the latest version of this manual,
scan this code or visit
02
BlackstoneProducts.com/support
13
SAFETY ALERT KEY
dANGeR
⚠
Indicates a hazardous situation
that, if not avoided, will result in
death or serious injury�
CAUTIoN
⚠
Indicates a hazardous situation
that, if not avoided, could result
in minor or moderate injury�
WARNING
⚠
Indicates a hazardous situation
that, if not avoided, could result
in death or serious injury�
NOTICE
Indicates information considered
important, but not hazard-
related (e�g� messages related to
property damage)�
01
Advertisement
Table of Contents

Subscribe to Our Youtube Channel
Summary of Contents for Black Stone 6000
- Page 1 Model: 6000 oWNeR’S MANUAl 10' x 10' BAR & GRILL TABLE OF CONTENTS For the latest version of this manual, scan this code or visit ASSeMBlY GUIde � � � � � � � � � � � � � � � � � � � � � � � � � � � � � � � � � � � � � � � � � � � � � � �...
-
Page 2: Assembly Guide
OWNER’S MANUAL | ASSEMBLY GUIDE Model: 6000 ASSEMBLY GUIDE PARTS LIST } Post 1 (1 piece) } Post 2 (1 piece) } Post 3 (1 piece) } Post 4 (1 piece) } Post 5 (1 piece) } Post 6 (1 piece) -
Page 3: Tools Included
Model: 6000 ASSEMBLY GUIDE | OWNER’S MANUAL } Roof panel } Roof panel } Roof panel } Roof panel 5 } Roof panel 6 } Roof panel 2 (1 piece) 3 (1 piece) 4 (1 piece) (2 pieces) (2 pieces) -
Page 4: Electric Requirements
OWNER’S MANUAL | ASSEMBLY GUIDE Model: 6000 ASSeMBlY INSTRUCTIoNS For ease of assembly, it is recommended to have 3 or more people and allow enough time to completely finish the assembly� Find a large, clean area to assemble your appliance�... - Page 5 Model: 6000 ASSEMBLY GUIDE | OWNER’S MANUAL Use eight (8) [CC] bolts, eight (8) [HH] washers, and eight Use eight (8) [AA] bolts and eight (8) [FF] flat washers STEP 05 STEP 06 [KK] plastic caps to attach the {...
- Page 6 OWNER’S MANUAL | ASSEMBLY GUIDE Model: 6000 Use four (4) [AA] bolts and four (4) [FF] flat washers to Use four (4) [AA] bolts and four (4) [FF] flat washers to STEP 09 STEP 10 attach cross beam connecter 1 { } to cross beam { }�...
- Page 7 Model: 6000 ASSEMBLY GUIDE | OWNER’S MANUAL Use four (4) [AA] bolts and four (4) [FF] flat washers to Use four (4) bolts and four (4) [FF] flat washers to attach one STEP 14 STEP 15 attach one (1) roof top rib assembly to the left and right cross beam (1) side panel 2 { } to the rear cross beam assemblies�...
- Page 8 OWNER’S MANUAL | ASSEMBLY GUIDE Model: 6000 Use four (4) [AA] bolts Use four (4) [AA] bolts STEP 18 STEP 19 and four (4) [FF] flat washers and four (4) [FF] flat washers to attach shelf 2 { } to the {...
- Page 9 Model: 6000 ASSEMBLY GUIDE | OWNER’S MANUAL Note: do NoT tighten Use four (4) [AA] bolts STEP 22 STEP 23 the bolts completely until all the and four (4) [FF] flat washers to bolts and washers are properly attach shelf brace 3 { } to the installed�...
- Page 10 OWNER’S MANUAL | ASSEMBLY GUIDE Model: 6000 Note: do NoT tighten the bolts completely until all the bolts Use four (4) [CC] bolts, four (4) [FF] flat washers, and four (4) STEP 26 STEP 27 and washers are properly installed�...
- Page 11 Model: 6000 ASSEMBLY GUIDE | OWNER’S MANUAL Use six (6) [CC] bolts, six (6) [FF] flat washers, and six Use six (6) [CC] bolts, six (6) [FF] flat washers, and six (6) [JJ] STEP 30 STEP 31 [JJ] sealant washers to attach one (1) roof panel 6 {...
- Page 12 OWNER’S MANUAL | ASSEMBLY GUIDE Model: 6000 OUTDOOR STRUCTURE ANCHORING GUIDE Use four (4) [GG] expansion bolts to anchor each post STEP 33 foot base { }� WARNING ⚠ Slide the peg of one (1) foot cover { } into the key hole of one (1) foot If your BLACKSTONE BAR &...
- Page 13 Model: 6000 USING YOUR BLACKSTONE | OWNER’S MANUAL USING YOUR BLACKSTONE BLACKSTONE BACKYARD BAR & GRILL enjoy using your BLACKSTONE BAR & GRILL! The North Atlantic Imports STEP 35 parts up to one year after t LIMITED WARRANTY (light string not included)
- Page 14 OWNER’S MANUAL | Model: 6000 BLACKSTONEPRODUCTS.COM/SUPPORT...
- Page 15 Model: 6000 | OWNER’S MANUAL This page intentionally left blank BLACKSTONEPRODUCTS.COM/SUPPORT...
- Page 16 This product may be covered by one or more issued U�S� and/or international patents and may include patent applications pending� For more information, please visit: BlackstoneProducts�com/patents dISTRIBUTed BY NoRTH ATlANTIC IMPoRTS, llC 1073 W 1700 N loGAN, UT 84321 USA | BlACKSToNe IS A ReGISTeRed TRAdeMARK oF NoRTH ATlANTIC IMPoRTS, llC ©2023 NoRTH ATlANTIC IMPoRTS�...
- Page 17 Modèle: 6000 MANUel dU PRoPRIÉTAIRe BAR ET GRILL 10' X 10' TABLE DES MATIÈRES Pour obtenir la dernière version de ce manuel, scannez ce code ou visitez GUIde d’ASSeMBlAGe � � � � � � � � � � � � � � � � � � � � � � � � � � � � � � � � � � � � � � � � � � �...
-
Page 18: Guide D'assemblage
MANUEL DU PROPRIÉTAIRE | GUIDE D’ASSEMBLAGE Modèle: 6000 GUIDE D’ASSEMBLAGE LISTE DES PIÈCES } Poteau 1 (1 pièce) } Poteau 2 (1 pièce) } Poteau 3 (1 pièce) } Poteau 4 (1 pièce) } Poteau 5 (1 pièce) } Poteau 6 (1 pièce) } Poteau 7 (1 pièce) -
Page 19: Outils Inclus
Modèle: 6000 GUIDE D’ASSEMBLAGE | MANUEL DU PROPRIÉTAIRE } Panneau de toit } Panneau de toit } Panneau de toit } Panneau de toit 5 } Panneau de toit 6 } Panneau de toit 2 (1 pièce) 3 (1 pièce) 4 (1 pièce) -
Page 20: Instructions De Montage
MANUEL DU PROPRIÉTAIRE | GUIDE D’ASSEMBLAGE Modèle: 6000 INSTRUCTIoNS de MoNTAGe Pour faciliter l’assemblage, il est recommandé d’avoir 3 personnes ou plus et de prévoir suffisamment de temps pour terminer complètement l’assemblage� Trouvez une grande surface propre pour assembler votre appareil�... - Page 21 Modèle: 6000 GUIDE D’ASSEMBLAGE | MANUEL DU PROPRIÉTAIRE Utilisez huit (8) boulons [CC], huit (8) rondelles [HH] et huit (8) capu- Utilisez huit (8) boulons [AA] et huit (8) rondelles plates [FF] pour fixer ÉTAPE 05 ÉTAPE 06 chons en plastique [KK] pour fixer l’ensemble de traverse {...
- Page 22 MANUEL DU PROPRIÉTAIRE | GUIDE D’ASSEMBLAGE Modèle: 6000 Utilisez quatre (4) boulons [AA] et quatre (4) rondelles plates [FF] pour Utilisez quatre (4) boulons [AA] et quatre (4) rondelles plates [FF] pour ÉTAPE 09 ÉTAPE 10 fixer le connecteur de traverse 1 { } à...
- Page 23 Modèle: 6000 GUIDE D’ASSEMBLAGE | MANUEL DU PROPRIÉTAIRE Utilisez quatre (4) boulons [AA] et quatre (4) rondelles plates [FF] pour Utilisez quatre (4) boulons et quatre (4) rondelles plates [FF] pour fixer ÉTAPE 14 ÉTAPE 15 fixer un (1) ensemble de nervure de toit aux ensembles de traverses gauche un (1) panneau latéral 2 {...
- Page 24 MANUEL DU PROPRIÉTAIRE | GUIDE D’ASSEMBLAGE Modèle: 6000 Utilisez quatre (4) boulons Utilisez quatre (4) boulons ÉTAPE 18 ÉTAPE 19 [AA] et quatre (4) rondelles plates [AA] et quatre (4) rondelles plates [FF] pour fixer la tablette 2 { } aux [FF] pour fixer l’étagère 3 {...
- Page 25 Modèle: 6000 GUIDE D’ASSEMBLAGE | MANUEL DU PROPRIÉTAIRE Remarque: Ne serrez pas Utilisez quatre (4) boulons ÉTAPE 22 ÉTAPE 23 complètement les boulons tant que [AA] et quatre (4) rondelles plates [FF] tous les boulons et rondelles ne sont pour fixer le renfort d’étagère 3 { } à...
- Page 26 MANUEL DU PROPRIÉTAIRE | GUIDE D’ASSEMBLAGE Modèle: 6000 Remarque: Ne serrez pas complètement les boulons tant que tous les Utilisez quatre (4) boulons [CC], quatre (4) rondelles plates [FF] ÉTAPE 26 ÉTAPE 27 boulons et rondelles ne sont pas correctement installés�...
- Page 27 Modèle: 6000 GUIDE D’ASSEMBLAGE | MANUEL DU PROPRIÉTAIRE Utilisez six (6) boulons [CC], six (6) rondelles plates [FF] et six (6) Utilisez six (6) boulons [CC], six (6) rondelles plates [FF] et six ÉTAPE 30 ÉTAPE 31 rondelles d’étanchéité [JJ]...
- Page 28 MANUEL DU PROPRIÉTAIRE | GUIDE D’ASSEMBLAGE Modèle: 6000 GUIDE D’ANCRAGE DE STRUCTURE EXTÉRIEURE Utilisez quatre (4) boulons à expansion [GG] pour ancrer chaque base ÉTAPE 33 de pied de poteau { }� AVeRTISSeMeNT ⚠ Faites glisser la cheville d’un (1) couvre-pied { } dans le trou de serrure d’un (1)
- Page 29 Modèle: 6000 UTILISATION DE VOTRE BLACKSTONE | MANUEL DU PROPRIÉTAIRE UTILISATION DE VOTRE BLACKSTONE GARANTIE LIMITÉE BLACKSTONE BACKYARD BAR & GRILL Profitez de votre BLACKSTONE BAR & GRILL! la garantie d’un an de North At ÉTAPE 35 rechange jusqu’à un an après l (guirlande lumineuse non incluse) Blackstone Products garantit ce Backyard Bar and Grill contre les défauts de...
-
Page 30: Manuel Du Propriétaire
MANUEL DU PROPRIÉTAIRE | Modèle: 6000 Cette page a été intentionnellement laissée vierge BLACKSTONEPRODUCTS.COM/SUPPORT... - Page 31 Modèle: 6000 | MANUEL DU PROPRIÉTAIRE Cette page a été intentionnellement laissée vierge BLACKSTONEPRODUCTS.COM/SUPPORT...
- Page 32 Ce produit peut être couvert par un ou plusieurs brevets américains et/ou internationaux délivrés et peut inclure des demandes de brevet en instance� Pour plus d’informations, rendez-vous sur: BlackstoneProducts�com/patents dISTRIBUÉ PAR NoRTH ATlANTIC IMPoRTS, llC 1073 W 1700 N loGAN, UT 84321 USA | BlACKSToNeeST UNe MARQUe dÉPoSÉe de NoRTH ATlANTIC IMPoRTS, llC ©2023 NoRTH ATlANTIC IMPoRTS�...
- Page 33 Modelo: 6000 MANUAl del PRoPIeTARIo BAR Y PARRILLA DE 10' X 10' TABLA DE CONTENIDO Para obtener la última versión de este manual, escanee este código o visite GUÍA de MoNTAJe BlackstoneProducts.com/support � � � � � � � � � � � � � � � � � � � � � � � � � � � � � � � � � � � � � � � � � � � � � � �...
-
Page 34: Lista De Partes
MANUAL DEL PROPIETARIO | GUÍA DE MONTAJE Modelo: 6000 GUÍA DE MONTAJE LISTA DE PARTES } Publicación 1 (1 pieza) { } Publicación } Publicación } Publicación } Puesto 5 (1 pieza) } Puesto 6 (1 pieza) 2 (1 pieza) - Page 35 Modelo: 6000 GUÍA DE MONTAJE | MANUAL DEL PROPIETARIO } Panel de techo } Panel de techo } Panel de techo } Panel de techo 5 } Panel de techo 6 } Panel de techo 2 (1 pieza) 3 (1 pieza)
-
Page 36: Instrucciones De Montaje
MANUAL DEL PROPIETARIO | GUÍA DE MONTAJE Modelo: 6000 INSTRUCCIoNeS de MoNTAJe Para facilitar el montaje, se recomienda contar con 3 o más personas y dejar suficiente tiempo para terminar completamente el montaje� encuentre un área grande y limpia para ensamblar su electrodoméstico�... - Page 37 Modelo: 6000 GUÍA DE MONTAJE | MANUAL DEL PROPIETARIO Utilice ocho (8) pernos [CC], ocho (8) arandelas [HH] y ocho (8) tapas Utilice ocho (8) pernos [AA] y ocho (8) arandelas planas [FF] para unir PASO 05 PASO 06 de plástico...
- Page 38 MANUAL DEL PROPIETARIO | GUÍA DE MONTAJE Modelo: 6000 Use cuatro (4) pernos [AA] y cuatro (4) arandelas planas [FF] para unir Use cuatro (4) pernos [AA] y cuatro (4) arandelas planas [FF] para unir PASO 09 PASO 10 el conector 1 de la viga transversal { } a la viga transversal { }�...
- Page 39 Modelo: 6000 GUÍA DE MONTAJE | MANUAL DEL PROPIETARIO Use cuatro (4) pernos [AA] y cuatro (4) arandelas planas [FF] para Utilice cuatro (4) pernos y cuatro (4) arandelas planas [FF] para fijar PASO 14 PASO 15 unir un (1) ensamblaje de costilla superior del techo a los ensamblajes de viga un (1) panel lateral 2 { } a los conjuntos de vigas transversales traseras�...
- Page 40 MANUAL DEL PROPIETARIO | GUÍA DE MONTAJE Modelo: 6000 Use cuatro (4) pernos [AA] Use cuatro (4) pernos [AA] PASO 18 PASO 19 y cuatro (4) arandelas planas [FF] cuatro (4) arandelas planas [FF] para para sujetar el estante 2 {...
- Page 41 Modelo: 6000 GUÍA DE MONTAJE | MANUAL DEL PROPIETARIO Nota: No apriete los pernos Utilice cuatro (4) pernos [AA] PASO 22 PASO 23 por completo hasta que todos los y cuatro (4) arandelas planas [FF] pernos y arandelas estén correcta- para sujetar la abrazadera del estante mente instalados�...
- Page 42 MANUAL DEL PROPIETARIO | GUÍA DE MONTAJE Modelo: 6000 Nota: No apriete los pernos por completo hasta que todos los pernos Utilice cuatro (4) pernos [CC], cuatro (4) arandelas planas [FF] PASO 26 PASO 27 y arandelas estén correctamente instalados�...
- Page 43 Modelo: 6000 GUÍA DE MONTAJE | MANUAL DEL PROPIETARIO Utilice seis (6) pernos [CC], seis (6) arandelas planas [FF] y seis (6) Utilice seis (6) pernos [CC], seis (6) arandelas planas [FF] y seis (6) PASO 30 PASO 31 arandelas selladoras...
- Page 44 MANUAL DEL PROPIETARIO | GUÍA DE MONTAJE Modelo: 6000 GUÍA DE ANCLAJE DE ESTRUCTURAS EXTERIORES Use cuatro (4) pernos de expansión [GG] para anclar la base de cada PASO 33 poste { }� AdVeRTeNCIA ⚠ deslice la clavija de una (1) cubierta de pie { } en el ojo de cerradura de una (1) Si su BLACKSTONE BAR &...
- Page 45 Modelo: 6000 USANDO SU BLACKSTONE | MANUAL DEL PROPIETARIO USANDO SU BLACKSTONE BLACKSTONE BACKYARD BAR & GRILL ¡disfruta usando tu BLACKSTONE BAR & GRILL! la garantía de 1 año de North A PASO 35 hasta un año después de la fec (cadena de luz no incluida) GARANTÍA LIMITADA...
-
Page 46: Manual Del Propietario
MANUAL DEL PROPIETARIO | Modelo: 6000 esta página se dejó en blanco intencionalmente BLACKSTONEPRODUCTS.COM/SUPPORT... - Page 47 Modelo: 6000 | MANUAL DEL PROPIETARIO esta página se dejó en blanco intencionalmente BLACKSTONEPRODUCTS.COM/SUPPORT...
- Page 48 este producto puede estar cubierto por una o más patentes estadounidenses y/o internacionales emitidas y puede incluir solicitudes de patentes pendientes� Para obtener más información, visite: BlackstoneProducts�com/patents dISTRIBUIdo PoR NoRTH ATlANTIC IMPoRTS, llC 1073 W 1700 N loGAN, UT 84321 USA | BlACKSToNe eST eS UNA MARCA ReGISTRAdA de NoRTH ATlANTIC IMPoRTS, llC ©2023 NoRTH ATlANTIC IMPoRTS�...
Need help?
Do you have a question about the 6000 and is the answer not in the manual?
Questions and answers