Table of Contents
Advertisement
Quick Links
Important Information
i
Warning
i
Cautions
Setting Up the Player
1
Check Accessories with Player
1
Insert Batteries in Remote
1
Connect Player
1
Turn on TV
2
Turn on Player
2
Load a Disc
Remote Control
4-5
Buttons
Playing a Disc
6-7
On-Screen Displays
8
Display On/Off Feature
8
Theatre Mode
9
Last Memory Feature
10-11 Searching by Chapter (Track), Time,
or Frame
12
Intro and Hi-Lite Scan
13
Variable Speed Playback
13
Still Frame and Frame Advance
Reference Section
22-24 Location of Controls (Front Panel,
Display Panel, and Back Panel)
24
Choosing a Hookup
25
Connect Player to TV Monitor (or VCR)
With AUDIO/VIDEO IN Jacks
26
Connect Player to TV Without
Audio/Video Inputs
27
Connect Player to Amplifier/Receiver
Model PSLD46
i
Information to User
i
Product Registration
3
Play a Disc
3
Pause Playback Temporarily
3
Remove Disc from the Player
3
Turn off Player
14
Manual (Visual) Scanning
15
Random Playback
16-17 Repeat Playback
18-19 Program Playback
20
Select Audio on Laser Discs
21
Select Audio on Compact Discs
21
CX Noise Reduction System
21
Listening for a Lifetime
28
Types of Discs That Can Be Played
29
Glossary
30
Care of Player and Discs
31-33 Trouble Checks
34
Customer Assistance and Service
34-35 Limited Warranty
36
Specifications
37
Index
Advertisement
Table of Contents

Summary of Contents for ProScan PSLD46
-
Page 1: Important Information
Connect Player to TV Monitor (or VCR) With AUDIO/VIDEO IN Jacks Connect Player to TV Without Audio/Video Inputs Connect Player to Amplifier/Receiver Model PSLD46 Information to User Product Registration Play a Disc Pause Playback Temporarily Remove Disc from the Player... -
Page 2: Product Registration
Model No._____________________________________________________________________ Serial No. _____________________________________________________________________ Purchase Date: ________________________________________________________________ Dealer/Address/Phone: ________________________________________________________ _______________________________________________________________________________ PSLD46 WARNING To reduce the risk of fire or shock hazard, do not expose this LaserDisc player to rain or moisture. CAUTION: To prevent electric shock, match wide blade of plug to wide slot, fully insert. - Page 3 Setting Up the Player Startup 1. Check accessories with player. Contact your dealer if any items are missing. POWER AUDIO PROGRAM SCAN FRAME ADVANCE Remote (Stock No. 221368) 2. Insert batteries in remote. 3. Connect player. • Connect the player to a TV monitor (or VCR) with page 25.
-
Page 4: Load A Disc
Setting Up the Player Startup 5. Turn on the player. A. Press POWER on player or remote. 6. Load a disc. A. Press OPEN•CLOSE CD or LD on the player to open the appropriate disc table — CD (compact disc) or LD (laser disc). the disc table is opening or closing. -
Page 5: Pause Playback Temporarily
Setting Up the Player Startup 7. Play the disc. A. Press OPEN•CLOSE CD or LD on the player to close the disc table. B. Press PLAY. that is playing in the display panel. You can also press PLAY to close the disc table and start playing the disc. -
Page 6: Remote Control
Remote Control Buttons POWER REPEAT A•B AUDIO PROGRAM CHAP•TIME SPEED HI - LITE RANDOM INTRO SCAN PLAY CHAP•TRACK SRCH FRAME ADVANCE SCAN STOP REPEAT CLEAR DISPLAY SELECT PAUSE SCAN DISC SIDE AUDIO Selects type of audio (digital, analog, stereo, left channel, or right channel). - Page 7 Remote Control Buttons HI-LITE INTRO Starts hi-lite scan on CDs and audio portion of CDVs. Starts intro scan on laser discs and video portions of CDVs. Number Buttons (0 Through 9 and +10) Use these buttons to direct search for a chapter (track). Also used during programming.
-
Page 8: Playing A Disc
Playing a Disc Playback Features On-Screen Displays Status displays appear automatically on the TV screen whenever the disc player is turned on, changes functions, or performs special functions. More information can be displayed about the disc that is playing. The type of disc determines the information and number of displays. - Page 9 Playing a Disc Playback Features On-Screen Displays Compact Disc (CD) and Audio Portion of Compact Video Disc (CDV) 1. Press DISPLAY while the disc is playing to display the current track number, elapsed play time of current track, and audio mode. The track numbers appear on the screen.
-
Page 10: Display On/Off Feature
Playing a Disc Playback Features Display On/Off Feature The DISPLAY OFF button turns the fluorescent display panel and on-screen displays on and off. Turning off the display panel may prevent low levels of noise from affecting the audio. 1. Press DISPLAY OFF on the player to turn off the display panel and on- screen displays. - Page 11 Playing a Disc Playback Features Last Memory Feature – Laser Disc (LD) The player remembers where you are on the laser disc that is playing when you press STOP or POWER. The player must be plugged into an outlet that has power to it at all times for the last memory feature to operate.
-
Page 12: Search By Chapter (Track), Time, Or Frame
Playing a Disc Playback Features Search by Chapter (Track), Time, or Frame Search For a Particular Chapter (Track) on Laser (LD) and Compact (CD) Discs 1. Direct Search: Enter the chapter (track) number by pressing the corresponding number(s) on the remote. For example, press 3 to play chapter (track) 3. - Page 13 Playing a Disc Playback Features Search by Chapter (Track), Time, or Frame Search For a Certain Time on Extended Play (CLV) Laser Discs and Video Portions of Compact Video Discs (CDV) 1. During playback, press CHAP•TIME on remote. 2. Enter the time using numbers on the remote. For example, for 12 minutes and 15 seconds, press 1, then 2, then 1, then 5.
-
Page 14: Intro And Hi-Lite Scan
Playing a Disc Playback Features Intro and Hi-Lite Scan Intro Scan on Laser and Video Portion of CDV Discs You can search all the chapters on the disc. The player will play a few seconds of the beginning of each chapter. 1. - Page 15 Playing a Disc Playback Features Variable-Speed Playback – Standard Play (CAV) Disc Only During playback of a standard play disc, you can vary the speed in reverse or forward playback. The sound is turned off during variable-speed playback. 1. Press SPEED SELECT normal speed in the forward direction or SPEED SELECT to play the disc at 1/8th the normal speed...
-
Page 16: Manual (Visual) Scanning
Playing a Disc Playback Features Manual (Visual) Scanning During playback, you can visually search (scan) forward or in reverse for a particular segment at a faster than normal speed using SCAN is muted or heard at a low level during scanning. Search Using the SCAN Shuttle on the Remote Rotate the SCAN shuttle on the remote to the right to search forward or to the left to search in reverse at three different... -
Page 17: Random Playback
Playing a Disc Playback Features Random Playback Laser discs having table of contents, CDs, and CDVs can be played back in random order. 1. Press PLAY and then press RANDOM on the remote. RDM appears in the display panel and RANDOM appears on the TV screen. -
Page 18: Repeat Playback
Playing a Disc Playback Features Repeat Playback During playback, the player will return to a specified point, repeatedly play a specified section, chapter (track), program, one side of the disc, or both sides of a laser disc. Return to a Specified Point (Memory Repeat) 1. - Page 19 Playing a Disc Playback Features Repeat Playback Repeat One Side of the Disc 1. Press REPEAT twice on the remote while the side is playing. S – RPT appears in the player’s display panel and REPEAT SIDE – A or B appears on the TV screen. The entire side is played over and over.
-
Page 20: Program Playback
Playing a Disc Playback Features Program Playback The disc player can be programmed to play back a maximum of 24 chapters (tracks) on laser discs, CDs, and CDVs in the order you select. 1. Press PROGRAM on the remote to display the program menu. - Page 21 Playing a Disc Playback Features Program Playback Press SCAN on the remote counterclockwise to search in reverse during program playback. Release to return to program playback. If the player moves to the previous chapter (track) in the program, playback will return to the beginning of the chapter (track) that was playing when searching began.
-
Page 22: Select Audio On Laser Discs
Playing a Disc Playback Features Select Audio on Laser Discs Some laser discs with digital audio also have analog audio encoded on the disc. Some laser discs having the different channels. To Select the Audio You Want to Listen To 1. -
Page 23: Select Audio On Compact Discs
Playing a Disc Playback Features Select Audio on Compact Discs You can listen to both channels (stereo), the right channel, or the left channel of audio on compact discs. To Select the Audio You Want to Listen To 1. During playback, press AUDIO on the remote. •... -
Page 24: Location Of Controls
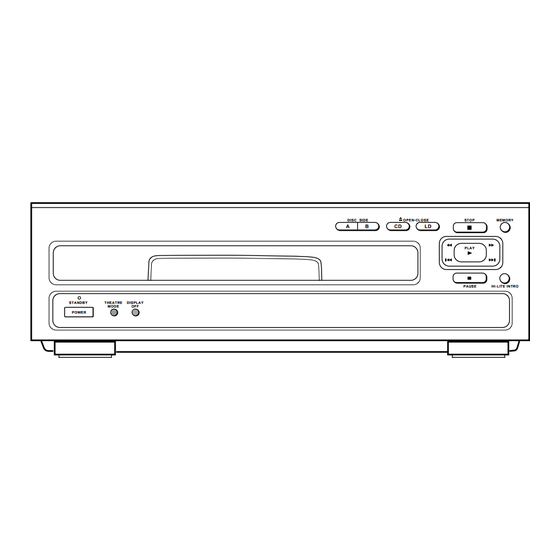
References Location of Controls Front Panel LD Disc Table Advances playback to the previous or next chapter (track) on the disc that is playing. Searches (scans) visually forward or in reverse at faster than normal speed. DISC SIDE A or B Plays only side A or B of a two-sided laser disc. -
Page 25: Display Panel
References Location of Controls Display Panel 1/L (Left) and 2/R (Right) Show the channel the audio is coming from. See pages 20 and 21. CHP/TRK Number Displays chapter (track) number that is playing. Information and Status Displays Gives information about what the player is doing or shows the status of the player. -
Page 26: Choosing A Hookup
References Location of Controls Back Panel AC-3 RF OUT V I D E O AC-3 RF OUT Jack This jack is for future use with Dolby AC-3 components. This jack cannot be used to playback current disc. Caution: Do not connect the audio input jacks of a normal stereo or amplifier to this jack. - Page 27 References Connection A TV Monitor (or VCR) With AUDIO/VIDEO IN Jacks. 1. Connect the player to a TV monitor (or VCR) as shown. If your TV or VCR has an S-VIDEO IN connector, connect it to the Caution: Unauthorized S-VIDEO OUT connector on the player. An optional S-VHS cable is required. copying, broadcasting, renting, or public per- If your TV (or VCR) has monaural audio, connect the AUDIO jack on the TV...
- Page 28 References Connection B TV Without Audio/Video Inputs 1. Connect the player using an optional RF output adapter (such as LD1150*) and an optional RF cable (such as AH065G*) as shown. Optional: You also may want to connect the player to an amplifier/receiver as shown on page 27.
-
Page 29: Optional Connection
References Optional Connection Amplifier/Receiver This connection lets you play CDs without turning on the TV or provides stereo audio if your TV is not stereo. 1. Connect the player to the amplifier/receiver as shown. This connection requires additional cables not provided.* Optional: To get the full benefit of the player’s superior digital sound reproduction, attach the OPTICAL DIGITAL OUT terminal to a compatible OPTICAL DIGITAL IN terminal on a compatible amplifier/receiver with an... -
Page 30: Types Of Discs That Can Be Played
References Types of Discs That Can Be Played The player can play back any of the disc types shown in the chart. The identifying symbols shown are normally printed on the label or jacket of the compatible disc. Discs Identifiying Type of Discs Symbols CD (Compact Disc) - Page 31 References Glossary Analog Audio Analog audio is a standard method of recording audio used on all laser discs. CAV (Standard Play) A video recording system is used where signals are recorded on the disc one frame (picture) per disc revolution, and the disc is played at a fixed rotational speed (CAV = Constant Angular Velocity) of 1,800 rpm (revolutions per minute).
-
Page 32: Care Of Player And Discs
References Care of Player and Discs Cleaning the Player Use a soft cloth or the dusting attachment of your vacuum cleaner to dust the exposed surface of the player. Use the vacuum cleaner attachment to remove dust from the ventilation holes on the top, back, sides, and bottom of the cabinet. -
Page 33: Trouble Checks
References Trouble Checks Sometimes problems can be easily solved by checking a few basic things. Check below before you call for help or take your player to an Authorized ProScan LaserDisc Player Servicenter. Trouble When Laser Disc Is Playing Disc table does not open when OPEN•CLOSE CD... - Page 34 References Trouble Checks Trouble When Laser Disc Is Playing Disc is rotating but there is no picture Picture continually moves vertically Disc does not play back properly or playback stops in the middle of the disc No audio during playback Picture “jitters”...
- Page 35 References Trouble Checks Trouble When CD Is Playing Cannot hear audio Sound is distorted Portion of disc is repeated Service code appears in display panel and on TV screen (U1, U2, F5, P2, L3, E4, H0, H1, H2, or A0) Here's What to Try: •...
-
Page 36: Limited Warranty
References Customer Assistance & Service You can reach Thomson at the Our toll-free LaserDisc number operates from 8 a.m. to 5 p.m., Thomson provides a toll-free telephone number to help you with any problems you may encounter with your player. Many can be diagnosed over the phone, and if necessary, a replacement unit can be shipped to you. - Page 37 References Limited Warranty To receive a replacement LaserDisc player before you return yours: If you are located near an exchange point: 1. We will send a replacement unit to our exchange point next business day delivery. 2. The exchange location will notify you of its arrival.
-
Page 38: Specifications
References Specifications General System ......Laser disc system and compact disc digital audio system Laser ...Semiconductor laser wavelength 780 nm Power requirements U.S. - Page 39 References Index 1/L Indicator ......20,21,23 2/R Indicator ......20,21,23 AC-3 RF OUT Jack .
- Page 40 We are committed to your complete satisfaction and viewing enjoyment. If you have a question or want information about your ProScan product, call our friendly toll-free number listed below. We’re ready to help you Monday through Friday, 9 a.m. to 6 p.m. EST, year round.
Need help?
Do you have a question about the PSLD46 and is the answer not in the manual?
Questions and answers