Table of Contents
Advertisement
Advertisement
Chapters
Table of Contents

Related Manuals for SureShot MGI Ai Series


Summary of Contents for SureShot MGI Ai Series
- Page 1 Digital Manual VERSION 1.0...
- Page 2 THANK YOU FOR PURCHASING MGI Ai NAVIGATOR GPS To get the most out of your Ai Navigator GPS please follow these quick steps before use. Register your Ai Navigator GPS via the Top Handle [Refer to registration doc.] Assembling the Ai Navigator GPS [section 3.0] Charging the battery [section 4.0] For Customer Support, please contact MGI directly for immediate...
-
Page 3: Table Of Contents
Contents 1.0 Registration 2.0 What Is Included 3.0 Assembling Your Ai Navigator GPS 3.1 Attaching the Rear Wheels 3.2 Attaching the Front Wheels 3.3 Rear Wheel Positions 3.4 Fifth Foldable Rear 3.5 Unfolding 3.6 Folding 3.7 Inverting Rear Wheels 4.0 Battery Charging; Connection 4.1 Battery Charge 4.2 Connecting the Battery onto the Ai Navigator GPS 4.3 Charging the Battery After Use... - Page 4 9.0 Warranty 9.1 Warranty Policy 9.2 Warranty Exclusions 9.3 Parts Installed During Warranty 10.0 Preventative Maintenance Program 10.1 Cleaning Your Ai Navigator GPS 10.2 Rear Wheel Axles Maintenance 10.3 Upper and Lower Bag Strap 10.4 Correcting the Alignment 10.5 MGI Service Schedule 10.6 Service Record 11.0 Service and Repair Centres 12.0 Purchasing Parts and Accessories...
-
Page 5: Registration
1. 0 REGISTRATION It is important you register your MGI Ai Navigator GPS immediately via the Top Handle. Registration allows you to: • Record your Ai Navigator GPS for warranty purposes • Speeds up any servicing required on your Ai Navigator GPS •... -
Page 6: Assembling Your Ai Navigator Gps
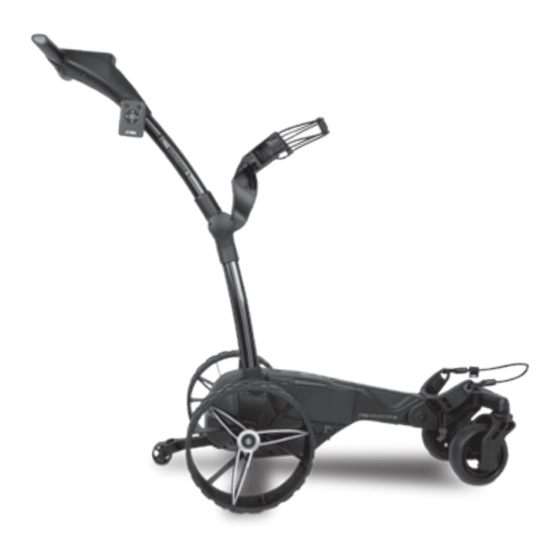
3.0 ASSEMBLING YOUR Ai NAVIGATOR GPS 3.1 ATTACHING THE REAR WHEELS First, lubricate both axles using the axle lubricant cloth provided in the MGI Pouch. Lubrication of the axles should be performed regularly to keep your cart in optimal condition. Press the black release button on the wheel hub. -
Page 7: Attaching The Front Wheels
3.2 ATTACHING THE FRONT WHEELS The two front wheels need to be attached to your MGI Ai Navigator . There is no difference between each front wheel so either can be placed on the left or right side. Lubricate the axles with the Lubricant Cloth in the MGI Pouch. -
Page 8: Fifth Foldable Rear
i. Drive position – Lock the wheel onto the groove closest to the battery base. To do this, press the black release button on the wheel hub, push the wheel onto the axle as far as possible and pull back until the wheel clicks into place. -
Page 9: Unfolding
3.5 UNFOLDING Please see below the steps to unfold an Ai Navigator GPS STEP 1: Depress the blue toggle to unlock the Top Bag Support. STEP 2: Unfold the Top Bag Support until it is vertical, as per the image. MGI Ai NAVIGATOR GPS User Manual 1.0... -
Page 10: Folding
STEP 3: The handle is now free to pull upwards. The handle will naturally unfold as you continue to pull until the handle is completely open. The front wheels will unfold simultaneously as the handle is lifted into position. STEP 4: Position handle to desired height then push the bag support forward until it clicks into place. -
Page 11: Inverting Rear Wheels
STEP 2: Push handle forward until top bag support touches chassis. The front wheels will fold under the cart as the handle is folded down. STEP 3: Lower handlebar until touching chassis. STEP 4: Press and hold blue toggle and rotate top bag support backward until it clicks into position. -
Page 12: Battery Charging; Connection
4.0 BATTERY CHARGING & CONNECTION The MGI Ai Navigator GPS can only be used with the: • MGI 24v 380Wh Lithium battery. 4.1 BATTERY CHARGER • Before using your MGI Ai Navigator GPS for the first time you must fully charge the battery overnight. •... -
Page 13: Charging The Battery After Use
Your Ai Navigator GPS has been equipped with a fail-safe battery connection, so the Ai Navigator GPS will not move when you connect the battery. Your Ai Navigator GPS will only start after the screen turns on. (Which may take up to 30 seconds). The Ai Navigator can then be activated by the speed control button or remote control. -
Page 14: Operating The Digital Top Box
Please ensure the top bag support straps are hooked in place securely before releasing. Failure to do so could result in injury to the user and/or damage to the Ai Navigator GPS 6.0 OPERATING THE DIGITAL TOP BOX Please see separate Top Box user manual for further detail on all functions. -
Page 15: Turn The Ai Navigator Gps
4. Another tap will stop the Ai Navigator GPS and the speed setting will revert to 4. 5. The desired speed can be altered up or down while the Ai Navigator GPS is moving. 6. To activate the park brake stop the Ai Navigator GPS by pressing the speed control button. -
Page 16: Unit Measurements
6.4 UNIT MEASUREMENTS You can change from metres / kilometres / yards / miles simply by pressing the Golf Menu on the home screen and selecting the appropriate units. For more information, please refer to the Top Box Manual. 6.5 DISTANCE MODES There are three distance measurement modes. -
Page 17: Remote Control
7.0 REMOTE CONTROL PLEASE NOTE: Your remote control is located in your MGI Pouch, along with the remote holder clip. MODEL: NAVIGATOR Ai Remote FCC ID : 2BA2LG7GPS IC : 30328-G7GPS CAN ICES-3 (B)/NMB-3(B) This device complies with Part 15 of the FCC Rules. Operation is subject to the following two conditions: 1. -
Page 18: Forward Arrow
• Blinking Green (Plugged In): Device is Charging and above 75% • Solid Green (Plugged In): Device is fully charged. • Alternating Red & Blue: Battery is below 25% and Searching For Bluetooth connection. • Orange Light: Locked 7.3 FORWARD ARROW Press the forward button to start and accelerate the Ai Navigator . -
Page 19: Remote Range And Safety Stop
This will help eliminate accidental button inputs when storing the remote in your pocket. The STOP button will continue to work, when the LOCK feature is activated. 7.8 REMOTE RANGE AND SAFETY STOP The Ai Navigator GPS can be remotely controlled by up to 100m. If the remote control loses contact with the Ai Navigator GPS , then the automatic safety stop will initiate after five seconds. -
Page 20: Warranty Exclusions
Duration of this warranty is: – 3 years on parts* – 3 years on Lithium batteries and chargers *MGI or an authorised service centre will repair or replace any parts found to be defective in materials or workmanship under normal use provided that: 1. -
Page 21: Parts Installed During Warranty
• All implied warranties [save those preserved by statute] are excluded. • Liability for consequential damages under any and all warranties are excluded to the extent exclusion is permitted by law. In the event of submersion in water (partial or full) of your Ai Navigator GPS ;... -
Page 22: Preventative Maintenance Program
10.0 PREVENTATIVE MAINTENANCE PROGRAM To properly provide for the continued operation of your MGI Ai Navigator GPS , MGI has introduced its Preventative Maintenance Program [PMP]. The PMP consists of work to be carried out by both the owner and authorised service centres. -
Page 23: Correcting The Alignment
• Removing the left and right hand straps form the upper bag support. • Undo and remove the screws holding the strap in position on the bag support. • Remove and replace both bag straps. • Insert bag strap securing screws. 10.4 CORRECTING THE ALIGNMENT To access motor trimming hold down speed control button for five seconds. -
Page 24: Service Record
10.7 SERVICE RECORD Date: Serviced by: 6 month inspection Invoice #: Signature: Date: Serviced by: 1 year inspection Invoice #: Signature: Date: Serviced by: 1 ½ year inspection Invoice #: Signature: Date: Serviced by: 2 year inspection Invoice #: Signature: Date: Serviced by: 2 ½... -
Page 25: Service And Repair Centres
11.0 SERVICE AND REPAIR CENTRES For all servicing, please do not go back to your place of purchase. To find your nearest service centre visit www.mgigolf.com For warranty repairs to be authorised you MUST provide proof of purchase. Please keep this with you as well as your serial number you can record in this manual. -
Page 26: Mgi Contact Information
14.0 MGI CONTACT INFORMATION MGI AUSTRALIA Service Email: customerservice@mgigolf.com Live Chat: visit mgigolf.com Toll Free within Australia: 1300 644 523 (excludes mobiles) Western Australia/ Internal phone +61 3 8872 6700 Local Service Centres: visit mgigolf.com to locate you local service centre. MGI USA Service Email: serviceusa@mgigolf.com Live Chat: visit mgigolf.com... - Page 27 Top Box Manual VERSION 1.0...
- Page 28 Contents 1.0 Initial Set-up 1.1 First Bootup 1.2 Registration 1.3 App Download 2.0 The Home Screen 3.0 Golf Menu 3.1 Toggling Metres and Yards 3.2 Men/Women par selection 3.3 Registering Handicap 4.0 Play Golf 4.1 Course Selection 4.2 Round Timer 4.3 Score Keeping 4.4 Changing Hole 4.5 Distance Function...
- Page 29 6.12 Reverting to Default Settings 7.0 Ai Navigator GPS Status 7.1 Viewing Battery Status 7.2 Adjusting Screen Brightness 7.3 View Odometer & Maintenance 8.0 Miscellaneous 8.1 Sleep Mode 8.2 Trimming The Motors 9.0 Frequently Asked Questions MGI Ai Navigator GPS Top Box Manual 1.0...
-
Page 30: Initial Set-Up
1.0 INITIAL SET-UP 1.1 FIRST BOOT-UP • When powering on your Ai Navigator GPS , please note it will take a few moments to boot. • Next, the Ai Navigator GPS will need to be connected to a Wi-Fi network to update to the latest firmware version and to allow user registration. -
Page 31: App Download
MGI App. The App comes with maps, scoring and can be your MGI Sureshot handheld device which can be taken anywhere. When connected via Bluetooth you will receive notifications from your... -
Page 32: Golf Menu
• Tap Rounds to view round history (See Section 12.0 for further information). • Tap Settings to change your Ai Navigator GPS preferences (See Section 4.0 for further information). • Tap the FLAG icon to bring up the course map. •... -
Page 33: Play Golf
4.0 PLAY GOLF To get to the Play Golf screen, tap Play Golf from the main screen. 4.1 COURSE SELECTION The Ai Navigator GPS will display the closest golf courses. After selecting the preferred course, tapping it will take you to the below screen. -
Page 34: Score Keeping
4.3 SCORE KEEPING To enter the score in on each hole, tap the pencil symbol in the bottom right of the screen. You can select how many shots taken and you can also select how many putts taken. 4.4 CHANGING HOLE To change hole, tap the arrow after entering in the score for the hole as seen above. -
Page 35: Reporting A Mapping Issue
4.6 REPORTING A MAPPING ISSUE • Golf courses change continually; it is advised to report any inaccuracies as they are found. To do this, tap the Golf Menu from the main screen, then tap mapping request. • Once on the mapping request screen, tap Next to report the mapping issue, from there choose the hole on the course that requires correcting. -
Page 36: Rounds
5.0 ROUNDS 5.1 CHECKING COURSE PAR From the Home Screen tap the Golf Menu; from there tap the Scorecard option to see the par for each hole. Scores can also be entered from this screen. 5.2 VIEWING ROUND SUMMARIES • To enter your score for each hole, simply tap the hole, enter the number of strokes taken, then tap save. - Page 37 • To view the round summary for the course, go into the Golf Menu from the Home Screen then tap Round Summary. • In the Round Summary you can view statistics from your round including your score compared to par and percentage of shots hit on the fairway.
-
Page 38: Settings
6.0 SETTINGS 6.0 SELECT/CHANGE YOUR WI-FI CONNECTION • To select or change your Wi-Fi connection, tap the Settings option on the Home Screen, then tap the first option Wi-Fi. • After selecting the Wi-Fi option, all nearby Wi-Fi connections will populate. -
Page 39: Competition Mode
6.2 COMPETITION MODE • To activate competition mode, click the settings option from the main page. From here you can click the switch to turn the comp mode blue which indicates it has been turned on. 6.3 UPDATING A COURSE •... -
Page 40: Time Settings
6.5 TIME SETTINGS • To change the time Settings on your Ai Navigator GPS , tap the Settings option from the Home Screen then tap Time. From here you will be able to change your displayed time format, date format and adjust for Daylight Savings. -
Page 41: View Firmware Version
6.8 VIEW FIRMWARE VERSION • To learn more about your Ai Navigator GPS , select Settings from the Home Screen and then tap About. • The About section will show you information about your Ai Navigator GPS such as the current firmware version and the Serial Number. -
Page 42: Reverting To Default Settings
• From there, you will have to tap yes to confirm unpairing and removal of remote from the Ai Navigator GPS 6.11 REVERTING TO DEFAULT SETTINGS • To revert all settings to default, go to Settings from the Home Screen scroll down and tap the toggle. •... -
Page 43: Adjusting Screen Brightness
• Ensure your remote is turned on to check remote control connection status and capacity. 7.2 ADJUSTING SCREEN BRIGHTNESS: • To adjust screen brightness, tap the BATTERY icon located in the bottom right of the Home Screen and use the slider to brighten or dim the screen as needed. -
Page 44: Miscellaneous
8.0 MISCELLANEOUS 8.1 SLEEP MODE • To enter Sleep Mode on the Ai Navigator GPS , hold the Speed Dial button down for 3 seconds. The option to enter Sleep Mode will pop up. • Sleep mode can be activated from any screen and will turn your screen black. - Page 45 • During trimming it will let you know the trimming is in progress and it will stop and return to the screen you were previously on, once completed. 9.0 FAQ Q: On the Ai Navigator GPS there is a menu option called Rounds. How and what does this synchronise with? A: Rounds scored on the GPS will be available here.
- Page 46 mgigolf.com MGI AUSTRALIA Service Email: customerservice@mgigolf.com Live Chat: visit mgigolf.com Toll Free within Australia: 1300 644 523 (excludes mobiles) Western Australia/ Internal phone +61 3 8872 6700 Local Service Centres: visit mgigolf.com to locate you local service centre. MGI USA Service Email: serviceusa@mgigolf.com Live Chat: visit us.mgigolf.com Telephone: 1800 617 2990...
Need help?
Do you have a question about the MGI Ai Series and is the answer not in the manual?
Questions and answers
Pulls to the right