
Related Manuals for Affymetrix GeneChip Fluidics Station 450


Summary of Contents for Affymetrix GeneChip Fluidics Station 450
- Page 1 Affymetrix ® GeneChip ® Fluidics Station 450 User’s Guide for AGCC P/N 08-0295 Rev. A June, 2008...
- Page 2 Affymetrix product only in accordance with the manual and written instructions provided by Affymetrix. You understand and agree that except as expressly set forth in the Affymetrix terms and conditions, that no right or license to any patent or other intellectual property owned or licensable by Affymetrix is conveyed or implied by this Affymetrix product.
-
Page 3: Table Of Contents
Contents CHAPTER 1 The Fluidics Station 450 Introduction Instrument Components Accessory Items How the Fluidics Station Works CHAPTER 2 Using the Fluidics Station 450 Introduction Starting the Fluidics Station Handling the Probe Array Cartridge Setting Up an Experiment Defining the Experiment Priming the Fluidics Station Running a Protocol on a Probe Array Customizing the Protocol... - Page 4 ® GeneChip Fluidics Station 450 for AGCC User’s Guide APPENDIX B Using More Than One Fluidics Station Introduction APPENDIX C Specifications Introduction APPENDIX D Warranty Warranty APPENDIX E Parameters and Messages Introduction LCD Messages INDEX...
-
Page 5: The Fluidics Station 450
The Fluidics Station 450 Chapter... - Page 6 Chapter...
-
Page 7: Introduction
Fluidics Station 450 and its components, gives an overview of how the fluidics station works, and covers the safe use of the fluidics station. We have written this user guide to be used in tandem with the Affymetrix ® GeneChip ®... - Page 8 ® GeneChip Fluidics Station 450 for AGCC User’s Guide FS450 FEATURES Table 1.1 FS-450 Features Feature Description Benefit • System will accept 1 to 3 vials. • Flexible loading and operation to 3 position sampling • System can detect the meet script and user with individual vial presence/absence of vials in the...
- Page 9 Affymetrix Technical Support representative. • Do not use the fluidics station in ways not specified by Affymetrix. Doing so may impair the protections provided by the fluidics station. Do not place hands or fingers inside the cartridge holder. Under fault conditions, the area behind the cartridge holder can have temperatures that rise to 100°C or higher.
- Page 10 ® GeneChip Fluidics Station 450 for AGCC User’s Guide Caution Notices: CAUTION • You must have read and understood the contents of this manual before attempting to operate this fluidics station. CAUTION • The power supply cord is used as the main disconnect device.
- Page 11 Wycombe Lane, Wooburn Green, High Wycombe HP10 0HH United Kingdom E-mail: supporteurope@affymetrix.com Tel: +44 (0) 1628 552550 Fax: +44 (0) 1628 552585 Affymetrix Japan, K. K. Mita NN Bldg 16 Floor, 4-1-23 Shiba, Minato-ku, Tokyo 108-0014 Japan Tel: (03) 5730-8200 Fax: (03) 5730-8201 www.affymetrix.com...
-
Page 12: Instrument Components
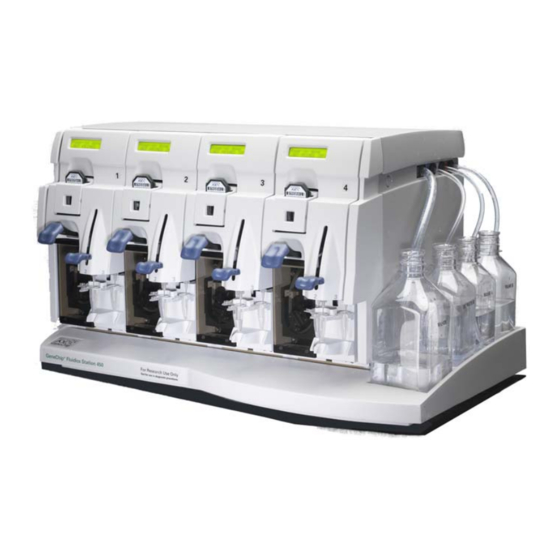
You can also choose a different protocol for each module as long as each uses the same Wash A and Wash B reagents. The modules are numbered 1 through 4 near the LCD window. The GeneChip Fluidics Station 450 includes the following components. See Figure 1.1 on page Sample Holders —... - Page 13 chapter 1 | The Fluidics Station 450 6. Needle Lever 7. LCD Window 3 & 4. Wash block and Cartridge Holder 8. Wash B Bottle 8. Wash A Bottle 9. DI Water Bottle 10. Waste Bottle 11. Sample Needles (extended) 2.
-
Page 14: Accessory Items
® GeneChip Fluidics Station 450 for AGCC User’s Guide Accessory Items Affymetrix provides the following accessories for Fluidics Station 450. Table 1.2 FS-450 accessories list Part Number Description Quantity 340011 Assy, Terminator Plug 350001 Assy, cable, CPU, DBP9,3/F 350014 Cord Power... -
Page 15: How The Fluidics Station Works
Expression Analysis Technical Manual, P/N 702232 (available at ® www.affymetrix.com/support ), for instructions on using the fluidics station with individual protocols. SAMPLE STAINING PROTOCOL Use the Affymetrix ® GeneChip ® Command Console™ (AGCC) software to define an experiment and start the fluidics station protocol. You can find information regarding this software in the AGCC User’s Guide (P/N... - Page 16 In addition to the preceding protocol, the fluidics station can perform variations of the steps described in the protocol and can run other protocols. For more information about the protocols that can be ® performed on the fluidics station, please contact your Affymetrix Technical Support representative.
-
Page 17: Using The Fluidics Station 450
Using the Fluidics Station 450 Chapter... - Page 18 Chapter...
-
Page 19: Introduction
Introduction ® ® This section describes how to use the Affymetrix GeneChip Fluidics Station 450 with fluidics protocols. For details using the Fluidic Station with the AGCC software, refer to the AGCC User’s Guide (P/N 702569). Starting the Fluidics Station Check to ensure that the fluidics station is connected to the power main through the power cord provided. -
Page 20: Handling The Probe Array Cartridge
® GeneChip Fluidics Station 450 for AGCC User’s Guide Lid Release Buttons CommLink Out (Note: these Connector buttons may (to terminator or be present or cable to next absent fluidics station) depending on the model of the fluidics station.) ON/OFF CommLink In Connector Switch... -
Page 21: Setting Up An Experiment
In the AGCC software, start the AGCC Fluidics control software. In the AGCC Launcher, click the AGCC Fluidics Control Icon; or Click Programs Affymetrix → Command Console → AGCC Fluidics Control.. Use the Master Control page to configure the the stations, modules and protocols. - Page 22 Check to ensure that all the wash lines are in the appropriate wash bottles. Please consult the probe array package insert that came with the cartridge kit for the appropriate wash buffer solutions, or contact your Affymetrix Technical Support representative.
-
Page 23: Running A Protocol On A Probe Array
chapter 2 | Using the Fluidics Station 450 Figure 2.3 Select the Prime_450 protocol from the drop-down list. Running a Protocol on a Probe Array After you have primed the fluidics station, it is ready to run a fluidics protocol. Follow the directions in the AGCC User’s Guide (P/N 702569) and/or the appropriate package insert. - Page 24 ® GeneChip Fluidics Station 450 for AGCC User’s Guide Figure 2.4 Select the protocol from the drop-down list.
- Page 25 chapter 2 | Using the Fluidics Station 450 You can also choose a customized hybridization-wash or wash protocol here. Refer to the AGCC User’s Guide (P/N 702569) or to Customizing the Protocol on page 32. If you are running a customized protocol, check the parameters of each of the protocols chosen to be sure they are appropriate for your experiment.
- Page 26 ® GeneChip Fluidics Station 450 for AGCC User’s Guide Figure 2.5 Inserting the cartridge into the cartridge holder - note orientation and probe array label...
- Page 27 chapter 2 | Using the Fluidics Station 450 Flip the cartridge lever up to engage the cartridge septa needles into the septa. Proper engagement of the washblock with the cartridge is indicated by a change in the message on the LCD (Figure 2.6).
- Page 28 ® GeneChip Fluidics Station 450 for AGCC User’s Guide To minimize damage to the probe array, the door closure forces are controlled. If proper engagement does not occur, simply press on the washblock cartridge door to complete the action. DO NOT FORCE UP THE CARTRIDGE LEVER. If prompted to “Load Vials 1-2-3,”...
- Page 29 chapter 2 | Using the Fluidics Station 450 If you are staining certain eukaryotic targets, you will use SAPE in vials 1 and 3. If you are using a protocol that requires only a single stain (such as for other eukaryotic targets), you will be prompted to place one vial at vial holder position 1.
- Page 30 ® GeneChip Fluidics Station 450 for AGCC User’s Guide Needle Lever in Up Position Vials Figure 2.7 The samples vials on the sample holder with the needle lever up — note the orientation of the vial caps. When you place the vials into the holders, orient the vial caps toward you so that the vials seat snugly into their respective holders.
- Page 31 chapter 2 | Using the Fluidics Station 450 Figure 2.8 Press down on the needle lever to begin the run.
- Page 32 ® GeneChip Fluidics Station 450 for AGCC User’s Guide Needle Lever Vials Figure 2.9 The vials on the sample holder with the needle lever down- note the orientation of the vial caps. As the run progresses, check to ensure that the cartridge is filling properly and that bubbles are not forming.
- Page 33 chapter 2 | Using the Fluidics Station 450 If bubbles are present in the cartridge, return it to the cartridge holder. Engage the cartridge by flipping up the cartridge lever to the closed position. The fluidics station will drain the cartridge and then fill it with a fresh volume of the last wash buffer used.
-
Page 34: Customizing The Protocol
Protocol changes will not affect runs in progress. For more specific instructions, refer to the AGCC User’s Guide (P/N 702569) or contact your Affymetrix Technical Support representative. Select Edit Protocol from the Edit menu on the workstation. The Edit Protocol dialog box appears. -
Page 35: Shutting Down
To maintain the cleanliness of the fluidics station and obtain the highest quality image and data possible, Affymetrix recommends performing a weekly bleach protocol. Please refer to Instrument Care and Maintenance on page 35 for further details. - Page 36 ® GeneChip Fluidics Station 450 for AGCC User’s Guide This page intentionally left blank.
-
Page 37: Instrument Care And Maintenance
Instrument Care and Maintenance Chapter... - Page 38 Chapter...
-
Page 39: Introduction
Introduction This chapter provides instructions on caring for and maintaining the instrument, and on troubleshooting if problems arise. INSTRUMENT CARE • Use a surge protector on the power line to the fluidics station. • Always run a Shutdown protocol when the instrument will be off or unused overnight or longer. -
Page 40: Fluidics Station Bleach Protocol
Fluidics Station 450 for AGCC User’s Guide Fluidics Station Bleach Protocol Affymetrix recommends a weekly cleaning protocol for the fluidics station. This protocol uses commonly purchased sodium hypochlorite bleach. This protocol is designed to eliminate any residual SAPE-antibody complex that may be present in the fluidics station tubing and needles. - Page 41 chapter 3 | Instrument Care and Maintenance Remove cartridges (if any) Washblocks disengaged with cartridge lever down Figure 3.1 Disengaged washblocks showing cartridge levers in the down position, remove any cartridges Prepare 500 mL of 0.525% sodium hypochlorite solution using deionized water.
- Page 42 ® GeneChip Fluidics Station 450 for AGCC User’s Guide The shelf life of this solution is 24 hours. After this period, you must prepare a fresh solution. Each fluidics station with four modules requires 500 mL of the 0.525% sodium hypochlorite solution. Place on the fluidics station an empty one liter waste bottle, a 500 mL bottle of bleach and a one liter bottle of DI water as shown in Figure...
- Page 43 The bleach cycle. Immerse the tubes into the 0.525% sodium hypochlorite solution. The waste line remains in the waste bottle. In the AGCC Launcher, click the AGCC Fluidics Control Icon; or Click Programs Affymetrix → Command Console → AGCC Fluidics (Figure 3.3).
- Page 44 ® GeneChip Fluidics Station 450 for AGCC User’s Guide Figure 3.3 The Fluidics Station protocol window: select all modules. Select the Station ID: tab for your Fluidics Station. In the Probe Array Type: dropdown list, select [no probe array]. Confirm that you have selected All for the probe array types.
- Page 45 chapter 3 | Instrument Care and Maintenance Temperature will ramp up to 50°C. Follow the prompts on each of the LCD. Load empty 1.5 mL vials onto each module if you have not already done so. Press down on each of the needle levers to start the bleach protocol (Figure 3.4).
- Page 46 ® GeneChip Fluidics Station 450 for AGCC User’s Guide Figure 3.4 Press down on the needle levers to start the bleach protocol. The fluidics station will begin the protocol and begin to empty the lines and perform the cleaning cycles using bleach solution. After approximately 30 minutes, the LCD will prompt you when the bleach cycle is over and the rinse cycle about to begin.
- Page 47 chapter 3 | Instrument Care and Maintenance THE RINSE CYCLE Once the bleach cycle has finished, the second part of the protocol is a rinse step. This step is essential to remove all traces of bleach from the system. Failure to complete this step can result in damaged arrays.
- Page 48 ® GeneChip Fluidics Station 450 for AGCC User’s Guide When the rinse is completed after approximately one hour, the fluidics station will bring the temperature back to 25 °C and drain the lines with air. The LCD display will read CLEANING DONE. Discard the vials employed for the bleach protocol.
- Page 49 For systems in routine use, Affymetrix recommends monthly replacement of the tubing. To ensure proper performance, use only tubing available from Affymetrix. This tubing is manufactured to the required specifications to ensure proper fluid delivery and array performance. You can obtain additional tubing by ordering from...
- Page 50 ® GeneChip Fluidics Station 450 for AGCC User’s Guide Peristaltic Tubing Figure 3.6 Module door open showing peristaltic tubing Open the white clamps to release tubing on both sides. See Figure 3.7. Do not attempt to replace the tubing on a module where the module has been removed from the case of the fluidics station.
- Page 51 chapter 3 | Instrument Care and Maintenance White Clamp Figure 3.7 Releasing peristaltic tubing Pull tubing off while gently turning the peristaltic pump head. Discard old tubing. Replace tubing with new peristaltic tubing supplied with the accessory kit as described below: Attach one end of the new tubing to the fitting on the right at the top of the pump enclosure.
-
Page 52: Troubleshooting And Assistance
Fluidics Station 450 for AGCC User’s Guide Troubleshooting and Assistance If problems arise with the fluidics station, use the following tables to locate the description that matches the problem. If you cannot find a solution, call Affymetrix Technical Support for assistance. TROUBLESHOOTING DECISION TREE The following simple flow charts (Figure 3.8... - Page 53 chapter 3 | Instrument Care and Maintenance Figure 3.8 Troubleshooting decision tree, page 1...
- Page 54 ® GeneChip Fluidics Station 450 for AGCC User’s Guide Figure 3.9 Troubleshooting decision tree, page 2...
- Page 55 Blocked sampling tube Clean or Prime script with or line of the fluidics fresh deionized (DI) water to station. flush out salt blockage. Call Affymetrix Technical Support for service. Failure of one of the Loosen the tubing clamps, Missing Fluid fluidics sensors.
- Page 56 Error While Buffer conductivity too Change the buffer: increase Filling low. salt. Call Affymetrix Technical Failure of one of the Support for service. fluid sensors. System detects • Missing or insuffi- Identify if chip is filled: improper conditions cient stain or anti- •...
- Page 57 Recovery script. • Attempt to rerun script if sample loss can be toler- Invalid ated. If problem persists, Command contact Affymetrix for service • If sample loss cannot be tolerated, do not attempt to rerun script. Contact Affymetrix for service...
- Page 58 ® GeneChip Fluidics Station 450 for AGCC User’s Guide MEANING OF ERROR MESSAGES The following lists some of the common error messages and what they mean (Table 3.4). Table 3.4 Common error messages Error Message Meaning The script contains a command that can not “Invalid Command”...
- Page 59 chapter 3 | Instrument Care and Maintenance Table 3.4 Common error messages Error Message Meaning “Stage C” “WashA” “Sense/Threshold” “960/890” The Pump command completed its step count before the conductivity sensor determined that the cartridge contained a solution with conductivity below the set threshold value.
- Page 60 Running a Protocol on cartridge at the end of a a Probe Array on page 21. hybridization-wash script. Buffer leaking inside the Loose tubing attachments Call Affymetrix Technical fluidics station. inside the fluidics station. Support for service. Washblock requires Call Affymetrix Technical replacement.
-
Page 61: When To Contact Technical Support
Instrument Specifications on page If the instrument must be returned for repair, call Affymetrix Technical Support. Make sure you have the model and serial number. Affymetrix, Inc. - Page 62 ® GeneChip Fluidics Station 450 for AGCC User’s Guide E-mail: supporteurope@affymetrix.com Tel: +44 (0) 1628 552550 Fax: +44 (0) 1628 552585 Affymetrix Japan, K. K. Mita NN Bldg 16 Floor, 4-1-23 Shiba, Minato-ku, Tokyo 108-0014 Japan Tel: (03) 5730-8200 Fax: (03) 5730-8201...
-
Page 63: Appendix A Customer Module Replacement Procedure
Customer Module Replacement Appendix Procedure... - Page 64 Appendix...
-
Page 65: Introduction
Introduction This section describes the procedure to replace a Fluidics Station 450 or 250 module in the field. Warning: To ensure user safety, avoid contact with any internal components in the instrument base while removing or installing modules unless specifically indicated by these instructions. - Page 66 ® GeneChip Fluidics Station 450 for AGCC User’s Guide MODULE REMOVAL The procedure below shows you how to remove a module. You can also refer to quick reference card, P/N 08-0099, Fluidics Station 450 Module Replacement Procedure. Tools Needed: Standard flathead screwdriver When making connections, always turn off power to all devices in the chain.
- Page 67 appendix A | Customer Module Replacement Procedure Grounding Drain Tube (Waste Conduit) Clear Waste Lines Color-Coded Reagent Lines 1/8 -turn Quck Release Fitting Figure A.1 Components under the fluidics station cover. Note that in some of the newer FS-450 versions, the side buttons may no longer be present and the drip tray and supply lines may be different.
- Page 68 ® GeneChip Fluidics Station 450 for AGCC User’s Guide Figure A.2 Disconnect the color-coded reagent line tubes Open the software and run the DRAIN_450 script until completion. The DRAIN script pumps the residual liquid in the reagent lines out to waste to reduce the probability that a droplet of buffer will fall from the disconnected ends of the lines onto one of the PC boards.
- Page 69 appendix A | Customer Module Replacement Procedure Figure A.3 Disconnect the clear, waste line tubes from the waste line. Ensure that no scripts are running on the supporting workstation and no scripts are running on the FS450 for which the module replacement is required.
- Page 70 ® GeneChip Fluidics Station 450 for AGCC User’s Guide Take care not to strip the retaining screw. This screw is captive on the module panel; you cannot remove it from the panel. You must gradually pull the module out toward you as you turn the screw otherwise you will strip the screw.
- Page 71 Grasp the module using both hands as shown and gently pull module out. Place the defective module in the new module shipping packaging for return to Affymetrix. Instructions for returning the module are contained within the package. To ensure safety, avoid contact with any internal components in the base.
-
Page 72: New Module Installation
® GeneChip Fluidics Station 450 for AGCC User’s Guide New Module Installation The procedure below shows you how to install a new module. Holding the new module in a secure manner, position the module such that it straddles the exposed rails in the base. See Figure A.6. - Page 73 appendix A | Customer Module Replacement Procedure Figure A.7 Ensure that the module tubing will not be pinched by the new module. Reconnect the clear, waste line tubing to the drain tube. See Figure A.8. Connect the waste line tubing from the cartridge to the drain tube inlet, “C” (marked as C on the drain tube) and connect the waste line tubing from the valve to the drain tube inlet “V”...
- Page 74 ® GeneChip Fluidics Station 450 for AGCC User’s Guide Figure A.8 Reconnect the clear, waste line tubes from the module to the drain tube.
- Page 75 appendix A | Customer Module Replacement Procedure From Cartridge to C on drain tube From Valve to V on drain tube Figure A.9 The “C,” or cartridge, waste line tubing and the “V,” or valve, waste line tubing...
- Page 76 ® GeneChip Fluidics Station 450 for AGCC User’s Guide Figure A.10 The locations of the C inlet and V inlet Align the screw at the bottom of the module into the threaded hole on the base. Using a slotted screwdriver, slowly rescrew the module retaining screw until the module is flush with the other modules.
- Page 77 Using More Than One Fluidics Station Appendix...
- Page 78 Appendix...
- Page 79 Introduction Using one computer workstation, you can connect up to eight fluidics stations together. Follow these steps to connect more than one fluidics station to the computer workstation. When making connections, always turn off power to all devices in the chain.
- Page 80 ® GeneChip Fluidics Station 450 for AGCC User’s Guide Table B.1 Guide to setting DIP switches Left Middle Right The FS450 only reads the station address switch when power is first switched on. If the address is changed while the station is already powered on, the new address will not take effect until the station is turned off and then turned back on again.
- Page 81 Specifications Appendix...
- Page 82 Appendix...
- Page 83 Introduction INSTRUMENT SPECIFICATIONS Fluidics Station Dimensions (height, depth, width) 40.2 x 41.0 x 71.1 cm or 15 13/16 x 16 1/8 x 28 inches Product Weight Approximately 80 pounds or 36.3 kg Temperature Operating: 15° to 30°C Storage (non-operating):-10° to 60°C Humidity Operating: 10-90% RH, non-condensing Storage (non-operating):10% to 95% RH...
- Page 84 ® GeneChip Fluidics Station 450 for AGCC User’s Guide This page intentionally left blank.
- Page 85 Warranty Appendix...
- Page 86 Appendix...
- Page 87 Warranty The Affymetrix ® GeneChip ® Fluidics Station 450 is warranted to the buyer by Affymetrix. Please refer to the Affymetrix Terms and Conditions received with this instrument at time of sale for information on the warranty.
- Page 88 ® GeneChip Fluidics Station 450 for AGCC User’s Guide This page intentionally left blank.
- Page 89 Parameters and Messages Appendix...
- Page 90 Appendix...
- Page 91 Introduction This section describes the user alterable parameters and the LCD script messages and their meaning. USER-ALTERABLE PARAMETERS The following list shows the various parameters that you can change in configuring the fluidics station for a 4 wash staining (Table E.1).
- Page 92 ® GeneChip Fluidics Station 450 for AGCC User’s Guide The following are parameters for a 2-wash staining (Table E.2). Table E.2 Parameters for a 2-washing staining Parameter Name Description Parameter Values Default VAR: HybTime Hybridization Time (seconds) 86399 1800 VAR: HybTemp Hybridization Temperature (°C) VAR: FlushTemp1 Flush A Temperature (°C)
- Page 93 appendix E | Parameters and Messages Table E.3 LCD Messages Message Meaning Purging with A Purges chip with ~ 2 mL of buffer A at 25°C from bottom to top then to waste. Draining to Vial 1 Recovers stain to Vial #1 for reuse or disposal. Draining to Vial 2 Recovers stain to Vial #2 for reuse or disposal.
- Page 94 ® GeneChip Fluidics Station 450 for AGCC User’s Guide Table E.3 LCD Messages Message Meaning LOAD 3 EMPTY VIALS Prompt to load vials. Purging with water Purge with 5 mL water to clean line. Washing needle 1 Performing wash needle #1 procedure. Purging with air Purge with air.
- Page 95 Index...
- Page 96 Index...
- Page 97 I N D EX Index dimensions 81 installation category 81 address more than one 77 setting 77 operating altitude 81 operating humidity 81 operating temperature 81 pollution degree 81 bubbles power requirements 81 priming 19 weight 81 care fluidics station operation components fluidics stations instrument 10...
- Page 98 GeneChip ® Fluidics Station 450 for AGCC User’s Guide priming fluidics station 19 probe array handling problems and solutions protocol customizing 32 staining 13 regulatory remove vials setting the address setting up an experiment shutting down specifications starting up support information technical support troubleshooting and assistance warnings...
Need help?
Do you have a question about the GeneChip Fluidics Station 450 and is the answer not in the manual?
Questions and answers