
Related Manuals for National Geographic NC-200


Summary of Contents for National Geographic NC-200
- Page 1 NC-200 USER GUIDE National Geographic gimbal cam is a portable gimbal camera that combines ease of use and functionality.
-
Page 2: Table Of Contents
Contents 1. Basic information overview 3 3.3 Using Face ID 18 3.4 Using dynamic motion recording mode 19 1.1 Included items 3 1.1.1 Standard items 3 3.5 Updating the firmware 20 1.1.2 Accessories (sold separately) 3 1.2 Part names 4 4. Using the National Geographic gimbal 1.2.1 Main unit (front/back view) 4 cam app 21 1.2.2 Main unit (side view) 4 4.1 Connecting the National Geographic gimbal 1.2.3 Main unit (top/bottom view) 5 cam app 21 1.3 Removing and inserting the memory card 5 4.2 Using live streaming... -
Page 3: Basic Information Overview
1. Basic information overview 1.1 Included items 1.1.1 Standard items Quick start guide Strap USB-C cable Backpack mount Main unit Battery Pouch Ferrite core Battery charger 1.1.2 Accessories (sold separately) Mini tripod / Microphone / ND filter / LCD protective film / Hard protective case (small) / Hard protective case (large) / Head tracker Visit the THINKWARE homepage (http://thinkware.com) to buy extra included items and accessories. -
Page 4: Part Names
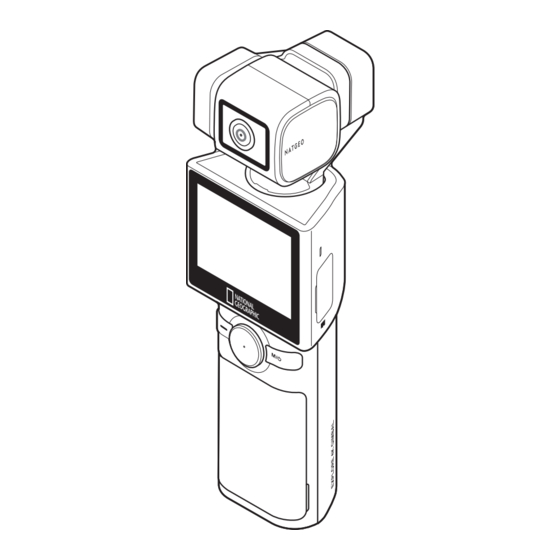
Basic information overview 1.2 Part names 1.2.1 Main unit (front/back view) Camera Pan motor M4 mount connector LED status Speaker Recording button Trigger Joystick Battery cover Strap holder Mode/Power button 1.2.2 Main unit (side view) Roll motor Microphone Microphone USB-C port USB port/SD card slot cover External microphone port microSD card slot... -
Page 5: Main Unit (Top/Bottom View)
Basic information overview 1.2.3 Main unit (top/bottom view) Battery cover release button 1/4” mount connector Tilt motor 1.3 Removing and inserting the memory card Before removing the memory card, ensure that the product is turned off. Gently push the bottom of the memory card with your fingernail to release it, and then remove it from the product. -
Page 6: Removing And Inserting The Battery
Basic information overview 1.4 Removing and inserting the battery • For optimal performance, use a genuine battery. • The performance of the product may be limited and the camera performance is not guaranteed if you do not use an authentic battery. For more information on battery safety and use, refer to the Battery Information Guide. -
Page 7: Charging The Battery With A Charger
Basic information overview 1.5.2 Charging the battery with a charger Check the metal parts of the battery and charger, and be sure to insert the battery in the correct direction. Operation status LED status Standby LED off Charging Red light on Fully charged Green light on Error Red + Green lights flicker •... -
Page 8: Checking The Battery Level
1.8 Connecting the product to the backpack mount You can use the included mount to stabilize the National Geographic gimbal cam in a bag or band. You can conveniently take pictures or record a video without having to hold the camera in your hands when you connect the product to the mount. -
Page 9: Connecting The Product To The Head Tracker (Optional)
When the power is turned on and the LED indicator flickers green, place the head tracker on a flat, vibration-free surface to calibrate it. Calibration takes about 10 seconds. On the National Geographic gimbal cam, tap the Settings( Connection Settings Head tracker >... -
Page 10: Safety Information For Proper Use
Basic information overview 1.10 Safety information for proper use Read the following safety information to properly use the product. Product operation • If the product is impacted, it may malfunction or break down. • Avoid contact with sand and liquid to protect the gimbal motor and sensors, etc. • To prevent damage from high temperatures during product use, it may enter overheat protection mode and stop recording. -
Page 11: Using The Product
2. Using the product 2.1 Overview of the LCD 2.1.1 Main menu tree The main menu tree of the product is as follows. Settings menu Preset... -
Page 12: Using The Lcd Function
Using the product 2.1.2 Using the LCD function You can use the corresponding function by sliding the LCD in each direction. • Swipe Up: Moves to the preset mode. • Swipe Down: Moves to the settings menu. • Swipe Left: Moves to the gimbal quick settings. • Swipe Right: Moves to the album. You can go back to the preview screen by swiping the LCD in the opposite direction of each direction on each mode screen. - Page 13 Using the product Settings menu screen Description App connection ➊ ➊ ➊ ➊ ➋ ➋ ➌ ➌ Turn the grid on/off (display grid in preview screen) ➋ ➋ Settings ➌ ➌ LCD brightness ➍ ➍ ➍ ➍ ➎ ➎ ➏ ➏ Turn beep on/off ➎...
-
Page 14: Using The Buttons
Using the product 2.2 Using the buttons Refer to the table below to use the product's buttons, trigger and joystick. Press and hold the button to turn on the product. Joystick Trigger Recording button M button Buttons Preview screen Recording Sort Short press Long press Short press Long press Start recording Stop recording Photo/video mode Stop recording and Power off... -
Page 15: Overview Of Led Status And Beep
Using the product 2.3 Overview of LED status and beep LED status Sort Description flickers once Power on Power off / fully charged LED off Charging light on Recording while charging flickers with varying brightness flickers slowly Start/stop recording a video flickers once Take a photo / continuous shot flickers once... -
Page 16: Overview Of National Geographic Gimbal Cam Features
3. Overview of National Geographic gimbal cam features 3.1 Using AI tracking mode AI tracking mode recognizes additional areas around a person's face, providing smart recognition extended tracking even for movements that change direction frequently and quickly. Each time you press the button, it switches in the following order: AI tracking Face tracking Face ID >...
Need help?
Do you have a question about the NC-200 and is the answer not in the manual?
Questions and answers