
Summary of Contents for RecPro RP-RANGE-17BL
- Page 1 INSTRUCTION MANUAL Gas Range RP-RANGE-17BL/RP-RANGE-17SS RP-RANGE-21BL/RP-RANGE-21SS...
-
Page 2: Table Of Contents
Table of Contents Product Introduction............... 3 Safeguard Measures ................ 4 Safeguard Preparations ..............5 Install Information................10 Functions ..................15 Range Features ................21 Product Troubleshooting..............22 Sanitation & Upkeep ..............23 Exploded-View Drawing ..............24 Product Warranty Information ............26 Warranty Contact Information ............ -
Page 3: Product Introduction
Product Introduction Thank you for your purchase of the RecPro Gas Range! Before the use of your new RecPro Gas Range, please review this user manual carefully. This user and instruction guide contains useful information pertaining to safety, maintenance/upkeep, installation, functions, features, and warranty. -
Page 4: Safeguard Measures
Safeguard Measures &WARNING This symbol indicates a safety alert. It will alert you to possible hazards that can cause serious bodily harm, property damage, or even death. The safety symbol will precede important messages about safety. If one does not follow the instructions in this guide WARNING: exactly, an explosion or fire may result in personal injury, property damage, or even death. -
Page 5: Safeguard Preparations
&Caution Hazards or unsafe practices can result in minor personal injury or harm. Read the following instructions carefully before attempting to use the following application to prevent the potential risk of electric shock, fire, damage to the appliance, or personal injury. Please use the appliance only for its intended purpose as described by this manual. - Page 6 • This appliance should be installed properly by a qualified technician, in accordance with local and state regulations and laws. Never modify or alter the appliance by removing screws, anti- • tip brackets, leveling legs, panels, or any other part of the product.
- Page 7 During and after use, do NOT touch or allow flammable materials, objects, or clothing to touch or come into contact with these areas until they have cooled down. Any burners, surface or oven, may be hot even though flames are not visible. These burners may still be hot enough to inflict burns or injuries.
- Page 8 • Upon storage or disposal of the appliance, please remove the oven door before doing so. CAUTION: Never attempt to utilize the range during a power failure. During the event the power fails during use, always shut off the oven, as your appliance may turn on unsupervised as the power restores.
- Page 9 • Protective Sheets: Never use aluminum foil to cover the oven bottom or burner pans, unless suggested by this manual. The improper use or installation of these sheets and liners can increase the risk of electrical shock or fire. NEVER use a searing grill on the cooktop: •...
-
Page 10: Install Information
When installing this range, you must adhere to the written instructions in this guide. No representative, agent, or employee of the manufacturer of RECPRO, or any other person(s) has authorization to do any kind of modifications, provisions/edits, or changes to the instructions mentioned in this user manual. - Page 11 CABINET SPECIFICATIONS To ensure proper operation of your range, suitable cabinets must be used. Cabinet specification information: • There must be a ventilation hole in the cabinet for air circulation. A minimum 3/8" gap at the bottom of the oven will also provide proper air circulation.
- Page 12 Cabinet and counter cutout: Model 2" 0.94" 1.56" 17"RV 17.75" 20.25" 16.12" 23mm 40mm 51mm Range 451mm 514mm 410mm max. max. min. 0.94" 1.56" 2" 21" RV 17.75" 20.25" 20.06" 23mm 40mm 51mm Range 451mm 514mm 510mm max. max. min. Above is the minimum cutout size How to Install Gas Range Oven: Once the gas line is in place and the cabinet has been...
- Page 13 4. Use any approved gas supply tube or hose with proper fitting to the range oven through the gas cavity on the upper left-rear corner of the cabinet. Connect a 12V power supply wire to the appliance from the upper right-rear corner of the cabinet (Fig.4). 5.
- Page 14 7. Install the top glass assembly as directed by the arrow. Tighten the screws marked in the picture Fig.1-1. (Fig.6-1, The holes on the left and right sides of the inside door frame are optional for mounting and do not require screws to be used.) 8.
-
Page 15: Functions
Function Lighting Oven with Match 1. Make sure and check that ALL knobs are turned to the OFF position before lighting with a match. 2. Ensure the main gas valve is in the open position. Open the gas range oven door. (Fig. 13) 4. - Page 16 6. Do not let go of the oven control knob, keep the oven control knob pushed in and hold the oven control knob in for 5 seconds after the pilot light is lit. If needed, repeat steps 4 and 5 if the gas range oven is not lit.
- Page 17 How to Light TOP Burners: &WARNING The top cover must be open when the main burner is in operation. Based on safety considerations, the top burner flame size should be adjusted so it does not extend beyond the edge of the cooking utensil. Lighting TOP burner with a match: 1.
- Page 18 5. To adjust to the desired flame, push and rotate the burner control knob. (Fig. 11) 0�00 c= __ -=======�I Fig.11 Igniting Gas Range Electronically: 1. Ensure all control knobs are in their OFF positions. Ensure the main gas tank valve is open. 3.
- Page 19 Gas burners Useful information on proper flame for burner: will tend to burn blue if the ratio of fuel to air is adjusted properly. Burner flames that burn yellow on the tip of the flame (over 1 inch) are a sign that the burner is not receiving enough air for the combustion of gas.
- Page 20 &WARNING MERCHANDISE HARM RISK! • If the control knob is set to the LIGHT position, DO NOT COOK as damage may occur to the ignition module and the burner electrodes. • DO NOT LET children or pets play near, at, or around the gas range.
-
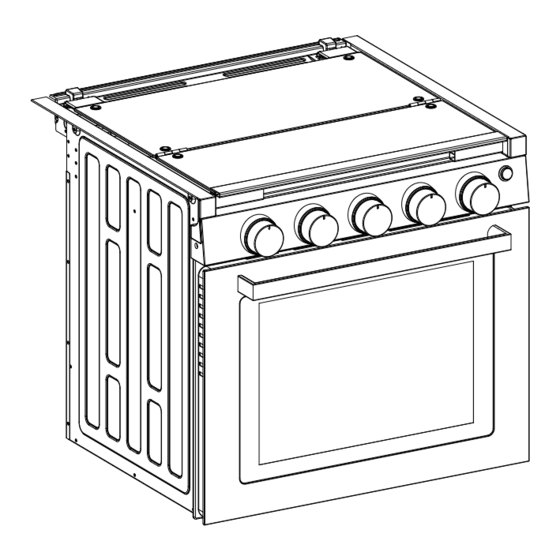
Page 21: Range Features
Range Features Glass Cover Optional Gas power Power Grill Left and Right Ignition Knob Burner: 6500BTU BTU/HR Oven Door Front Burner: 8000BTU Top Burner Control Knob Oven: 7100BTU Oven Control Knob Fuel/Power Propane Back light Inlet 10" WC Min to 13. Pressure 8"... -
Page 22: Product Troubleshooting
Product Troubleshooting PROBLEM/SYMPTOM POSSIBLE CAUSE/SOLUTION Area surface Surface control knob has not burners will not been fully rotated to the LIGHT ignite or area position. surface burners do Check to see if gas valve is not ignite uniformly open. If not, open it. -
Page 23: Sanitation & Upkeep
Sanitation & Upkeep • Ensure all control knobs are in the OFF position before cleaning. • Ensure the cooktop and all components relating to the gas range are cooled off before touching or cleaning. • When cleaning the oven, only use an oven cleaner specifically designed for ovens. Ensure proper usage of the oven cleaner by following the instructions of the cleaner thoroughly. -
Page 24: Exploded-View Drawing
Exploded-View Drawing 24IPage... - Page 25 Chimney Holder Oven Burner Pipe Control Panel Igniter Viewing Lamp Oven AL Pipe Rear Burner Valve 029 Front Glass Temp Control Holder Front Burner Valve ScrewM4X4 Oven Thermostat Hinge B ODS Holder Knob Base Chimney Decoration Panel Side Cavity Plate Decoration Ring Rear Cover Oven Burner Baffle Plate...
-
Page 26: Product Warranty Information
Product Warranty Information Your RECPRO appliance is covered by a one-year limited warranty. For one year from your original date of purchase of the original purchaser, RECPRO will pay costs for repairing or replacing any parts of this appliance that prove to be defective in materials or workmanship when such appliance is installed, used, and maintained in accordance with the provided instructions. - Page 27 Damage caused by services performed by unauthorized service companies, use of parts other than genuine RECPRO parts or parts obtained from persons other than authorized service companies, or external causes such as abuse, misuse, inadequate power supply, accidents, fires, or acts of God.
-
Page 28: Warranty Contact Information
RECPRD ® For further information, please contact: ICON DIRECT INC 806 S. DIVISION ST. BRISTOL, IN 46507, USA...
Need help?
Do you have a question about the RP-RANGE-17BL and is the answer not in the manual?
Questions and answers
Is there any other adj. for the oven on a RP-RANGE-21BL ?