Advertisement
Quick Links
Advertisement

Related Manuals for Lloyd Pascal 260.94.167M


Summary of Contents for Lloyd Pascal 260.94.167M
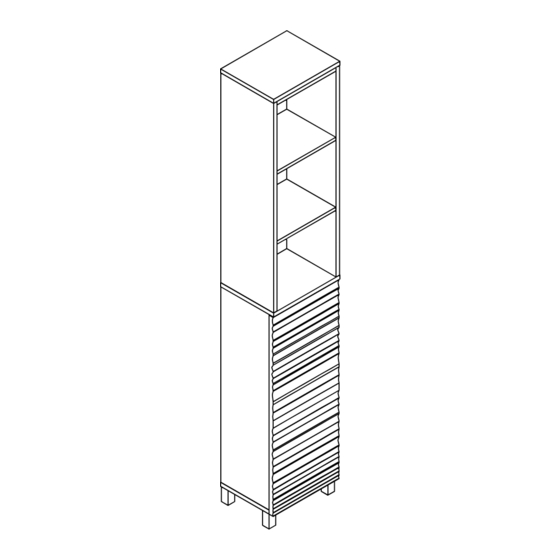
- Page 1 Meet your new Lloyd Pascal Tallboy with single door Customer Helpline If you need help or have damaged or missing parts, call our customer helpline 0121 776 5720 Assembly instructions- Please keep for future reference- 260.94.167M GREY 260.96.167M WHITE Issue 2- 13/7/20...
- Page 2 Welcome to We would love to see your new product in its new home. Share your experience by taking a picture the Lloyd of your new LP product and post it on social media tagging Pascal family #welovehome #Lloydpascal #LPfurniture #LPhome established Connect with Us: Using your in 1919...
- Page 3 Safety and Care Advice IMPORTANT, RETAIN FOR FUTURE REFERENCE: READ CAREFULLY. • Keep children and animals away • Assemble the item as close to its • We do not from the work area, small parts final position (in the same room) as recommend the use could choke if swallowed.
-
Page 4: Table Of Contents
Fittings Please check that you have all the fittings listed below: NOTE: The quantities below are the correct amount to complete the assembly. In some cases more fittings may be supplied than required. Bag 1 8x30mm Dowel x8 6x30mm Dowel x4 8x50mm Dowel x2 Glue x1 Male camlock x16... - Page 5 Tools required Phillips Screwdriver Power Drill (small and medium) Eye protection (when using glue) Drill Bit #welovehome...
- Page 6 Panels Fixed Shelf x2 (26.8cm Upper Left side x1 (82.5cm Upper right side x1 (82.5cm x24cm) x22.2cm) x24cm) Upper Back x1 (83.2cm Middle top x1 (30cm x24cm) Top x1 (30cm x24cm) x27.5cm) Bottom x1 (30cm x21.9cm) Leg x4 (3cm x6cm) Bottom Left side x1 (77cm x21.8cm) Adjustable shelf x1 (26.6cm...
- Page 7 Door x1 (78cm x29.7cm) #welovehome...
- Page 8 8x30mm Dowel x8 6x30mm Dowel x4 8x50mm Dowel x2 Glue x1 8x50mm Dowel x2 8x30mm Dowel x2 Male camlock x16 Double thread Female camlock x24 25mm Sticker x24 screw x4 Push catch x1 3x16mm Screw x2 4mm Hex Key x1 Bolt x4 Glue x1 Shelf support x4...
-
Page 9: 8X30Mm Dowel X8
8x30mm Dowel x6 Glue x1 Bottom HINT: Runners/ Grooves are on the back panel of the unit Male camlock x16 #welovehome... - Page 10 Female camlock x4 Glue x1 NOTE: Use a screwdriver to turn the female camlock clockwise to lock. Female camlock x4 Glue x1 NOTE: Use a screwdriver to turn the female camlock clockwise to lock. #welovehome...
- Page 11 Glue x1 Female camlock x4 NOTE: Use a screwdriver to turn the female camlock clockwise to lock. #welovehome...
-
Page 12: Push Catch X1
Push catch x1 3x16mm Screw x2 Double thread Female camlock x4 screw x4 #welovehome... - Page 13 Female camlock x4 Glue x1 NOTE: Use a screwdriver to turn the female camlock clockwise to lock. #welovehome...
- Page 14 4mm Hex Key x1 Bolt x4 Glue x1 Female camlock x4 Glue x1 TWO PEOPLE REQUIRED Turn Product #welovehome...
- Page 15 25mm Sticker x24 Shelf support x4 Note: You can adjust the shelves to your preference #welovehome...
-
Page 16: It Screw X1
Hinge x2 4.5x15mm Screw x4 IT Screw x1 4.5x15mm Screw x4 WARNING: back of instructions for further details on Rotate Product #welovehome... -
Page 17: Plastic Fastener X8
Plastic fastener x8 #welovehome... - Page 18 4x32mm Screw x1 1Tx10mm Washer x1 Wall strap x1 #welovehome...
- Page 19 Wall plug x1 4x32mm Screw x1 Wall strap x1 1.5Tx18mm Washer x1 TWO PEOPLE REQUIRED WALL WARNING! IN ORDER TO PREVENT OVERTURNING THIS PRODUCT MUST BE USED WITH THE WALL ATTACHMENT DEVICE PROVIDED NOTE: To hide the wall strap behind the unit, drill the hole lower than the top of the unit.
- Page 20 A Guide to Wall Mounting & Fixings Important note: Important: when drilling into walls always check that there are no hidden wires or pipes etc. If plastic wall plugs (rawl plugs) Make sure that the screws and wall plugs being used are suitable for are supplied with your product, supporting your unit.
- Page 21 Using camlocks Step 1 Step 3 Connect the male Push the male camlock camlock as directed in into every hole. the assembly instructions using a screwdriver. Step 2 Step 4 Insert the female Turn the female camlock camlock as shown in the with a screwdriver.
Need help?
Do you have a question about the 260.94.167M and is the answer not in the manual?
Questions and answers