Table of Contents
Advertisement
Quick Links
Advertisement
Table of Contents

Related Manuals for Uovision Home Guard W5

Summary of Contents for Uovision Home Guard W5
- Page 1 Home Guard W5 Camera User Manual...
-
Page 2: Table Of Contents
Content 1. Device introduction ............ 1 1.1 How the camera works ..........1 1.2 Camera Overview ............. 2 2 Quick start guides ............4 2.1 Installing the batteries ..........4 2.2 Installing the SD card ..........5 2.3 Downloading the Mobile App ........5 2.4 Adding camera to your account........ -
Page 3: Device Introduction
1. Device introduction The camera can connect to your Wi-Fi network, and 1.1 How the camera works send pictures to Linckeazi cloud server. It’s convenient to be browsed or controlled by Web site or APP. Page 1... -
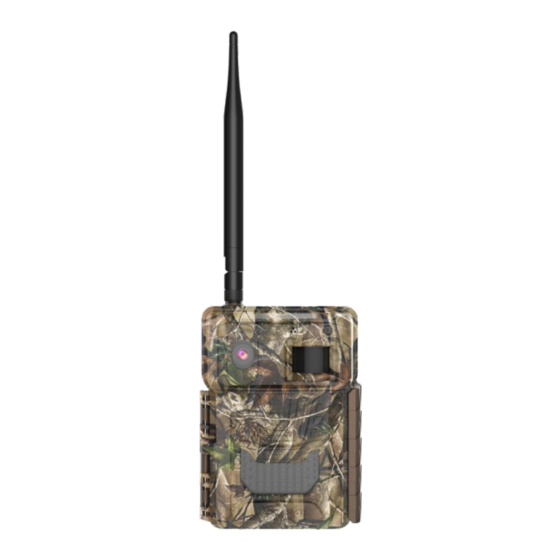
Page 4: Camera Overview
1.2 Camera Overview 1: Wi-Fi antenna 2: Camera lens 3: MIC 4: Light sensor 5: PIR sensor 6: IR LED board Page 2... - Page 5 7: Micro USB 8: SD slot 9: Power switch 10: Display 11: Buttons 12: External power jack 13: Tripod thread 14: Replaceable battery tray Page 3...
-
Page 6: Quick Start Guides
2 Quick start guides This camera can function on 12*AA/6*18650 batteries. 2.1 Installing the batteries It’s easier for you to take out the batteries from the battery tray by the small crowbar. Note: Only the AA battery tray is in the standard packaging. If you want to use 18650 batteries, please contact your retailer to buy the 18650 power pack accessories. -
Page 7: Installing The Sd Card
·Do not mix the old and new batteries ·Do not mix different types of batteries ·For AA batteries, we recommend high-density and high-performance batteries, such as Alkaline or Lithium batteries. ·Remove batteries when not in use to prevent leakage! To power up the camera you will need to install a SD 2.2 Installing the SD card card in the slot in the bottom of the camera. -
Page 8: Adding Camera To Your Account
Accessing the Web Portal: Open your web browser to: You also can scan the QR code and install the APK file https://www.linckeazi.com to your smart phone. Android APP IOS APP 2.4 Adding camera to your account Login if you already have an account, or simply Login your account: register one with your email account. - Page 9 Page 7...
- Page 10 Add Device: Please note: The camera needs to be added in Name your camera, input the SN, input the Wi-Fi your cloud account before use. MAC of your camera in the IMEI Number line, and add location description if necessary. Page 8...
- Page 11 The SN is labeled inside the camera. The Wi-Fi MAC address can be found in MENU->SYS->Wi-Fi Info (Please see below screenshot). Page 9...
-
Page 12: Copy The Wifi.ini Configure File To The Sd Card
Just edit the Wi-Fi name and Wi-Fi password in the 2.5 Copy the Wifi.ini configure file to the SD card Wifi.ini file. Copy it to the SD card, insert the SD card and restart the camera, the camera will connect the Wi-Fi network soon. -
Page 13: Power Switch And Buttons
Please Log into your Linckeazi account, enter Service & Support ->Setup, write the Account and Password, and click “Save”. Then copy the generated WIFI.INI file to the SD card and restart the camera again. Slide the power switch to SETUP position, then you 2.6 Power switch and buttons can start setting the CAM. - Page 14 OFF: Power off ( Please remove batteries when not in use Power Switch: SETUP: Setting the camera; ON: Working mode ( the screen will be powered off MENU: Enter menu : Navigation button. Buttons: OK: Confirm operation Page 12...
-
Page 15: Setting Map
3 Setting map 3.1 Settings NET Tab Wi-Fi Mode On/Off Sending Time Instant/0:00/1:00/2:00/…/23:00/ Remote Control Delay 5Min/ 0.5H/ 1H/ 2H/3H/ 4H/ 6H/ 12H/ 24H Setting Sync Upload/ Download FW Update No/Yes Page 13... - Page 16 Sending Time: Instant: Once there is a trigger, the photo will be sent immediately. 0:00/1:00/2:00/…/23:00/: The photos will be sent together at one preset time Remote Control: You can remotely control your camera via mobile phone or web-portal. Choose Delay XXH means the wireless module will wake up after every XX hours even if there is no triggering.
- Page 17 Send Option Flash Power Low/Normal/High Photo Burst:It’s the number of pictures that to be taken of each triggering. If photo burst is 3, it means the camera will take 3 pictures after one triggering. Send Option: You can choose which one of the pictures that to be sent via Send Option.
- Page 18 of an area. Work Time:The camera can work at a preset time and preset days. In the rest of the time the camera is not work. Work hour: 00:00-00:00 means 24 hours. If the settings is across a day, for example: Start: 20:00 Stop: 10:00 means 00:00-10:00 am and 20:00-24:00 of the chosen day.
-
Page 19: Connect To Wi-Fi Network And Send A Test Photo
Password:Make sure you write down your password or save it to your mobile phone so you can access your camera if you ever forget your password. Diagnose: If the camera can’t work properly, please choose Diagnose. The camera will generate a log file folder in your SD card Please send all the files in log folder to FAE for help. -
Page 20: Setting Cam With Web Portal Or App
3.3 Setting CAM with Web Portal or APP The CAM can be easily set through Web Portal or APP. Page 18... -
Page 21: Other Basic Operation Via App
3.4 Other basic operation via APP Retrieve a photo or video clip instantly Take a photo Change the settings of your camera Camera settings Camera Status Page 19... - Page 22 Show the status of your camera Request HQ photos or Video Clips from your Request HQ photos or Videos camera. Page 20...
-
Page 23: Auxiliary Power
Your camera comes with an Auxiliary power jack. If 4 Auxiliary power you want to hook up an external 9V-12V battery to power the camera, you can. The jack necessary to make the connection is a standard 4mm jack. For best results, mount the camera approximately 5 Mount tips 1-1.5 meter off the ground and 3-15 meters. - Page 24 of the camera. Fig 12 b. Reflect with trees or other things to add more light to your target. Fig 13 c. Avoid placing the camera where the air flow is surging or too much vegetation. False triggers most occur on sunny, breezy days. When the wind moves the vegetation, the camera detects this and cannot distinguish it from a warm-blooded animal moving through...
-
Page 25: Appendixⅰ: Technical Specifications
AppendixⅠ: Technical Specifications Picture Resolution 5MP(Real Sensor) /8MP /12MP/20MP/32MP Lens F/NO 1.85 (Field of View)=64° Flash Power Full, Low Display Screen 2.4” LCD Memory Card Up to 128GB Video Resolution 1440P, 1080P, 720P, WVGA PIR Sensor Multi Zone PIR Sensitivity Adjustable (High/Normal/Low) Video Trigger Time <0.6S Operation/Storage Tem. -
Page 26: Appendix Ⅱ: Parts List
Dimensions 158mmX114mmX71mm Operation Humidity 5% - 90% Security authentication FCC, CE, RoHS Appendix Ⅱ: Parts List Part Name Quantity Digital Camera Belt User Manual Declaration of Conformity to Directive 2014/53/EU CE Caution:Hereby, the manufacturer declares that Page 24... - Page 27 this camera is in compliance with the essential requirements and other relevant provisions of Directive 2014/53/EU. Pls ask for your distributor for a copy of the Declaration of Conformity to Directive 2014/53/EU. The camera manufacturer provides 12 months of warranty service for this product against manufacturing defects or malfunctions.
- Page 28 year, the camera manufacturer will repair or replace the camera at no charge. The purchase receipt must be included from an authorized retailer to validate the warranty. Improper use of the camera resulting in damage is not covered by this warranty. The camera manufacturer can provide repair service, after the warranty expiration.
Need help?
Do you have a question about the Home Guard W5 and is the answer not in the manual?
Questions and answers