Table of Contents
Advertisement
Quick Links
OWNER'S MANUAL
STYLER
Before beginning installation, read these instructions
carefully. This will simplify installation and ensure that the
product is installed correctly and safely. Leave these
instructions near the product after installation for future
reference.
ENGLISH
S3*NF
MFL71825946
Rev.00_103122
Copyright © 2022 LG Electronics Inc. All Rights Reserved.
www.lg.com
Advertisement
Table of Contents

Subscribe to Our Youtube Channel
Related Manuals for LG STYLER S3 NF Series


Summary of Contents for LG STYLER S3 NF Series
- Page 1 This will simplify installation and ensure that the product is installed correctly and safely. Leave these instructions near the product after installation for future reference. ENGLISH S3*NF www.lg.com MFL71825946 Rev.00_103122 Copyright © 2022 LG Electronics Inc. All Rights Reserved.
-
Page 2: Table Of Contents
Preparing Loads ....................18 Checking the Items before Every Load ............20 Loading the Appliance..................21 Control Panel ....................28 Programme Table ....................30 Option Programmes and Extra Functions ............35 SMART FUNCTIONS LG ThinQ Application ..................37 Smart Diagnosis ....................39 MAINTENANCE Regular Cleaning....................40 TROUBLESHOOTING Before Calling for Service................42... -
Page 3: Safety Instructions
SAFETY INSTRUCTIONS SAFETY INSTRUCTIONS READ ALL INSTRUCTIONS BEFORE USE The following safety guidelines are intended to prevent unforeseen risks or damage from unsafe or incorrect operation of the appliance. The guidelines are separated into ‘WARNING’ and ‘CAUTION’ as described below. Safety Messages This symbol is displayed to indicate matters and operations that can cause risk. - Page 4 The power cord can be damaged, resulting in a risk of fire and electric shock. • Contact LG or a qualified repair person immediately to repair or replace all power cords that have become frayed or otherwise damaged.
- Page 5 The appliance is not designed for use on transportations such as ship and airplane. Check with an authorized LG service centre for use under other special circumstances. • Do not tamper with controls. • Install the appliance where the floor is firm and level. The appliance may vibrate excessively and eventually fall if installed on an unstable surface, causing damage or injury.
- Page 6 SAFETY INSTRUCTIONS • Do not repair or replace any part of the appliance or attempt any servicing unless specifically recommended in the user-maintenance instructions or in published user-repair instructions that you understand and have the skills to carry out. • To reduce the risk of electric shock, do not install the appliance in humid spaces such as a bathroom.
- Page 7 SAFETY INSTRUCTIONS • Do not put live animals inside the appliance. • Do not allow children to climb into the appliance. • In the event of a gas leak (propane/LPG), ensure adequate ventilation and contact an authorized service centre before resuming use. Do not touch or disassemble the electrical outlet of the appliance.
- Page 8 SAFETY INSTRUCTIONS • Do not use heat to dry articles containing foam rubber or similarly textured rubber-like materials. • Do not open door during operation. The performance of the appliance may be adversely affected. If the appliance is installed on or near carpet, condensation from escaping hot air or steam may stain or damage the carpet.
- Page 9 SAFETY INSTRUCTIONS Grounding instructions • Improper connection of the equipment-grounding conductor can result in a risk of electric shock. Check with a qualified electrician or service person if you are in doubt that the appliance is properly grounded. • This appliance must be grounded. In the event of malfunction or breakdown, grounding will reduce the risk of electric shock by providing a path of least resistance for electric current.
-
Page 10: Installation Parts And Specifications
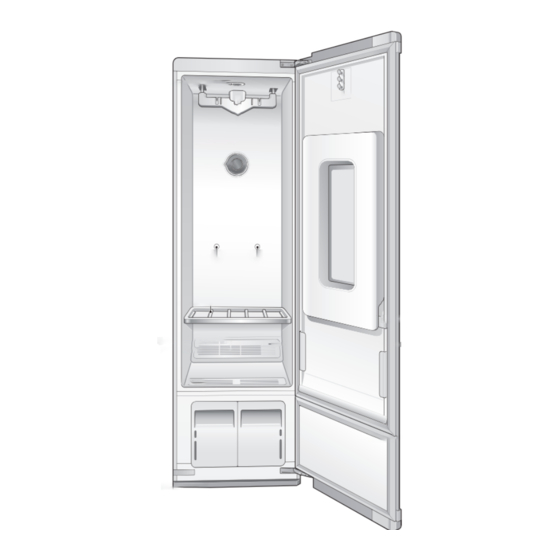
INSTALLATION INSTALLATION Parts and Specifications NOTE • Appearance and specifications may vary without notice to improve the quality of the appliance. Interior Interior light Pants crease care Moving hanger Door Shelf holder Clip Shelf Steam nozzle Aroma filter Water supply tank Hot air circulation vent *1 The door swing can be reversed by the installer Water drain tank... - Page 11 NOTE • The included accessories vary depending on the model you purchased. • Contact the store where the appliance was purchased or LG customer service if any accessories are damaged or missing. • For your safety and for extended product life, use only authorized components. The manufacturer is not responsible for product malfunction or accidents caused by the use of separately purchased unauthorized components or parts.
-
Page 12: Installation Place Requirements
INSTALLATION Installation Place • Ensure that when the appliance is installed, it is easily accessible for an engineer in the event of a Requirements breakdown. • Do not install the appliance in an area where it Before installing the appliance, check the following will be exposed to water and/or weather. - Page 13 INSTALLATION Allow at least 20 cm between the top of the appliance and any overhanging shelves or cabinets. NOTE • If the appliance is too close to adjacent items, performance may decrease and electricity consumption may increase. • Additional space should be considered on all sides of the appliance to reduce noise transfer.
-
Page 14: Unpacking The Appliance
INSTALLATION Closet Ventilation WARNING Requirements • The power plug must be plugged into an Closets with doors must have both an upper and appropriate outlet socket that is installed and lower vent to prevent heat and moisture build-up grounded/earthed in accordance with all local in the closet. -
Page 15: Levelling The Appliance
INSTALLATION Moving the Appliance Use the wrench (packaged with the appliance) to turn the levelling feet. Use the wheels at the bottom of the appliance to • Unscrew the front feet to raise the appliance move the appliance. Push the appliance slowly or screw in the feet to lower it. - Page 16 NOTE • If the direction of the door swing needs to be • The pads may leave a sticky residue when they changed after installation, contact the LG are removed. The residue can be removed with Customer Information Centre. alcohol.
- Page 17 INSTALLATION Installing hinge covers Insert one side of the tray first, then the other. Push the tray until it slides completely in. Open the appliance door. Snap the hinge cover onto the upper hinge assembly with the bent edge on the far side from the hinge.
-
Page 18: Operation Operation Overview
OPERATION OPERATION Operation Overview Choose a desired programme. • Touch a programme selector button. You can toggle to one of the settings each time Using the Appliance you pressed the button. Prepare items. • Wash clothes first, if needed. Begin a programme. •... - Page 19 OPERATION Sorting the items Symbols on the care labels • For best fabric care results, always treat fabrics Label Meaning Check with similar care requirements together. • Different fabrics have different care Hand Wash requirements, and some fabrics cannot be treated in certain programmes or should be Machine Wash, Normal treated separately.
-
Page 20: Checking The Items Before Every Load
OPERATION Checking the Items before Checking the Aroma Sheet Every Load Use a dryer fabric softener sheet to add a refreshing aroma to items. Replace the fabric Checking the Lint Filter softener sheet after every use. Remove the aroma filter from the appliance. Always make sure the lint filter is clean before starting a new load;... -
Page 21: Loading The Appliance
OPERATION • Use only clean tap water or bottled water. NOTE Foreign materials in the water may shorten the lifespan of the appliance. • Spray perfume 4–5 times on a cotton pad and then place it in the Aroma Holder to use. •... - Page 22 OPERATION plastic or metal hanger that hooks snugly into the Item How to style it indentations in the moving hanger. Skirt Lightweight blanket, throw Baby blanket Moving hanger Pants (not creased) Shorts Children’s clothes Scarf Moving hanger or shelf • Use the moving hanger for suits, coats, jackets, blouses, dresses, skirts, and pants that don’t Shawl require a crease.
- Page 23 OPERATION • Hang hangers in the same direction on the • Wrinkles may appear at the back of the collar on moving hanger to prevent collisions. some garments. • Do not allow children to play with or hang onto • Use the diagonal hanger grooves in the moving the moving hanger.
- Page 24 • For optimum results, use the extra pants care programme which is designed for use with the pants crease care feature. This programme can be downloaded using the LG ThinQ and used as the Downloaded programme. Opening and Closing the Pants Tug gently on the sides of the pants legs.
- Page 25 This programme can The Pants Crease Care be downloaded using the LG ThinQ and used as the Downloaded programme. Hang clothes in the pants crease care using the...
- Page 26 OPERATION • If the pants are longer, use the higher hooks • Gently tug the edges of the pants to smooth out any wrinkles. Make sure the pants are to keep the pants from hitting the floor of hanging straight in the pants crease care. the cabinet.
- Page 27 OPERATION of the cabinet, and items in contact with the NOTE surface may remain damp at the end of the programme. • Hang the shelf on the shelf holder when treating long clothes such as coats or dresses. Assembling the Shelf Storing Hangers Remove unused hangers from the moving hanger and store them in the shelf during operation.
-
Page 28: Control Panel
OPERATION Control Panel The control panel responds to touch using static electricity. A light touch is enough to operate it. Use a cloth when cleaning the controls to avoid contacting and activating the buttons. Foreign substances on the control, wearing gloves, or touching the buttons through cloth may prevent the buttons from activating. Control Panel Features Depending on the model, some of the following functions may not be available. - Page 29 • In order to use the Remote Control function, refer to SMART FUNCTIONS. Delay ON Touch this button to delay the start time of the programme. Wi-Fi • Touch and hold this button for 3 seconds to initiate the connection of the appliance to the LG ThinQ application.
-
Page 30: Programme Table
Downloaded: There are 5 special programmes which are set as a default. You can choose one of special programmes each time the Refresh button is touched. • With LG ThinQ application, you can see what a special programme is selected and download a new special programme. Fabric / Clothes... - Page 31 OPERATION Programme Sanitary Setting Normal / Fine Dust / Heavy Duty Use this programme to reduce germs and to dry items. Choose this programme for clothing, bedding, and children’s clothing and soft toys. Quilts or blankets should be a single layer and weigh 1.5 kg or less. Fabric / Clothes Suit, coat, school uniform, scarf, outdoor/performance clothing, towels, underwear, t-shirts, socks, jeans, jean jackets, lingerie, sportswear,...
- Page 32 OPERATION Wrinkle Care The appliance utilizes high temperature steam and moving hangers to reduce wrinkles without damaging the garment. Wrinkle Care Performance Comparison Styler The appliance uses steam to indirectly iron, wrinkled clothing may not be fully free of creases after cycle. There may be a difference in wrinkle care performance depending on the weight and material of the cloth.
- Page 33 OPERATION Programme Styling Process Programme Setting Preparing Steaming Drying Sanitizing Sanitary Normal Fine Dust Heavy Duty Gentle Dry Normal Dehumidify Time Dry NOTE • If the Sanitary programme are changed to a kind of Refresh or Gentle Dry programme during operation, the sanitize process is not performed.
- Page 34 OPERATION Programme Fabric & Clothes Refresh Sanitary Gentle Dry Winter coats, suits, sportswear, uniforms Acetate Suit lining, blouses, neckties, pajamas Acrylic Suit lining, blouses, neckties, pajamas Nylon Stockings, lingerie Polyurethane (less than 5%) Stretchable clothing Rayon Suit Lining *1 Check fabric care labels in garments before use. NOTE •...
-
Page 35: Option Programmes And Extra Functions
OPERATION Option Programmes and Night Care Extra Functions Use this function to store items overnight or anytime, items can’t be removed soon after a Control Lock programme ends. The function periodically produces warm air to prevent condensation, Use this function to prevent unwanted use of the keeping items warm and dry until they are appliance or to keep programme settings from removed. - Page 36 OPERATION • The drain tank may be filled before end of Dehumidify setting depending on the environment. • It is possible for room temperature to increase due to outgoing airflow from the appliance.
-
Page 37: Smart Functions
LG ThinQ application and register it again. wireless router manual. • LG ThinQ is not responsible for any network • The application is subject to change for connection problems or any faults, appliance improvement purposes without notice malfunctions, or errors caused by network to users. - Page 38 Application Once cycle download is completed in the appliance, the appliance keeps the downloaded cycle until a Search for the LG ThinQ application from the new cycle is downloaded. Google Play Store or Apple App Store on a To operate a downloaded programme on the smartphone.
-
Page 39: Smart Diagnosis
GPL, LGPL, MPL, and other open diagnosis method. source licenses that have the obligation to disclose • Launch the LG ThinQ application and select the source code, and to access all referred license Smart Diagnosis feature in the menu. Follow... -
Page 40: Maintenance
MAINTENANCE MAINTENANCE WARNING • Unplug the appliance before cleaning to avoid the risk of electric shock. Failure to follow this warning can cause serious injury, fire, electrical shock, or death. • Never use harsh chemicals, abrasive cleaners, or solvents to clean the appliance. They will damage the finish. - Page 41 MAINTENANCE • Use only clean tap water in the supply tank for best performance and to prolong the life of the appliance. Do not use distilled water. • Do not reuse the water from the water drain tank in the water supply tank. Clean the exterior of the tanks with a wet cloth.
-
Page 42: Troubleshooting
Operation of your appliance can lead to errors and malfunctions. The following tables contain possible causes and notes for resolving an error message or malfunction. It is recommended to read the tables carefully below in order to save your time and money that may cost for calling to LG Electronics service centre. - Page 43 TROUBLESHOOTING Symptoms Possible Cause & Solution The appliance won’t Circuit breaker/fuse is tripped/blown. operate. • Check house circuit breakers/fuses. Replace fuses or reset breaker. The appliance should be on a dedicated branch circuit. Appliance is not connected to 220-240 V socket. •...
- Page 44 TROUBLESHOOTING Symptoms Possible Cause & Solution Control panel won’t Control panel or button has dirt on it. respond. • Dirt or foreign objects on the control panel will interfere with the operation of the buttons. Clean the control panel. Control panel is locked. •...
- Page 45 • Find the Wi-Fi network connected to your smartphone and remove it, then connected to the Wi-Fi register your appliance on LG ThinQ. network. Mobile data for your smartphone is turned on. • Turn off the Mobile data of your smartphone and register the appliance using the Wi-Fi network.
- Page 46 Memo...
- Page 47 Memo...
Need help?
Do you have a question about the STYLER S3 NF Series and is the answer not in the manual?
Questions and answers