Table of Contents
Advertisement
Quick Links
Advertisement
Table of Contents

Summary of Contents for W&T P10
- Page 1 W& telecommunication. www.wtlan.ru . www.wtlan.ru...
-
Page 2: Table Of Contents
Table of Contents About This Guide ......................... 6 Getting Started with Your Phone ..................7 Hardware Overview ...................... 7 W&T-P10/P10P Hardware ..................7 Power LED Indicator ................... 10 Line Key LED ...................... 10 Screen and Icons ......................11 Idle Screen ......................11 Calls Screen ...................... - Page 3 Rejecting Calls with Do Not Disturb (DND) ............24 Ending Calls........................ 25 Muting/Unmuting Audio ....................26 Holding and Resuming Calls ..................26 Holding a Call ...................... 26 Resuming a Held Call ..................27 Redirecting Incoming Calls ..................27 Forwarding All Incoming Calls to a Contact ............28 Forwarding All Incoming Calls on All Lines ............
- Page 4 Saving a History Record to Local Directory ............49 Saving a History Record to Blacklist ..............49 Deleting History Records ..................50 Customizing Your Phone ....................52 Changing the Administrator Password ............... 52 Changing the Backlight and Time ................53 Changing the Language .....................
-
Page 5: About This Guide
About This Guide About This Guide Thank you for choosing W&T-P10/P10P IP phones, which deliver the industry’s leading HD audio quality and a widerange of business telephony features, such as Call Hold, Call Transfer, Busy Lamp Field, Call Recording, Paging and Conference over an IP network. -
Page 6: Getting Started With Your Phone
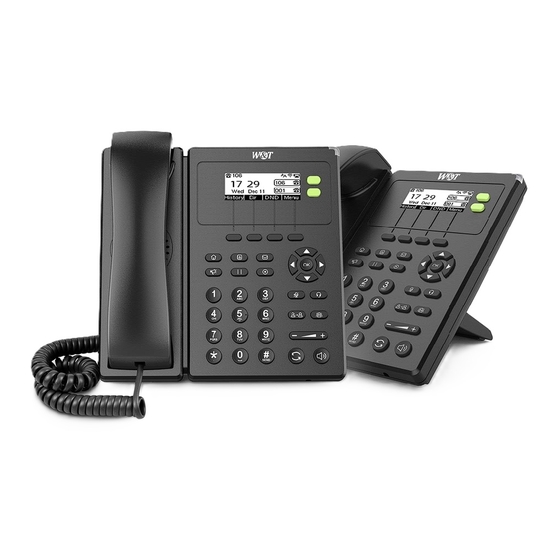
This chapter provides the overview of phone hardware and screen layout, and how to navigate your phone for the best performance. Topics Hardware Overview Screen and Icons Entering Characters Hardware Overview Topics W&T-P10/P10P Hardware Power LED Indicator Line Key LED W&T-P10/P10P Hardware W&T telecommunication www.wtlan.ru... - Page 7 Getting Started with Your Phone Getting Started with Your Phone Item Description Handset Handset to pick up and answer call Handset to pick up and answer call Phone Screen Shows information about your phone, such as Shows information about your phone, such as calls, messages, soft keys, calls, messages, soft keys, Line Keys Access your phone lines and features...
- Page 8 Getting Started with Your Phone Soft Keys Access the function displayed on the screen above the soft keys. The soft Menu Key Enter Menu Contact Phone book shortcut MESSAGE Key Accesses voice mails Paging Key Paging HOLD Key Places a call on hold or resumes a held call Recorder Key Record the voice when talking Navigation Keys...
-
Page 9: Power Led Indicator
Getting Started with Your Phone Logo W&T Logo Power LED Indicator The power LED indicator indicates the call, message and phone’s system status. LED Status Description Solid red The phone is initializing Fast-flashing red (0.3s) The phone is ringing Slowly-flashing red (1s) The phone receives a voice mail or text message Solid red for 0.5s and off The phone enters the power-saving mode... -
Page 10: Screen And Icons
Getting Started with Your Phone Screen and Icons The user screens and icon indicators can help you navigate and understand the important information on the phone's status. Topics Idle Screen Calls Screen Icons in the Status Bar Line Key Icons Other Icons Idle Screen The idle screen is made up of the status bar, line keys, and soft keys. -
Page 11: Icons In The Status Bar
Getting Started with Your Phone Getting Started with Your Phone Check with your system administrator to find out if this feature is available on the phone. Check with your system administrator to find out if this feature is available on the phone. Check with your system administrator to find out if this feature is available on the phone. -
Page 12: Line Key Icons
Getting Started with Your Phone Getting Started with Your Phone Line Key Icons Icons on the line key that vary by phone models. Icons on the line key that vary by phone models. Icon indicators (associated with line) (associated with line) Icon Description The private line is registered successfully... -
Page 13: Entering Characters
Getting Started with Your Phone Getting Started with Your Phone Call Icon Description Description Waiting Ringing Calling Entering Characters Entering Characters You can use the keypad keys on You can use the keypad keys on your phone to enter or update field information. your phone to enter or update field information. - Page 14 Getting Started with Your Phone Getting Started with Your Phone Select ABC, abc abc, 2aBmode, press * key or # key one or more times more times to enter one of the following special characters: following special characters: Enter special * key: *.,'?!\-()@/:_;+&%=<>...
-
Page 15: Call Features
Call Features Call Features You can use the phone to place and answer calls, ignore incoming calls, transfer a call to someone else, conduct a conference call and perform other basic call features. Topics Placing Calls Answering Calls Switching Among the Handset, Speakerphone and Headset Modes Disabling Call Waiting Silencing or Rejecting Incoming Calls Ending Calls... -
Page 16: Placing Calls
Call Features Placing Calls You can use your phone like a regular phone to place calls in many ways easily. Topics Placing a Call from the Dialer Placing Multiple Calls Redialing a Number Placing a Call from the Call History Placing a Call from the Directory Placing a Call from the Dialer The Dialer enables you to enter a number to place a call, and it displays a list of previously... -
Page 17: Placing Multiple Calls
Call Features Start typing a phone number. Select the desired line key. Pick up the handset, press the Speakerphone key or the HEADSET key 2.Enter a number or select a contact. 3.Select Send. Your system administrator can enable live dialpad feature, which enables your Note phone to automatically dial out the phone number after a period of time without selecting Send. -
Page 18: Redialing A Number
Call Features your system administrator to find out if this feature is available on the phone. Redialing a Number The phone keeps a record of all the placed calls. You can recall the contact you recently called. Procedure 1. Press the RD key. A record of Placed Calls is displayed on the phone screen. -
Page 19: Answering Calls
Call Features You can place a call to a contact directly from your directory. Procedure 1.Select Dir or navigate to Menu>Directory>Local Contacts. 2.Select the desired contact group or All Contacts. 3.Highlight the desired contact and select Send. If the selected contact has multiple numbers, highlight the desired number, and select Send. -
Page 20: Answering A Call When In A Call
Call Features Procedure 1.Do one of the following: Pick up the handset. Press the Speakerphone key Press the Speakerphone key Press the HEADSET key. Press the HEADSET key. Press Answer or the line key that has the flashing green LED indicator. or the line key that has the flashing green LED indicator. -
Page 21: Answering A Call Automatically
Call Features during a call. Answering a Call Automatically Auto answer enables you to automatically answer an incoming call in speakerphone (hands-free) mode when your phone is idle. When you are in an active call and an incoming call arrives on the phone, the Note incoming call will not be automatically answered even if the auto answer is enabled. -
Page 22: Disabling Call Waiting
Call Features 1. During the call, pick up the handset, press the Speakerphone key , or press the HEADSET key. For example, if you're using the handset, press the HEADSET key to switch to the headset, or press the Speakerphone key to switch to the speakerphone. -
Page 23: Silencing Or Rejecting Incoming Calls
Call Features Silencing or Rejecting Incoming Calls When you receive an incoming call, you can choose to silence or reject the call instead of answering. Rejecting Calls with Do Not Disturb (DND) You can enable DND to reject all incoming calls automatically when you do not want to be interrupted. -
Page 24: Ending Calls
Call Features Tip:To activate or deactivate DND quickly, press the DND soft key when the phone is idle. Deactivating DND You can deactivate DND when you are ready to resume receiving calls again. Procedure 1.Navigate to Menu>Features>DND. 2.Select Disable from the DND Status field. 3.Select Save. -
Page 25: Muting/Unmuting Audio
Call Features If you are using the speakerphone, press the Cancel key, Speakerphone key Muting/Unmuting Audio When you are in a call, you can mute the audio, so that you can hear the other person, but they cannot hear you. Procedure 1.Press the MUTE key during a call. -
Page 26: Resuming A Held Call
Call Features Procedure 1. Press the HOLD key or Hold during a call. The phone ignores engaged audio device (handset or headset) and plays beep in the Speakerphone (hands-free) mode by default. When you have multiple calls on the phone and the current call is held, you can Note press the corresponding line key to swap to the active call. -
Page 27: Forwarding All Incoming Calls To A Contact
Call Features Forwarding All Incoming Calls to a Contact Forwarding All Incoming Calls on All Lines Deactivating Call Forward Diverting Calls to a Contact Forwarding All Incoming Calls to a Contact You can set up the forwarding type which enables your phone to forward all incoming calls to a contact. -
Page 28: Deactivating Call Forward
Call Features 2.Select the desired forwarding type and select Enabled from the corresponding field. 3.Enter the contact number you want to forward incoming calls to in the Forward to field. 4.If you select the No Answer Forward option, select the desired ring time to wait before forwarding from the s field. -
Page 29: Transferring Calls
Call Features Procedure 1.Select Directory (Dir) or navigate to Menu>Directory>Local Contacts. 2.Select the desired contact group or Local Contacts. 3.Highlight the desired contact, and select Option>Detail. 4.Edit the contact information. 5.Enter a contact’s number you want to divert the call to in the Auto Divert field. 6.Select Save. -
Page 30: Performing Transfer With A Transfer Key
Call Features You can transfer a call to another contact immediately without consulting with her/him first. Procedure 1.Press the TRAN key or XFER during a call. 2.Do one of the following: Enter the number or select a contact from the placed call list you want to transfer to. ... -
Page 31: Conference Calls
Call Features After you have set a Transfer key with a specific contact, you can perform a blind transfer by using it. Before You Begin Confirm with your system administrator that the transfer mode has set to perform a blind transfer. -
Page 32: Setting Up A Local Conference Call
Call Features Topics Setting Up a Local Conference Call Holding or Resuming a Conference Call Splitting a Conference Call Ending a Conference Call Setting Up a Local Conference Call You can set up a local conference call with up to two contacts. Procedure 1.Place a call to the first party. -
Page 33: Splitting A Conference Call
Call Features When you place a conference call on hold, other participants cannot hear each other until you resume the held conference call. Procedure 1.Press the HOLD key or Hold to place the conference on hold. 2.Press the HOLD key again or Resume to resume the held conference call. Splitting a Conference Call You can split the conference call into individual calls. -
Page 34: Advanced Call Features
Advanced Call Features Advanced Call Features You can perform some server-dependent tasks on the phone. Contact your system administrator to find out if your phone supports these advanced call features. Voice Mail Voice Mail feature allows you to leave voice mails for someone or listen to your voice mail messages on your IP phones. -
Page 35: Directory
Advanced Call Features You can listen to your voice mails on the phone, to obtain voice information sent by a contact. Before You Begin You need to set the voice mail code in advance. Procedure 1.Navigate to Menu>Message>Voice Mail>View Voice Mail. The phone screen displays the amount of new and old voice mails. -
Page 36: Local Contacts
Advanced Call Features Blacklist Local Contacts You can store up to 2000 contacts in your local directory, you can search, add, edit and delete a contact. Topics Managing the Local Directory Groups Managing the Local Directory Contacts Moving a Local Directory Contact to Blacklist Searching for Contacts Managing the Local Directory Groups You can manage the Local Directory groups when the phone is idle. - Page 37 Advanced Call Features Adding Contact Groups To organize your contacts and make them easier to find, you can add additional groups in the Local Directory. Procedure 1.Select Dir or navigate to Menu>Directory>Local Contacts. 2.Select AddGrp. 3.Enter the desired group name and select Ring Type. 4.Select Save.
- Page 38 Advanced Call Features Deleting Contact Groups When you delete a contact group, the contacts in the group will not be deleted. You can view the contacts in All Contacts list. Procedure 1.Select Dir or navigate to Menu>Directory >Local Contacts. 2.Highlight the desired group. 3.Select Option>Delete.
- Page 39 Advanced Call Features Deleting a Contact Deleting All Contacts Adding Contacts When you add a contact to your Local Directory, you can choose how much information you want to enter for your contact. You are required to enter a contact name at least for each new contact.
- Page 40 Advanced Call Features Procedure 1.Select Dir or navigate to Menu>Directory>Local Contacts. 2.Select the desired contact group or All Contacts. The contact names are displayed in alphabetical order. Editing Contacts You can update your contacts' information. Procedure 1.Select Dir or navigate to Menu>Directory>Local Contacts. 2.Select the desired contact group or All Contacts.
- Page 41 Advanced Call Features Procedure 1.Select Dir or navigate to Menu>Directory>Local Contacts. 2.Select the desired contact group or All Contacts. 3.Highlight the desired contact, and select Option>Delete. The phone prompts you whether to delete the contact. 4.Select OK. If the contact added to the Favorites directory is deleted in the Local Directory, it Note will be automatically deleted from the Favorites directory.
- Page 42 Advanced Call Features If the contact added to the Favorites directory is deleted in the Local Directory, it Note will be automatically deleted from the Favorites directory. Moving a Local Directory Contact to Blacklist You can move a contact in the Local Directory to blacklist. Incoming calls from this contact will be rejected automatically.
-
Page 43: Blacklist
Advanced Call Features 2.Select Search. 3.Enter your search criteria in the search field. Blacklist Incoming calls from the Blacklist are rejected automatically. You can store up to 30 contacts in the blacklist to block unwanted callers. Topics Adding a Blacklist Contact Viewing Blacklist Contacts Editing a Blacklist Contact Deleting Blacklist Contacts... - Page 44 Advanced Call Features 3.Enter the blacklist contact’s information. 4.Select Save. Viewing Blacklist Contacts You can view the blacklist contacts from the Blacklist on your phone. Procedure 1. Navigate to Menu>Directory>Blacklist. Editing a Blacklist Contact You can update your blacklist contacts' information. Procedure 1.Navigate to Menu>Directory>Blacklist.
- Page 45 Advanced Call Features Deleting Blacklist Contacts You can delete one or all blacklist contacts. If a contact is removed from the blacklist, you can answer the call from the contact normally. Topics Deleting a Blacklist Contact Deleting All Blacklist Contacts Deleting a Blacklist Contact If you want to answer a call from a specific contact, you need to remove it from the Blacklist.
- Page 46 Advanced Call Features Deleting All Blacklist Contacts You can delete all contacts from the Blacklist when you are ready to answer calls from them again. Procedure 1.Navigate to Menu>Directory>Blacklist. 2.Select Option>Delete All. The phone prompts you whether to delete all contacts. 3.Select OK.
-
Page 47: Call History
Advanced Call Features 4.Select OK. Call History The call history list includes Missed Calls, Placed Calls, Received Calls and Forwarded Calls, and each list holds 100 entries. Topics Viewing History Records Saving a History Record to Local Directory Saving a History Record to Blacklist Deleting History Records Viewing History Records The history record saves the call information such as the caller's name and number, local... -
Page 48: Saving A History Record To Local Directory
Advanced Call Features 4.Select Option>Detail. Saving a History Record to Local Directory To identify someone's call the next time, you can save a history record to the Local Directory. Procedure 1.Select History. 2.Select the desired list. 3.Highlight the desired entry, and select Option>Add to Contacts. 4.Edit the contact information. -
Page 49: Deleting History Records
Advanced Call Features 4.Edit the contact information. 5.Select OK. Deleting History Records You can delete one or all call records from the call history list. Topics Deleting a Call Record Deleting All Call Records Deleting a Call Record You can delete any call record from the call history list. Procedure 1.Press History. - Page 50 Advanced Call Features Procedure 1.Press History. 2.Select the desired list. 3.Select Option>Delete All. The phone prompts you whether to delete all the records. 4. Select OK. W&T telecommunication www.wtlan.ru...
-
Page 51: Customizing Your Phone
Customizing Your Phone Customizing Your Phone You can make your phone more personalized by customizing various settings. Topics Changing the Administrator Password Changing the Backlight and Time Changing the Language Time & Date Changing the Administrator Password By default, you require an administrator password to access the Advanced/Advanced Settings menu. -
Page 52: Changing The Backlight And Time
Customizing Your Phone 3.Select OK. Changing the Backlight and Time You can change the brightness of the phone screen during phone activity and inactivity. The brightness automatically changes after the phone has been idle for a specified time. You can change the screen backlight and time in the following settings: Backlight Time: The delay time to change the brightness of the phone screen when the phone is inactive. -
Page 53: Time & Date
Customizing Your Phone Contact your system administrator to find out exactly which languages are supported on your phone. Procedure 1.Navigate to Menu>Basic>Language. 2.Select the desired language. 3.Select Save. The phone language is changed to the selected one. Time & Date You can set the time and date manually. -
Page 54: Changing The Time And Date Format
Customizing Your Phone 2.Select the Manual from the General field. 3.Edit the date and time. 4.Select OK. The time and date set on the phone will be changed accordingly. Changing the Time and Date Format You can set the phone to display the time in 12-hour format or 24-hour format. You can also change the date format, including the options to display the day (D), month (M), and year (Y). -
Page 55: Adjusting The Volume
Customizing Your Phone Adjusting the Volume Setting the Ring Tone Adjusting the Volume You can adjust the volume of the ringer, media, and the audio during a call. Procedure 1. Press the Volume key to adjust the volume. Setting the Ring Tone You can set distinctive ring tones for groups or contacts in your Local Directory so that you can identify the caller when your phone rings. - Page 56 Customizing Your Phone Setting a Ring Tone for the Phone You can choose a ring tone for all incoming calls. Procedure 1.Navigate to Menu>Basic>Ring Tones>Type. 2.Select the desired ring tone. 3.Select OK. Setting a Ring Tone for a Group You can select a unique ring tone for various groups in your Local Directory. You can only set a ring tone for a group that is added manually.
-
Page 57: Wireless Network
Customizing Your Phone 5.Select Save. Setting a Ring Tone for a Contact You can select a unique ring tone for various contacts in your Local Directory. This helps you quickly identify callers according to the ring tones. Procedure 1.Select Dir or navigate to Menu>Directory>Local Contacts. 2.Select the desired contact group or All Contacts. -
Page 58: Activating The Wi-Fi Mode
Customizing Your Phone Connecting to the Wireless Network Viewing the Wireless Network Information Disconnecting the Wireless Network Connection Deactivating the Wi-Fi Mode Activating the Wi-Fi Mode You can activate the Wi-Fi mode to connect your phone to an available wireless network. Procedure 1.Navigate to Menu>Basic>Wi-Fi. -
Page 59: Viewing The Wireless Network Information
Customizing Your Phone network, you can also connect it manually. Before You Begin Get the password of the wireless network from your system administrator. Make sure that the Wi-Fi mode is activated. Procedure 1.Navigate to Menu>Basic>Wi-Fi. 2.Highlight the Available Network(s) and select Enter. (X represents the number of available networks) 3.Optional: To research the available network, select Scan. -
Page 60: Disconnecting The Wireless Network Connection
Customizing Your Phone (X represents the number of available networks). 2.Select Detail to view the detailed wireless network information. If the phone is connected to a wireless network successfully, you can also navigate to Menu>Basic>Wi-Fi>Wi-Fi Status to view the connected wireless network information. Disconnecting the Wireless Network Connection When you no longer want to connect to the current wireless network, you can disconnect Procedure... - Page 61 Customizing Your Phone 2.Select Off from the Wi-Fi field. 3.Select OK. W&T telecommunication www.wtlan.ru...
-
Page 62: Maintaining Your Phone
Maintaining Your Phone Maintaining Your Phone When your phone is unable to operate properly, you need to investigate or troubleshoot issues along with other tasks your system administrator may ask you to perform. Topics Rebooting Your Phone Resetting to Factory Settings Rebooting Your Phone The improper operation may cause malfunction. -
Page 63: Resetting To Factory Settings
Maintaining Your Phone Resetting to Factory Settings When some issues occur on your phone and you have tried all troubleshooting suggestions but still do not solve the problem, you can reset your phone to factory configurations. This operation will delete all your personal configuration settings, and reset all settings to the factory defaults.