Table of Contents
Advertisement
Quick Links
Advertisement
Table of Contents

Subscribe to Our Youtube Channel
Related Manuals for Solight PRO 1L202


Summary of Contents for Solight PRO 1L202
- Page 1 USER MANUAL PRO 1L202...
-
Page 2: Main Functions
MAIN FUNCTIONS Wireless Ultrawide control angle of view Wireless Quality control night mode 1080P Two-way Full HD video full duplex Communication TF card Max. 128 GB... -
Page 3: Packaging Content
PACKAGING CONTENT Smart WiFi doorbe 1x USB cable 1x User Packing of scr Instructions and dowels 1x Imbus Reversible 1x Installation adhesive tape holder... -
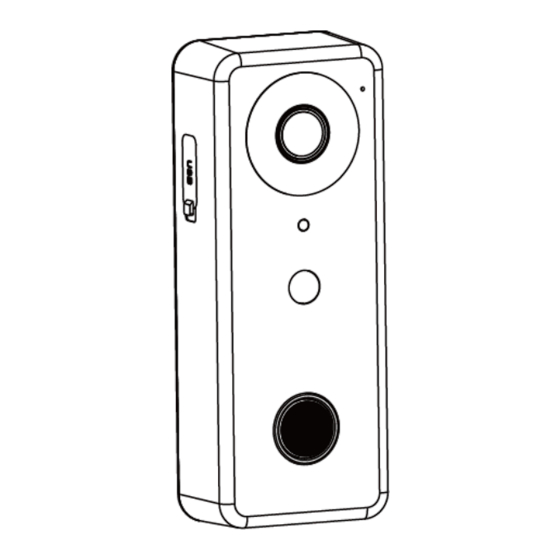
Page 4: Description Of Equipment
DESCRIPTION OF EQUIPMENT Microphone Lens Motion sensor Light sensor Ring button Speaker Sound channel Lens Image recording Additional light in low light Infrared LEDs conditions PIR sensor PIR sensor settings Presents the working states of the Indicator light device Sends a notification to the app Ring button when the button is pressed Microphone... - Page 5 USB - C Waterproof 5V/2A cover When you open the waterproof silicone cover on the side, you'll find a USB-C charging slot. The TF memory card slot can be found by removing the battery cover.
-
Page 6: General Information
Svorky 1, 2: Power supply 12-24V AC or DC. Before using the device for the first time, turn on the device, press and hold the reset button for approximately 5 seconds until "System reset" is heard and then release the button. GENERAL INFORMATION •... -
Page 7: Mobile Applications
INDICATOR LIGHT SIGNALLING The meaning of status LED status Blue lights up, red Configuration status flashes slowly Blue lights up, red Connecting to Wi-Fi flashes fast Weak battery Blue and red light Connection is fine, live Shining blue transmission Neither blue nor red Sleep mode or off-line lights MOBILE APPLICATIONS... -
Page 8: Device Pairing
DEVICE PAIRING To pair your device, click on "Add device" or "+" in the top right corner... - Page 9 Select "Camera and lock" and then "Smart Doorbell" (Fig. Confirm that the indicator light is flashing on the device by ticking it and click "Next" (Fig. 2) Enter the name of your 2.4GHz Wi-Fi network and enter its password (Figure 3).
- Page 10 Use the camera to read the QR code from your phone and confirm in the mobile app if you hear a beep. Wait for the device to pair. For more detailed information about the application and product, please visit www.youtube.com under the title "Solight 1L202 - Application Instructions".
- Page 11 LOCATION OF THE BELL 1. Use double-sided tape to place on a smooth surface. Glue the cover first, then insert the bell into it. 2. To attach the device to a rough surface, first screw the bracket to the wall and then attach the bell to it.
- Page 12 CHARGING THE DOORBELL Always take the device inside the building when charging, never charge outside. Attach a USB-C cable to the side of the doorbell, then plug it into a 5V/2A USB adapter, which plugs into an AC 100~240V outlet. Charge for at least 4 hours.
- Page 13 GONG PAIRING Equipment description USB plug Play melody button - plays the currently selected melody Melody selection button - plays other melodies Volume - set the ringer volume LED indicator The bell and gong operate at 433MHz. Pair the gong with the bell after you have paired the bell with the mobile app.
-
Page 14: Power Supply
A source with a power of 12W and higher is suitable for powering the doorbell. The product has been issued with a CE Declaration of Conformity in accordance with the applicable regulations. On request from the importer at www.solight.cz...
Need help?
Do you have a question about the PRO 1L202 and is the answer not in the manual?
Questions and answers