Advertisement
Quick Links
Advertisement

Summary of Contents for Mission Critical Purkeys DIRECT -04
- Page 1 A MISSION CRITICAL ELECTRONICS BRAND DIRECT™-04 INSTALLATION GUIDE INST041 R2.04...
-
Page 3: Table Of Contents
CONTENTS General Information ................2 Direct-04 Diagram for Straight Truck ..........3 Mounting the Direct Controller ............4 Straight Truck Input Harness Installation ........5 Main Harness Installation ...............7 Part List ..................11 Limited Commercial Warranty Policy ..........16 P: 479.419.4800 | F: 479.419.4801 | www.purkeys.net... -
Page 4: General Information
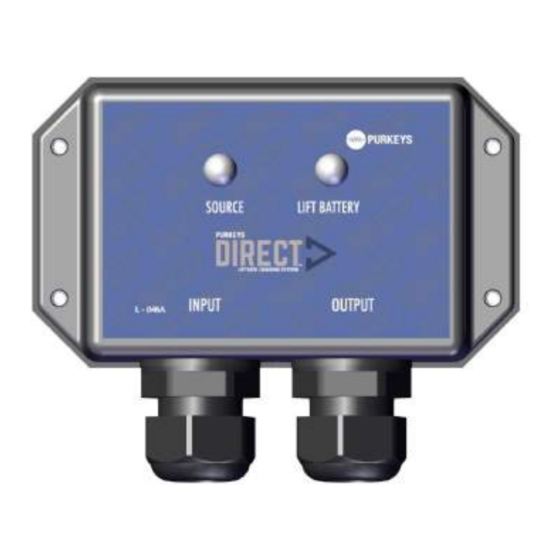
GENERAL INFORMATION The Purkeys Direct™ system improves the charging of liftgate batteries by utilizing a DC/DC Converter to boost the voltage for optimal charging. The boost in voltage overcomes the normal voltage drop caused by the extended distance between the liftgate batteries and the vehicle charging system. -
Page 5: Direct-04 Diagram For Straight Truck
DIRECT-04 INSTALLATION GUIDE DIRECT-04 DIAGRAM FOR STRAIGHT TRUCK P: 479.419.4800 | F: 479.419.4801 | www.purkeys.net... -
Page 6: Mounting The Direct Controller
MOUNTING THE DIRECT CONTROLLER Step 1: Mount the Direct Controller at the front of the trailer via the mounting holes on the L-bracket. Note: If the L-bracket is not used, mount the Direct Controller at the front of the trailer via the mounting holes on the mounting plate. -
Page 7: Straight Truck Input Harness Installation
DIRECT-04 INSTALLATION GUIDE STRAIGHT TRUCK INPUT HARNESS INSTALLATION Step 1: Route the jacketed 2-conductor input harness toward the vehicle battery box. Note: Place the cable clamps along the input harness every 6 inches to ensure proper support for the cable. Avoid sharp edges and possible chaffing points. - Page 8 Step 4: Cut about 6 inches off the jacketed portion of the white and blue wires. Apply the supplied ¾ inch black heat shrink where the jacket was stripped off. Step 5: Slide the supplied red ¼ inch heat shrink over the blue wire.
-
Page 9: Main Harness Installation
DIRECT-04 INSTALLATION GUIDE MAIN HARNESS INSTALLATION Step 1: Route the Direct jacketed 4-conductor DC/DC converter main harness down the front of the straight truck box and back to the liftgate battery box. Note: Place the cable clamps along the 4-conductor jacketed main harness every 6 inches to ensure proper support for the cable. - Page 10 Note: If your battery box includes a slide-out tray, include enough slack to allow the tray to fully extend without tugging the wire connections. Step 4: Pull the jacketed 4-conductor main harness out of the box (making it easier to work on), and cut off the excess at the mark.
- Page 11 DIRECT-04 INSTALLATION GUIDE Step 8: Slide the supplied red ¼ inch heat shrink over the orange, yellow, and black wires. Slide the supplied black ¼ inch heat shrink over the white wire. Step 9: Crimp 3/8 ring terminals onto the white and black 8-gauge wires.
- Page 12 Main Harness Installation Complete.
-
Page 13: Part List
DIRECT-04 INSTALLATION GUIDE PART LIST PART# MOD00077 DIRECT CONTROLLER REPLACEMENT PART# H-00286 50 FT MAIN HARNESS PART# H-00345 20 FT SELECT/DIRECT INPUT HARNESS P: 479.419.4800 | F: 479.419.4801 | www.purkeys.net... - Page 14 PART# BK-1049 (Revision B) TERMINAL BAG KIT PART# BK-1054 (Revision B) HARDWARE BAG KIT PART# DIRECT-04 DIRECT STRAIGHT TRUCK...
- Page 15 DIRECT-04 INSTALLATION GUIDE PART# FH00043 MIDI FUSE HOLDER PART# F00062 30 AMP MIDI FUSE PART# PL00079 DIRECT MOUNTING PLATE P: 479.419.4800 | F: 479.419.4801 | www.purkeys.net...
- Page 16 PART# INST041 DIRECT-04 INSTALLATION GUIDE PART# INST030 DIRECT DIAGNOSTIC GUIDE...
- Page 17 DIRECT-04 INSTALLATION GUIDE NOTES P: 479.419.4800 | F: 479.419.4801 | www.purkeys.net...
-
Page 18: Limited Commercial Warranty Policy
LIMITED COMMERCIAL WARRANTY POLICY MCE Purkeys FE, LLC (hereafter “Purkeys”), warrants each product to be free of defects in material or workmanship under normal use and service. This warranty is for the benefit of Original Equipment Manufacturers, Dealers, Warehouse Distributors, Fleets, or other End Users (hereafter “Customers”) and covers products manufactured by Purkeys and sold new to Customers either directly by Purkeys or by its authorized dealers, distributors, or agents. - Page 19 DIRECT-04 INSTALLATION GUIDE P: 479.419.4800 | F: 479.419.4801 | www.purkeys.net...
Need help?
Do you have a question about the Purkeys DIRECT -04 and is the answer not in the manual?
Questions and answers