Advertisement
IMPORTANT SAFEGUARDS
Before operating this product, please read these instructions completely and save this manual for future use.
All information provided in this section is directed to guide you towards the correct and safe operation of this device. By following the instructions, you can avoid injuries to yourself and others, as well as avoid damage to property.
READ ALL INSTRUCTIONS BEFORE USING

- Toddlers, infants, people who are unable to operate should not be allowed to use this appliance. Please keep it out of reach of children.
- Never alter the appliance. Also, do not try to disassemble or repair it.
- Do not place or store the product where it can fall or be pulled into a tub or sink.
- Do not reach for the product that has fallen into water. Unplug immediately.
- Do not use the product while bathing.

- This appliance can be used by children aged 8 years and above. People with reduced physical, sensory or mental capabilities, lack of experience, and knowledge can also use the appliance if given proper supervision or instruction concerning the use of the appliance in a safe way by understanding the hazards involved.
- Children shall not play with the appliance. Cleaning and user maintenance shall not be made by children without supervision.
- The appliance is only to be used with the power supply unit provided with the appliance.
- The battery must be removed from the appliance before it is scrapped.
- The appliance must be disconnected from the supply mains while removing the battery
- The battery is to be disposed of safely.
- Regarding how to remove the battery, please refer to the "disposal" section
- Do not fill the tank with water warmer than 40 ºC.
- If the external flexible cable or cord of this transformer is damaged, replace it with the manufacturer or the service agent, or a similarly qualified person to avoid the hazard.
- Keep the cord away from heated surfaces.
- Please do not use it if the nozzle is lost.
FOLLOW THESE INSTRUCTIONS
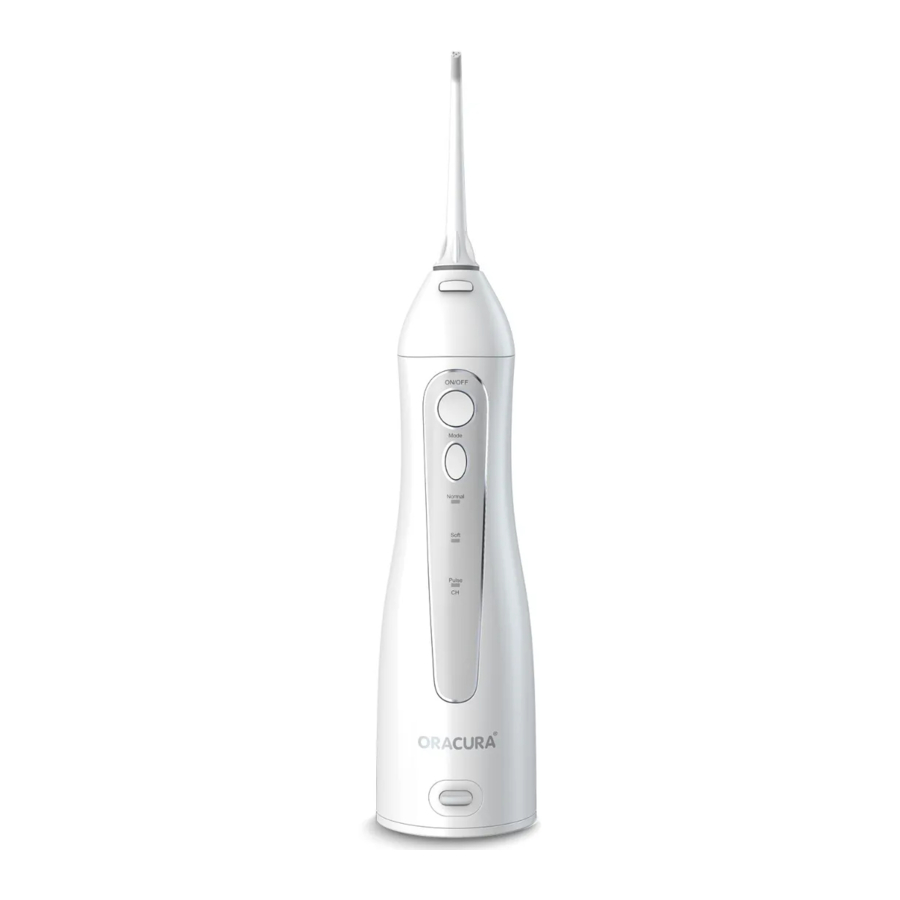
Configuration

- Nozzle release button
- On/Off button
- Mode button
- Mode indicator
- Charging base
- Charging base cover
- Nozzle
- Identification ring
- Nozzle suction tube
- Filter
- Water tank
- Water tank cap
Note:
There may be some liquid remaining inside the main appliance before use (tank, water suction tube, etc). This is the remaining distilled water that was used for the performance (water flow) test, so there are no health concerns regarding the same.
How to use
Charging the device (Fig. 1)

- Take the charger base cover down and insert the appliance plug securely into the appliance socket. Before inserting the appliance plug, make sure that there is no remaining liquid inside the socket.
- Insert the charging adaptor securely into the power outlet.
- The "CH" indicator blinks when the device is charging and it will turn off after it is fully charged.
- Recover the cover onto the charger base again after charging is finished.
Note:
If the "CH" indicator is blinking during or after water flossing, it means that the battery needs to be recharged. Full recharging will take about 4 hours.
Use the Smart Water Flosser
- Attach nozzle onto the unit. (Fig. 2)

- Open the water tank cap to fill the tank with water at which the temperature does not exceed 40ºC. Close the cap. (Fig. 3)

- OR Slide the water tank down off the unit, fill the tank with water at which the temperature does not exceed 40ºC, then attach the tank onto the unit. (Fig. 4)

- Press the "Mode" key to select the mode that you desire. You can also change the working mode during the process of your water flossing. (Fig. 5).
Normal: for normal cleaning.
Soft: for gentle cleaning of sensitive gums.
Pulse: for cleaning and massaging the gums.

- Hold the unit in an upright position with the nozzle tip pointing towards your teeth.
- Keep your mouth slightly opened so that the water can flow out.
- Press the "On/Off" key to start the water flossing process.(Fig. 6)

- Directing the water jet flow at a 90-degree angle to the teeth and gums.
- Directing the water jet slowly along with the teeth.
- Directing the water jet along the gum line with the nozzle tip at a 90-degree angle to the gum tissue.
- Cleaning between the teeth and around any braces, crowns, or bridgework thoroughly.


- Press the "On/Off" key and then press the nozzle release button to replace other nozzles as per your need. (Fig.7)

- Once water flossing is completed, press the "On/Off" key again to turn off the device.
- Switch off your device and place it in the protected case after use.

After using the appliance (Fig.8)

- Open the water tank cap and dispose of the water in the tank.
- Press "On/Off" key to turn on the unit, and drain the water inside the appliance.
- Press "On/Off" key again to turn off the unit, and close the water tank cap.
- Wipe the device with dry cloth.
Note: To prevent bacteria from propagating, make sure there is no remaining water inside the unit. If you're not going to use the appliance for a long time, make sure to wipe and dry the appliance before storing it.
Maintenance
Use only water or neutral cleaning agent to clean the device. Never use caustic or abrasive agents (e.g., vinegar or lime scale removers), since they may damage the device. Do not wash using hot water of over 50ºC. Keep the device away from high temperature area and avoid direct sunlight.
Main unit
- Remove the dirt by wiping the unit. Use a cloth with liquid soap to clean it and wipe it off using a dry cloth.
- Do not submerge the main unit in water to clean.
- Dry after washing with water.
Water tank cap
Wipe off any grime and dirt with a cloth.
Nozzle
- Wash with water and wipe with soft cloth.
- Replace the nozzle every 6 months.
Water suction tube
- Wash with water and wipe with soft cloth.
- Do not bend, pull or twist the water suction tube.
Tank
- Wash with water and wipe with soft cloth.
- Dry the tank when not using for a long period.
Tank Troubleshooting
| Problem | Possible Cause | Solution |
It does not work | You've just purchased the product or it has been left unused for more than 3 months. | Charge the unit for at least 4 hours. |
| It only works for a few minutes even after charging | The battery has reached the end of its life cycle. | Contact service center for support. |
| Charging time was insufficient. | Charge the unit for at least 4 hours. | |
Water pressure is very low | There is dirt stuck in the nozzle | Replace the nozzle |
| The nozzle is deformed | ||
| There is dirt stuck in the filter | Clean the filter | |
Water does not come out | The tank is empty | Fill up tank |
| The appliance is tilted too much while in use | Use with the appliance in a vertical state | |
| You've just purchased the product or it has been left unused for a period. | Pull out the nozzle then flush nozzle hole on the body. |
Disposal
The rechargeable battery inside your appliance is easy to remove for recycling. At the end of the product's life and prior to disposal, please remove the rechargeable battery from the handle by following the instructions below. During the below operation, be sure to protect your eyes, hands, fingers, and the surface on which you work.

- Remove 2pcs rubber feet on the bottom of the handle.
![]() (Like on Fig. 9)
(Like on Fig. 9)
![]()
- Insert a screwdriver into the slot located at the bottom of the handle and turn counterclockwise to release the bottom
![]() cap (Like on Fig. 9)
cap (Like on Fig. 9) - Slide the water tank down off the device and unscrew the two screws beside the suction tube. (Fig. 10)
![]()
- Open the top cover and put the inner out of the unit, then unscrew all the screws of the inner.(Fig. 11)
![]()
- Cut off the battery line and pull out the batteries from the inner.(Fig. 12)
![]()
 (Like on Fig. 9)
 cap (Like on Fig. 9)


If you have recycling questions, please contact your local waste management office.
ORACURA Solutions Pvt Ltd,
6th Floor, Unit 1, Vidhani Kalpavruksha, H233-2, MIDC, T.T.C. Industrial Area, Nerul.
Navi Mumbai 410706
Toll-Free: 1800-120-7201
WhatsApp: +91 77387 33700
Email: support@oracura.in

Documents / ResourcesDownload manual
Here you can download full pdf version of manual, it may contain additional safety instructions, warranty information, FCC rules, etc.
Advertisement
Need help?
Do you have a question about the OC010 and is the answer not in the manual?
Questions and answers