Table of Contents
Advertisement
Available languages
Available languages
Quick Links
Advertisement
Table of Contents

Subscribe to Our Youtube Channel
Related Manuals for Perel CWS1


Summary of Contents for Perel CWS1
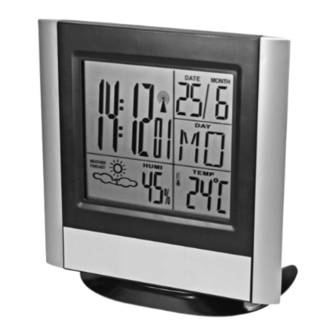
- Page 1 CWS1 WALL/DESKTOP CLOCK HORLOGE MURALE / DE BUREAU WAND-/BUREAUKLOK RELOJ MURAL/DE SOBREMESA WAND-/TISCHUHR RELÓGIO MURAL DE SECRETARIA USER MANUAL NOTICE D’EMPLOI GEBRUIKERSHANDLEIDING MANUAL DEL USUARIO BEDIENUNGSHANDLEITUNG MANUAL DE INSTRUÇÕES...
-
Page 3: Operation
Press SET to confirm. • Choose the time display format (12h or 24h) with UP and confirm with SET. • Continue setting the seconds, the hours, the minutes and the date with UP and confirming with SET until your CWS1 is set. -
Page 4: Technical Specifications
Use this device with original accessories only. Velleman nv cannot be held responsible in the event of damage or injury resulted from (incorrect) use of this device. For more info concerning this product, please visit our website www.perel.eu. The information in this manual is subject to change without prior notice. -
Page 5: Spécifications Techniques
• Kies uw taal met UP (E voor Engels, D voor Duits, F voor Frans, I voor Italiaans, S voor Spaans). Bevestig met SET. • Selecteer het weergaveformaat (12h of 24h) met UP en bevestig met SET. • Stel de seconden, de uren, de minuten en de datum verder in met UP en bevestig telkens met SET tot uw CWS1 volledig is ingesteld. -
Page 6: Technische Specificaties
Gebruik dit toestel enkel met originele accessoires. Velleman nv is niet aansprakelijk voor schade of kwetsuren bij (verkeerd) gebruik van dit toestel. Voor meer informatie omtrent dit product, zie www. perel.eu. De informatie in deze handleiding kan te allen tijde worden gewijzigd zonder voorafgaande kennisgeving. - Page 7 • Seleccione el formato de visualización de la hora (12h o 24h) con UP y confirme con SET. • Ajuste los segundos, las horas, los minutos y la fecha con UP y confirme con SET hasta que el CWS1 esté ajustado.
-
Page 8: Especificaciones
Falls Zweifel bestehen, wenden Sie sich für Entsorgungsrichtlinien an Ihre örtliche Behörde. Wir bedanken uns für den Kauf der CWS1! Lesen Sie diese Bedienungsanleitung vor Inbetriebnahme sorgfältig durch. Überprüfen Sie, ob Transportschäden vorliegen. Sollte dies der Fall sein, verwenden Sie das Gerät nicht und wenden Sie sich an Ihren Händler. -
Page 9: Technische Daten
Verwenden Sie dieses Gerät nur mit originellen Zubehörteilen. Velleman NV übernimmt keine Haftung für Schaden oder Verletzungen bei (falscher) Anwendung dieses Gerätes. Für mehr Informationen zu diesem Produkt, siehe www. perel.eu. Alle Änderungen ohne vorherige Ankündigung vorbehalten. CWS1 – RELÓGIO MURAL / DE SECRETARIA 1. -
Page 10: Especificações Técnicas
• Escolher o modo de hora (12h ou 24h) com UP e confirmar com SET. • Continuar a ajustar os segundos, as horas, os minutos e a data com UP e confirmar com SET até que o seu CWS1 esteja ajustado.
Need help?
Do you have a question about the CWS1 and is the answer not in the manual?
Questions and answers