Table of Contents
Advertisement
Available languages
Available languages
Quick Links
Nemo
SCT
SCT
WSCT
Climatic sensor
WSCT
0682
EN -
Instructions and warnings for installation and use
IT -
Istruzioni ed avvertenze per l'installazione e l'uso
FR -
Instructions et avertissements pour l'installation et l'utilisation
ES -
Instrucciones y advertencias para la instalación y el uso
DE -
Installierungs-und Gebrauchsanleitungen und Hinweise
PL -
Instrukcje i ostrzeżenia do instalacji i użytkowania
NL -
Aanwijzingen en aanbevelingen voor installatie en gebruik
Advertisement
Table of Contents

Summary of Contents for Nemo SCT
- Page 1 Nemo WSCT Climatic sensor WSCT 0682 EN - Instructions and warnings for installation and use IT - Istruzioni ed avvertenze per l’installazione e l’uso FR - Instructions et avertissements pour l’installation et l’utilisation ES - Instrucciones y advertencias para la instalación y el uso...
- Page 3 Note • The numbering of the figures in this Guide does not correspond to that used in the full Instruction Manual. • This Guide does not substitute the full Nemo WSCT/ SCT Climatic Instruction Manual. sensor Step 1 - Installation and connections 60°...
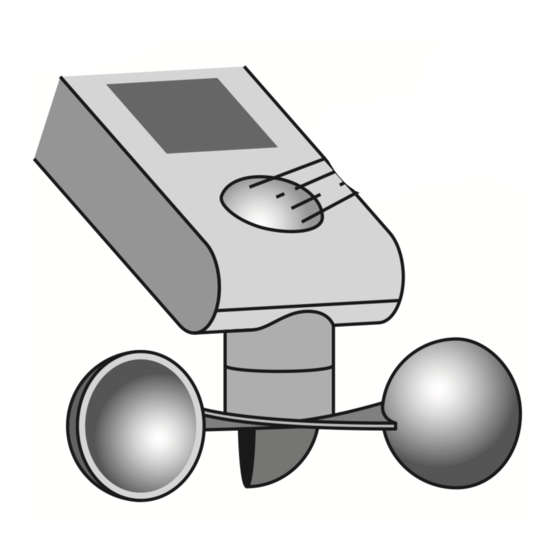
- Page 4 Fig. A photovoltaic power cell “Sun” sensor “Wind” sensor (WSCT only) button “P1” Wind (WSCT only) Led “L1” Step 2 - Memorizing the sensor and confirming memorization “P1” “P1” “P1” sec. Hold down Wait Release Press 3 times Press 1 time (confirming memorization) “P1”...
- Page 5 Step 3 - Calibrating the “Sun” sensor “L1” (green) ≥ 1Klux sec. fast flashing Turn the trimmer to “Test” Illuminate the sensor Wait Down Series of flashes “L1” (green-red-) fast flashing Cover the sensor Series of flashes ...
-
Page 6: Product Description And Intended Use
• The manufacturer is not responsible for damage due faces. The tilt range is given in the Quick reference to atmospheric events undetected by the device's variations in wind speed (not present on SCT) and sun- guide (Step 1 - phase 1). sensors. - Page 7 English – 5...
-
Page 8: Product Installation
• Calibrating the wind sensor (function not available time; when it exceeds the setpoint, after 2 minutes the ing the user that memorisation of the new sensor on SCT model) (Quick reference guide - Step 4) is not possible. sensor sends the Down command to the motor. -
Page 9: Basic Troubleshooting
Led off = No setpoint exceeded the lower number in Table A. Caution! – Diagnostics mode can only be used for reading signals off the Leds, not for operating the (*) = Not present on SCT model awning. wind “L1” (green-red-) sec. -
Page 10: Ec Declaration Of Conformity
■ Operating temperature: - 20°C to + 55°C Mr. Luigi Paro ■ Dimensions mm: (volume) 125 x 250 x 100 (H) (Managing Director) ■ Weight: WSCT: 250 g; SCT: 230 g • “Sun” sensor ■ Range: 3 to 80 klux ■ Setting: 5 to 60 klux ■... -
Page 11: Guida Rapida
Nota alla consultazione • In questa Guida rapida la numerazione delle fig- ure è autonoma e non corrisponde alla nu merazione citata nel testo del Manu- Nemo WSCT/ SCT Climatic ale completo. • Questa guida non sos- sensor tituisce il Manuale completo. - Page 12 Fig. A cella fotovoltaica sensore Sole sensore Vento (solo per WSCT) tasto “P1” Vento (solo per WSCT) Sole Led “L1” Passo 2 - Memorizzazione del sensore e verifica della memorizzazione “P1” “P1” “P1” sec. Mantenere premuto Attendere Rilasciare Premere 3 volte Premere 1 volta (verifica della memorizzazione)
- Page 13 Passo 3 - Taratura del sensore “Sole” “L1” (verde) ≥ 1Klux sec. lampeggi veloci Ruotare trimmer su “Test” Illuminare il sensore Attendere Discesa Serie di lampeggi “L1” (verde-rosso-) lampeggi veloci Coprire il sensore Serie di lampeggi ...
-
Page 14: Avvertenze Generali
(funzione assen- ITALIANO sitivo. Operazioni non permesse possono causare te nel modello SCT) e dell’intensità della luce solare. Quando il valore rilevato dai sensori climatici supera solo malfunzionamenti. Il costruttore declina ogni re- Istruzioni originali sponsabilità... - Page 15 Italiano – 5...
-
Page 16: Installazione Del Prodotto
• Taratura del sensore vento (funzione assente nel RICEVITORE DEL MOTORE mente la manovra (= sensore memorizzato). modello SCT) (Guida rapida - Passo 4) Come per qualsiasi trasmettitore, anche per il presen- 01. Ruotare il trimmer “Vento” in senso antiorario, fino te sensore climatico è necessario memorizzare il suo 5 - TARATURA DEI SENSORI a raggiungere la posizione “Test”. - Page 17 Dopo 10 minuti (circa) viene meno atmosferico che si sta manifestando in quell’i- (*) = Segnalazioni assenti nel modello SCT ripristinato il funzionamento automatico. stante è al di sotto o al di sopra della soglia impostata wind “L1”...
-
Page 18: Smaltimento Del Prodotto
■ Dimensioni mm: (volume) 125 x 250 x 100 (H) Attenzione! – La modalità “diagnostica” provoca Ing. Luigi Paro ■ Peso: WSCT: 250 g; SCT: 230 g solo la segnalazione sul Led e non il comando (Amministratore delegato) della tenda. -
Page 19: Guide Rapide
Note pour la consultation • Dans ce guide rapide, le numérotage des figures est autonome et ne correspondent pas au numérotage cité dans le texte du Nemo WSCT/ SCT Climatic manuel complet. • Ce guide ne rem- sensor place pas le manuel complet. - Page 20 Fig. A cellule photovoltaïque capteur soleil capteur vent (uniquement pour touche « P1 » Vent WSCT) (uniquement pour WSCT) Soleil Led « L1 » Étape 2 - Mémorisation du capteur et vérification de la mémorisation “P1” “P1” “P1” sec. Maintenir appuyé Attendre Relâcher Appuyer 3 fois...
- Page 21 Étape 3 - Étalonnage du capteur « Soleil » « L1 » (vert) ≥ 1Klux sec. clignotements rapides Tourner le trimmer sur « Test » Éclairer le capteur Attendre Descente Série de clignotements « L1 » (vert-rouge-) clignotements rapides Couvrir le capteur ...
-
Page 22: Recommandations Générales
(fonction absente • Ne pas mettre le dispositif à proximité de fortes dans le modèle SCT) et de l'intensité de la lumière du sources de chaleur et ne pas l’exposer à des soleil. - Page 23 Français – 5...
-
Page 24: Installation Du Produit
- Étape 1 - phase 11). tion, appuyer sur la touche P1 (jaune) sur le cap- dans le modèle SCT) (Guide rapide - Étape 4) teur. Puis, s'assurer que le moteur s'arrête immé- 01. Tourner le trimmer « Vent » dans le sens contraire 4 - MÉMORISATION DU CAPTEUR DANS LE... - Page 25 à la valeur configu- 03. Vérifier que la Led « L1 » émet des clignotements (*) = Signalisations absentes dans le modèle SCT rée, après 3 secondes le capteur transmet au moteur rouges et verts en alternance.
-
Page 26: Mise Au Rebut Du Produit
Led et ne commande ■ Dimensions en mm : (volume) 125 x 250 x 100 (H) pas le store. ■ Poids : WSCT : 250 g ; SCT : 230 g Remarque - Pour vérifier s'il existe vraiment une DÉCLARATION DE CONFORMITÉ CE panne du dispositif, il suffit de lancer les procédures... -
Page 27: Guía Rápida
Nota sobre la consulta • En esta guía rápida la numeración de las figuras es autónoma y no coincide con la numer- ación del texto del manual completo. • Nemo WSCT/ SCT Climatic Esta guía no sustituye el manual com- sensor pleto. - Page 28 Fig. A celda fotovoltaica sensor Sol sensor Viento (sólo para WSCT) tecla “P1“ Viento (sólo para WSCT) Led “L1“ Paso 2 - Memorización del sensor y verificación de la memorización “P1” “P1” “P1” sec. Mantener pulsado Esperar Soltar Pulsar 3 veces Pulsar 1 vez (verificación de la memorización)
- Page 29 Paso 3 - Calibración del sensor “Sol” “L1” (verde) ≥ 1Klux sec. parpadeos rápidos Girar el regulador a “Test” Iluminar el sensor Esperar Bajada Serie de parpadeos “L1” (verde-rojo-) parpadeos rápidos Cubrir el sensor Serie de parpadeos ...
- Page 30 (función au- raciones no permitidas pueden provocar desperfec- sente en el modelo SCT) y de la intensidad de la luz tos de funcionamiento. El fabricante declina toda solar. Cuando el valor medido por los sensores climá- ticos es superior o inferior al umbral de intervención...
- Page 31 Español – 5...
-
Page 32: Instalación Del Producto
• Calibración del sensor Viento (función ausente en 3 - INSTALACIÓN DEL PRODUCTO ños movimientos (depende del modelo de motor). el modelo SCT) (Guía rápida - Paso 4) Para realizar la instalación, fije las piezas del produc- • Verificación de la memorización efectiva del 01. Girar el regulador “Viento” en sentido antihorario to siguiendo el orden numérico indicado en la Guía rá-... - Page 33 Led y no el mando del toldo. Procedimiento para ajustar el umbral de inter- (*) = Señales ausentes en el modelo SCT vención del sensor “Sol” y “Viento” (fig. 4) Nota – Para verificar si existe realmente un fallo en el wind “L1”...
-
Page 34: Eliminación Del Producto
Con la presente, Nice S.p.A. declara que los pro- ■ Alimentación: completamente autónoma, dotada 8 - QUÉ HACER SI... ductos: Nemo WSCT, Nemo SCT están en con- de una celda fotovoltaica integrada, de 64 mWp Si la intensidad del viento o de la luz superan el formidad con los requisitos esenciales y con las ■... - Page 35 Kurzanleitung Hinweis zum Gebrauch • In dieser Kurzanleitung entspricht die Nummerie- rung nicht der Nummerierung der voll- ständigen Gebrauchsanweisung. • Die- Nemo WSCT/ SCT Climatic se Kurzanleitung ersetzt nicht die voll- sensor ständige Gebrauchsanleitung. Schritt 1 - Installation und elektrische Anschlüsse 60°...
- Page 36 Abb. A Fotovoltaikzelle Sonnensensor Windsensor (nur für WSCT) Taste „P1“ Wind (nur für WSCT) Sonne Led „L1“ Schritt 2 - Speicherung des Sensors und Überprüfung der Speicherung “P1” “P1” “P1” sec. Gedrückt halten Warten Loslassen 3 Mal drücken 1 Mal drücken (Überprüfung der Speicherung) “P1”...
- Page 37 Schritt 3 - Eichung des Sensors „Sonne“ “L1” (grün) ≥ 1Klux sec. Schnelles Blinken Den Trimmer auf „Test“ drehen den Sensor anleuchten Warten Mehrmaliges Blinken Absenken “L1” (grün-rot-) Schnelles Blinken Den Sensor abdecken Mehrmaliges Blinken Den Sensor aufdecken Den Trimmer nach oben drehen Hochfahren Schritt 4 - Eichung des Sensors „Wind“...
- Page 38 Änderungen des Produkts ab. Echtzeit von Windgeschwindigkeit (Funktion nicht im • Die Vorrichtung nicht in die Nähe von Wärmequel- Modell SCT vorhanden) und Sonnenlichtstärke. Wenn len bringen oder offenen Flammen aussetzen. Dies der durch die Klimasensoren erfasste Wert den einge- könnte sie beschädigen und zu einer mangelhaften...
- Page 39 Deutsch – 5...
- Page 40 • Eichung des Windsensors (Diese Funktion ist nicht sich die Flügel des Windsensors auf einer horizontalen schließen. im Modell SCT vorhanden) (Kurzanleitung - Schritt 4) Ebene befinden (Kurzanleitung - Schritt 1 - Phase 11). 02. Eine Bewegung ausführen lassen und während- dessen die Taste P1 (gelb) auf dem Sensor drü- 01.
- Page 41 überprüfen, ob die Intensität des wieder in Betrieb genommen. Wetterphänomens in diesem Moment über oder un- (*) = Keine Meldungen im Modell SCT vorhanden • Funktionsweise des Grenzwertes „SONNE“ ter dem eingestellten Grenzwert liegt und um even- wind “L1”...
-
Page 42: Entsorgung Des Produkts
Ing. Luigi Paro ■ Abmessungen (mm): (Volumen) 125 x 250 x 100 die Markise. (Geschäftsführer) ■ Gewicht: WSCT: 250 g; SCT: 230 g Hinweis – Um zu überprüfen, ob das Gerät wirklich defekt ist, den in Kapitel 5 beschriebenen Eichvorgang Sensor „Sonne“... - Page 43 Szybkie wprowadzenie Uwaga na temat konsultacji instruk- cji • Numeracja rysunków w niniejszym, szybkim wprowadzeniu, jest swobodna i nie odpowiada numeracji zamieszczo- Nemo WSCT/ SCT Climatic nej w tekście kompletnej instrukcji. • Ni- niejsze szybkie wprowadzenie NIE za- sensor stępuje kompletnej instrukcji.
- Page 44 Rys. A ogniwa fotowoltaiczne Czujnik “słońca” Czujnik “wiatru” (tylko dla WSCT) przycisk “P1“ Wiatr (tylko dla WSCT) Słońce Dioda “L1“ Krok 2 - Wczytywanie czujnika i kontrola wczytywania “P1” “P1” “P1” sec. Przytrzymać wciśnięty Odczekać Zwolnić Nacisnąć 3 razy Nacisnąć 1 raz (kontrola wczytywania) “P1”...
- Page 45 Krok 3 - Kalibracja czujnika “słońca” “L1” (zielona) ≥ 1Klux sec. szybkie mignięcia Obrócić kondensator dostrojczy na “Test” Oświetlić czujnik Odczekać Seria mignięć Opuszczanie “L1” (zielona-czerwona-) szybkie mignięcia Zasłonić czujnik Seria mignięć Odsłonić czujnik Obrócić kondensator Podnoszenie dostrojczy na inną wartość Krok 4 - Kalibracja czujnika “wiatru”...
- Page 46 (funk- • Nie umieszczać urządzenia w pobliżu źródeł ciepła cja nieobecna w modelu SCT) oraz natężenia światła i nie narażać go na działanie wolnych płomieni. Te słonecznego. W przypadku, kiedy wartość odczyta- działania mogą...
- Page 47 Polski – 5...
- Page 48 że nastąpiło natychmiastowe zatrzymanie ma- newru przez silnik (= czujnik zapamiętany). • Kalibracja czujnika wiatru (funkcja nieobecna w 4 - WCZYTYWANIE CZUJNIKA DO ODBIOR- modelu SCT) (Szybkie wprowadzenie - Krok 4) 5 - KALIBRACJA CZUJNIKÓW NIKA SILNIKA 01. Obracać kondensator dostrojczy ”wiatru” w kie- Po zakończeniu procedury wczytywania, należy wyka-...
- Page 49 (to znaczy na koniec biegu, idąc w słońca i wiatru (jeżeli obecny), dioda L1 będzie zawsze zgaszona, również podczas przesyłania poleceń przez kierunku zgodnym z ruchem wskazówek zegara), (*) = Sygnalizacje nieobecne w modelu SCT urządzenie. działanie czujnika słońca zostaje wyłączone. wind “L1”...
-
Page 50: Utylizacja Urządzenia
Niniejszym, spółka Nice S.p.A. deklaruje, że pro- numerem. ■ Regulacja progu: od 5 do 60 klux dukty: Nemo WSCT i Nemo SCT są zgodne z Uwaga! – Tryb ”diagnostyka” wywołuje wyłącznie ■ Autodiagnostyka: po upływie 24 h bez zmiany podstawowymi wymogami i innymi postanowie- sygnalizację... - Page 51 Snelstartgids Opmerking bij de raadpleging • De af- beeldingen in deze Snelstartgids volgen een eigen nummering die niet overeenstemt met de vermelde nummering in de volledige Nemo WSCT/ SCT Climatic handleiding. • Deze Snelstartgids vervangt sensor geenszins de volledige handleiding.
- Page 52 Afb. A fotovoltaïsche cel ‘Zon’-sensor ‘Wind’-sensor (alleen voor WSCT) toets “P1” Wind (alleen voor WSCT) Led “L1” Passo 2 - Memorizzazione del sensore e verifica della memorizzazione “P1” “P1” “P1” sec. Ingedrukt houden Wachten Loslaten 3 maal indrukken 1 maal indrukken (opslagcontrole) “P1”...
- Page 53 Stap 3 - IJken van de ‘Zon’-sensor “L1” (groen) ≥ 1Klux sec. snel knipperend Trimmer naar “Test” draaien De sensor verlichten Wachten Achtereenvolgens knipperen Omlaag “L1” (groen-rood-) snel knipperend De sensor bedekken Achtereenvolgens knipperen De sensor onthullen Trimmer naar andere waarde draaien Omhoog Stap 4 - IJken van de ‘Wind’-sensor (alleen voor het model WSCT)
-
Page 54: Algemene Aanbevelingen
(functie niet geen aansprakelijkheid voor schade die het gevolg is aanwezig bij het model SCT) en van de intensiteit van van op willekeurige wijze gewijzigde inrichtingen. het zonlicht. Wanneer de door de klimaatsensoren ge- •... - Page 55 Nederlands – 5...
-
Page 56: Installatie Van Het Product
02. Regel een manoeuvre en druk tijdens de uitvoering controleer of de bladen van de windsensor horizontaal het model SCT) (Snelstartgids - stap 4) ervan op de toets P1 (geel) van de sensor. Contro- staan (Snelstartgids - stap 1 - fase 11). - Page 57 04. Om de procedure te beëindigen, wacht u tot het knip- wanneer deze de ingestelde waarde overschrijdt, stuurt (*) = Signaleringen aanwezig bij het model SCT de sensor na 3 seconden een ‘Omhoog’-instructie naar peren ophoudt. wind “L1”...
-
Page 58: Technische Gegevens Van Het Product
■ Afmetingen (mm): (volume) 125 x 250 x 100 (H) Opmerking – Om te controleren of er zich in de inrichting ■ Gewicht: WSCT: 250 g; SCT: 230 g ook echt een storing heeft voorgedaan, volstaat het de ‘Zon’-sensor ijkingsprocedures vermeld in Hoofdstuk 5 uit te voeren. - Page 59 - Appendix - Appendice - Appendice - Apéndice - Anhang - Załącznik - Bijlage...
- Page 60 hysteresis threshold: set threshold value: e.g. positioned automatically gust of wind 30 Km/h at half the set threshold Km/h value instantaneous wind speed over-threshold momentary drops in speed, within the hysteresis hysteresis values drops in speed lasting under-threshold less than 10 minutes “0”...
- Page 61 sunrise daytime dusk night-time Klux set threshold light value: e.g. 30 Klux intensity over-threshold momentary drops in light, within the hyste- hysteresis resis values drops in light, within the under-threshold under-threshold values hysteresis threshold: positioned automatically at half the set threshold value “1”...
- Page 64 Nice SpA Oderzo TV Italia www.niceforyou.com info@niceforyou.com...
Need help?
Do you have a question about the SCT and is the answer not in the manual?
Questions and answers