Table of Contents
Advertisement
Available languages
Available languages
Quick Links
Advertisement
Chapters
Table of Contents

Summary of Contents for HUSH OnAir
- Page 1 briefing book DE / EN...
- Page 2 OnAir Controller! Danke, dass du dich für Yellowtec Equipment entschieden hast. Dein neuer hush oder hush + steht dir ab sofort zur Seite und hilft dir dabei, deine OnAir Signalisierung ganz einfach zielgerichtet und professionell einzusetzen. Dieses Briefing Book hält für dich viele nützliche Infos bereit, die dir den Ein- stieg in die Steuerung deiner OnAir Signalisierung mit hush erleichtern.
-
Page 3: Table Of Contents
Inhalt Sicherheitshinweise Erste Schritte hush Frontseite hush Rückseite Modes hush Remote hush App hush + Preamp Blockschaltbilder Anwendungsbeispiele English Version Konformitätserklärungen... -
Page 4: Sicherheitshinweise
Remote sicher zu verwenden. Eine unsachgemäße Benutzung kann zum Verlust von Garantie- und Gewährleistungsansprüchen führen. Der hush OnAir Controller dient der Ansteuerung der OnAir Anzeige des m!ka OnAir Mikrofonarms. hush + enthält zusätzlich einen Mikrofonvorverstärker. Die optionale hush Remote kann als Bedieneinheit an beiden Geräten verwendet werden. -
Page 5: Erste Schritte
Erste Schritte Jetzt kann‘s losgehen! Sobald dein hush mit Strom versorgt wird, ist er aktiv. Schließe hush dazu über das beiliegende USB-C-Kabel an deinen Computer an. Optional kannst du dafür auf den beiliegenden USB-C auf USB-A Adapter zurückgreifen. Zum Betrieb von hush ohne Computer ist ein zertifiziertes 5V-Netzteil zu verwenden. -
Page 6: Hush Frontseite
Siehe Seite 10. Siehe Seite 10. ein zertifiziertes 5V- Netzteil anschließen. *Beachte, dass sich die Fronten der Modelle hush und hush + im Logoaufdruck unterscheiden. Außerdem verfügt hush über einen Mic Out, während hush + mit einem Line Out ausgestattet ist. -
Page 7: Hush Rückseite
MIDI-Eingang Hardware zur Steuerung eines Leucht- Ansteuerung über MIDI an. segments der Yellowtec MIDI-Einstellungen kannst litt Signalleuchte. Mehr du in der hush App vorneh- Infos zu litt findest du unter Siehe Seite 12. www.yellowtec.de/litt. men. MIDI-EXT IN GPIs GPOs Anschluss für hush Remote... -
Page 8: Modes
Modes Wähle deinen Ansteuerungsweg! Zur Steuerung von hush hast du die Wahl zwischen fünf Modes. Sie machen es möglich, hush in völlig unterschiedliche Anwendungsumgebungen ganz einfach einzubinden. Ändere den verwendeten Mode jederzeit direkt am Gerät oder in der Siehe Seite 10. -
Page 9: Hush Remote
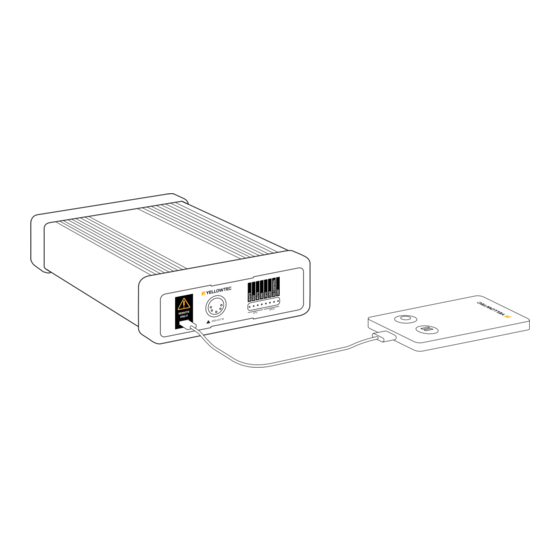
Remote hush Remote Wähle den Mode „REMOTE“ aus, um deine OnAir Signalisierung über die hush Remote per Knopfdruck zu steuern. Schließe diese dazu an den mit „REMOTE ONLY“ gekennzeichneten Steckplatz auf der Rückseite deines hush an. Mute-Taste OnAir-Taste Drücke die OnAir-Taste der hush Die Mute-Taste der hush Remote ist als Räusper-Taste konzipiert. -
Page 10: Hush App
Verwende sie, um auszuwählen wie du dein hush oder hush + Gerät ansteuern möchtest. Wähle für die Auswahl des aktiven Mode bitte in der hush App den Tab Siehe Seite 8. STATUS an. Der Status-Tab bietet dir darüber hinaus im Bereich „Test“ die Möglichkeit, schnell zu überprüfen, ob dein hush korrekt verkabelt ist. - Page 11 PREAMP (hush + only!) Das Modell hush + ermöglicht dir neben der Rotlicht-Steuerung auch die Kontrolle über dein Mikrofonsignal. Sofern du hush + nutzt, findest du daher im Tab PREAMP der hush App einige Einstellmöglichkeiten, um dein Mikrofonsignal zu optimieren.
- Page 12 App MIDI SETUP Falls du hush via USB-MIDI oder EXT-MIDI ansteuern möchtest, findest du in der hush App vielfältige Konfigurationsmöglichkeiten. Wähle dafür in der hush App den Tab MIDI SETUP aus. Füge dort eigene Profile hinzu oder wähle eines der hinterlegten MIDI-Profile aus, z.B.
- Page 13 Via „Restore Defaults“ kannst du deinen hush wieder auf Werks- einstellungen zurücksetzen. Wähle „OnAir Indicator Settings“, um einzustellen, ob du einen älteren m!ka Mic Arm mit einfarbigem OnAir Indicator (rot) oder ein aktuelles Modell mit dual-color OnAir Indicator (rot/weiß) nutzt. Beim ersten Anschließen deines hush wirst du...
- Page 14 USB HID USB MIDI EXT MIDI Das Blockschaltbild oben zeigt dir den funktionalen Aufbau des Modells hush. Beachte bitte, dass dein Mikrofonsignal bei der Verwendung von hush völlig unbeeinflusst weitergeleitet wird. Eine Mute-Funktion ist in dieser Variante beispielsweise nicht vorgesehen.
- Page 15 USB HID USB MIDI EXT MIDI Das Blockschaltbild oben zeigt dir den funktionalen Aufbau des Modells hush + . Im Gegensatz zu hush, bietet dir hush + auch Steuerungsoptionen über dein Mikrofonsignal. hush + verfügt über einen hochqualitativen Mikrofonvorverstärker. Er bietet dir Möglichkeiten, dein Mikrofonsignal zu optimieren und zu kontrollieren, z.B.
- Page 16 Viele Streamer nutzen keine Hardware, die eine Rotlicht-Steuerung unterstützt. hush ist im REMOTE Mode die ideale Plug‘n‘Play Lösung. Verbinde die hush Remote über das beiliegende Kabel mit deinem hush oder hush + . Per Knopfdruck kannst du so das Rotlicht an deinem m!ka Mikrofonarm aktivieren.
- Page 17 Kontrolle über das LED-Signal der litt Signalleuchte von Yellowtec. Bringe litt beispielsweise von außen neben deiner Studiotür an und mache allen eindeutig klar, dass du aktuell OnAir bist und nicht gestört werden möchtest. Mehr Infos zu litt findest du unter www.yellowtec.de/litt.
- Page 18 Anwendungsbeispiele hush im External MIDI Setup Auch in eine MIDI-Infrastruktur lassen sich hush oder hush + ganz bequem via Plug‘n‘Play integrieren. Steuere deine hush Einheit via MIDI-Hardware an. Hierzu kannst du ein beliebiges MIDI-Gerät nutzen. hush bietet dir maximale Flexibilität für die Integration der Signalisierung in dein individuelles MIDI-Umfeld.
- Page 19 Kontrolle über das LED-Signal der litt Signalleuchte von Yellowtec. Bringe litt beispielsweise von außen neben deiner Studiotür an und mache allen eindeutig klar, dass du aktuell OnAir bist und nicht gestört werden möchtest. Mehr Infos zu litt findest du unter www.yellowtec.de/litt.
- Page 20 Auch über eigens definierte Software Kommandos lassen sich deine hush Einheit und damit deine OnAir Signalisierung steuern. Wähle zur Nutzung deiner eigenen Software Kommandos in deiner hush App oder direkt am hush oder hush + Gerät den Mode USB-HID an.
- Page 21 Platz für Notizen...
- Page 22 OnAir Controller! Thank you for choosing Yellowtec equipment. From now on, your new hush or hush + will support you with easily operating your OnAir signaling in a targeted and professional way. This Briefing Book contains plenty of useful information that will help you to get started with the control of your OnAir signaling with hush.
- Page 23 Content Safety Instructions First Steps hush Front Panel hush Rear Panel Modes hush Remote hush App hush + Preamp Block Diagrams Examples of Use Declarations of Conformity...
-
Page 24: Safety Instructions
Read this guide carefully before using any hush device. Always observe the following instructions in order to use and operate hush, hush + , and the hush Remote safely. Improper use may result in the loss of warranty and guarantee claims. -
Page 25: First Steps
5V power supply. When using hush for the first time, connect it to your PC or Mac via USB-C and open the hush App. It will prompt you to specify which type of m!ka OnAir Mic Arm you are using. -
Page 26: Hush Front Panel
App. See page 30. computer. *Note that the fronts of the hush and hush + models differ in the logo print. Another difference is that hush provides a Mic Out, while hush + is equipped with a Line Out. -
Page 27: Hush Rear Panel
Connect a hush Remote to Use the GPI connectors to this USB-C slot to control control hush in GPI-Mode. The your hush via remote. To do red light status is available at so, use the supplied cable the GPO output. By default the... -
Page 28: Modes
Modes Choose the most convenient way! To control hush you have a choice of five modes. They allow you to easily integrate hush into completely different environments and cover many application areas. At any time you can change the selected mode either directly on your hush device or See page 30. -
Page 29: Hush Remote
Remote hush Remote Select the mode “REMOTE“ to manage your OnAir signaling at the push of a button via hush Remote. Therefore, connect the remote to the slot on your hush‘s rear panel which is marked with “REMOTE ONLY“. -
Page 30: Hush App
STATUS The hush App is available at www.yellowtec.com/hush/downloads. In the hush App you can choose your desired mode to control your hush or hush + device. To determine the currently active Mode, please select the tab STATUS in the hush See page 28. - Page 31 Activate or deactivate the high-pass filter at the touch of a button to remove unwanted rumble. This is how hush + helps you to further optimize your microphone signal to deliver high-quality sound!
- Page 32 App MIDI SETUP If you want to control hush via USB-MIDI or EXT-MIDI, you will find various configuration options in the hush App. To access them, select the tab MIDI SETUP. There you can add your own profiles or select one of the stored MIDI profiles, e.g.
- Page 33 “Info“ to check your unit‘s serial number and your active firmware version. Restore your hush unit to factory defaults via “Restore Defaults“. Select “OnAir Indicator Settings“ to state whether you are using an older m!ka Mic Arm with a single-color OnAir Indicator (red) or a current model with dual-color OnAir Indicator (red/white).
- Page 34 EXT MIDI The block diagram above shows you the functional structure of the model hush. Please note that your microphone signal is passed through completely unaffected when using hush. A mute function, for example, is not provided in this variant.
- Page 35 USB MIDI EXT MIDI The block diagram above shows the functional structure of the hush + device. In contrast to hush, hush + offers you control options for your microphone signal. hush + comes with a high-quality microphone preamp. It offers you various options optimizing and controlling your mic signal, e.g.
- Page 36 Use hush in Streaming Setup As versatile OnAir Controllers, hush and hush + give you control over your OnAir signaling. To show you common configurations, we have illustrated some application examples on the following pages. Many streamers do not use hardware that supports red light control. hush in Remote mode is the ideal plug‘n‘play solution.
-
Page 37: Examples Of Use
“USB-MIDI“ and connect hush via USB to your PC or Mac. This setup allows you to control the OnAir indicator of your m!ka Mic Arm directly from your PC. As soon as you start a recording in your DAW software, the OnAir indicator on your mic arm will be activated simultaneously. - Page 38 OnAir signaling into your individual MIDI environment. If you need to make adjustments to your hush‘s default MIDI preset, use the hush App. It offers you extensive configuration options in the tab MIDI SETUP.
- Page 39 Examples of Use hush in Broadcaster Setup The control via GPIs fulfills all wishes for the integration of hush and hush + into a professional broadcast infrastructure. Select the GPIs to integrate hush into the already existing red light logic of your system (red / white / mute).
- Page 40 OnAir signaling, select the USB- HID mode in the hush App or directly on your hush or hush + unit. For the definition of software commands we provide your with libraries for PC and Mac.
- Page 41 According EC Directive 2014/30/EU (EMC - Directive) We, Yellowtec GmbH, Heinrich-Hertz-Str. 3, 40789 Monheim, Germany herewith declare in sole responsibility that the products hush + OnAir Controller (Product Code: YT3902) hush OnAir Controller (Product Code: YT3903) hush Remote (Product Code: YT3904)
- Page 42 According to Electromagnetic Compatibility Regulations 2016 We, Yellowtec GmbH, Heinrich-Hertz-Str. 3, 40789 Monheim, Germany herewith declare in sole responsibility that the products hush + OnAir Controller (Product Code: YT3902) hush OnAir Controller (Product Code: YT3903) hush Remote (Product Code: YT3904) to which this declaration refers, complies with the following regulations, enactments and standards.
- Page 43 Phone: +49 2173 967 423 Fax: +49 2173 967 403 Email: rgallos@yellowtec.com Model Names: hush + OnAir Controller (Product Code: YT3902) hush OnAir Controller (Product Code: YT3903) hush Remote (Product Code: YT3904) Type of Equipment: Multimedia Device Classification: Class B Equipment...
- Page 44 BB v1 www.yellowtec.com/hush shop.yellowtec.com Manufactured by Yellowtec GmbH, Heinrich-Hertz-Str. 3, 40789 Monheim, Germany...
Need help?
Do you have a question about the OnAir and is the answer not in the manual?
Questions and answers