Table of Contents
Advertisement
Available languages
Available languages
Quick Links
Advertisement
Table of Contents

Related Manuals for PROEL SG WECONBOX

Summary of Contents for PROEL SG WECONBOX
-
Page 2: Table Of Contents
Rel. 01-06/23 INDICE: 1. INTRODUZIONE p. 3 2. ISTRUZIONI DI SICUREZZA p. 4 3. APERTURA CONFEZIONE E CONTROLLO p. 6 4. INSTALLAZIONE ED ACCENSIONE p. 7 5. ISTRUZIONI PER L'USO p. 9 6. MANUTENZIONE p. 12 7. SPECIFICHE TECNICHE p. 12 INDEX: 1. -
Page 3: Introduzione
PROEL. PROEL si riserva il diritto di apportare senza preavviso cambiamenti e modifiche estetiche, funzionali o di design a ciascun proprio prodotto. -
Page 4: Istruzioni Di Sicurezza
Leggere il presente manuale prima di installare e dare corrente all’apparecchiatura, seguire le precauzioni di sicurezza elencate di seguito ed osservare tutti gli avvertimenti indicati nel presente manuale e stampati sull’apparecchiatura. Si prega di contattare un distributore PROEL per ricevere assistenza riguardo qualsiasi dubbio su come attivare l’apparecchiatura in modo sicuro. - Page 5 Se il cavo di alimentazione esterno di questa apparecchiatura da illuminazione è danneggiato, deve essere sostituito con un cavo speciale, disponibile esclusivamente presso i rivenditori PROEL. Non attivare mai l’apparecchiatura con coperture mancanti o danneggiate. In caso di non utilizzo, si consiglia di scollegare il prodotto dalla rete elettrica.
-
Page 6: Apertura Confezione E Controllo
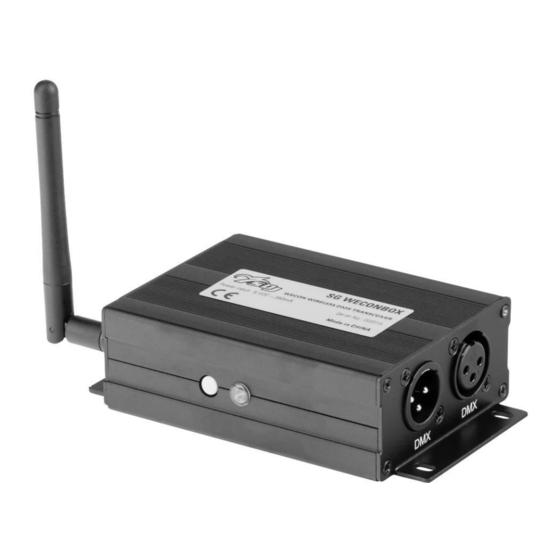
Controllare che la scatola contenga i seguenti articoli: N° 1 SG WECONBOX N° 1 Adattatore 5VDC N° 1 Cavo di alimentazione VISTA FRONTALE 1 –... -
Page 7: Installazione Ed Accensione
4. - INSTALLAZIONE ED ACCENSIONE 4.1 - INSTALLAZIONE PRODOTTO - Non scuotere l'apparecchio. Evitare l'utilizzo di forza eccessiva durante le operazioni di installazione o fissaggio dell'unità. - L'unità può essere installata a pavimento, in appoggio, a parete, a soffitto o su truss. ATTENZIONE! E' OBBLIGATORIO il montaggio della fune di sicurezza (PLH232 –... - Page 8 4.2 - COLLEGAMENTO ALLA LINEA DI ALIMENTAZIONE Il dispositivo deve essere collegato ad un sistema di alimentazione dotato di un’efficiente messa a terra. Inoltre, si consiglia di proteggere le linee di alimentazione dei prodotti dai contatti indiretti e/o da cortocircuiti verso massa utilizzando interruttori differenziali opportunamente dimensionati.
-
Page 9: Istruzioni Per L'uso
Modalità Setup e Modalità Working Mode. Per passare da una modalità di funzionamento all’altra, l’apparecchio non deve essere collegato alla linea DMX. Il transceiver SG WECONBOX esce di fabbrica impostato già in Modalità Protocollo Trasmettitore 1 per default: led di stato (2) Blu. Se tale modalità è già quella richiesta, passare direttamente alla sezione 5.2 ed in particolare al paragrafo 5.2.3. - Page 10 5.2: MODALITA’ WORKING MODE 5.2.1: PROTOCOLLO WECON 6 GRUPPI (modalità SETUP Rosso) In questa modalità il led di stato (2) assumerà 6 diversi colori corrispondenti a diverse modalità di trasmissione / ricezione a seconda del colore del gruppo. Il colore del gruppo andrà scelto premendo ripetutamente il pulsante multifunzione (3).
- Page 11 5.2.3: PROTOCOLLO TRASMETTITORE 1 (modalità SETUP Blu – MODALITA’ DI DEFAULT) PROTOCOLLO TRASMETTITORE 2 (modalità SETUP Magenta) In questa modalità il LED di stato (2) assumerà diversi colori, corrispondenti a diverse modalità di funzionamento dell’apparecchio, secondo la seguente tabella: STATO E COLORE DESCRIZIONE Blu lampeggiante lento Trasmettitore acceso, ma non collegato alla linea DMX...
-
Page 12: Manutenzione
6. - MANUTENZIONE Per garantire ottime prestazioni, l’apparecchio deve essere pulito frequentemente. Scollegare l’apparecchio della corrente e lasciarlo raffreddare per almeno 35 minuti onde evitare il rischio di bruciature. Utilizzare un’aspirapolvere o compressore o una spazzola morbida o un panno per rimuovere la polvere depositata. -
Page 13: Introduction
PROEL. PROEL reserves the right to make, without notice, any aesthetical, functional or design changes or modifications in everyone of its products. PROEL doesn't assume any responsibility for the use or application of the products here described. -
Page 14: Safety Instructions
Contact a qualified technician for any maintenance work not described in this manual. Do not modify the fixture or install accessories and upgrade kits that are not the Proel original ones. People involved in the installation and maintenance of the device must:... - Page 15 If the external power cord of this light is damaged, it must be replaced with a special cord exclusively available from Your PROEL dealer. Never operate the equipment with lenses and / or covers missing or damaged.
-
Page 16: Opening And Control
Verify that the box contains the following items: N° 1 SG WECONBOX N° 1 Adapter 5VDC N° 1... -
Page 17: Installation And Switch On
4. - INSTALLATION AND SWITCH ON 4.1 - PRODUCT INSTALLATION - Do not shake the device. Avoid the use of too much force during installation or unit fixing. - The unit can be installed on the floor, on the wall, ceiling or on a truss. WARNING! IT'S REQUIRED the mounting of the safety rope (PLH232 –... - Page 18 4.2 - CONNECTION TO THE MAINS The device must be connected to a power supply system with a proper earth system. Moreover, it is recommended to protect power supply lines of the products from indirect contact and / or shorting to earth by using appropriately sized anti electrical shock switch. The electrical connection must be carried out by a qualified electrician.
-
Page 19: Setup
DMX line. The transceiver SG WECONBOX leaves our warehouse already set as default in Transmitter Protocol 1: LED status (2) blue. If this is the desired Working Mode, it is possible to directly go to the section 5.2, specific section 5.2.3. - Page 20 5.2: WORKING MODE 5.2.1: WECON PROTOCOL 6 GROUPS (SETUP mode Red) In this mode, the status LED (2) will assume 6 different colors corresponding to different transmitter / receiver modes depending on the color of the group. The color of the group will be chosen by repeatedly pressing the multifunction button (3).
- Page 21 5.2.3: TRANSMITTER PROTOCOL 1 (SETUP mode Blue – DEFAULT SETTING) TRANSMITTER PROTOCOL 2 (SETUP mode Magenta) In this condition, the status LED (2) will assume different colors corresponding to different working modes as indicated in the table below: STATUS AND COLOR DESCRIPTION Blue slowly blink Transmitter ON, but not connected to a DMX signal...
-
Page 22: Maintenance
6. - MAINTENANCE To ensure optimal performance, the unit must be frequently cleaned. Unplug the device from the mains and let it cool for at least 35 minutes to avoid the risk of burns. Use a vacuum cleaner or an air compressor or a soft brush or a cloth to remove the dust deposited. 7.
Need help?
Do you have a question about the SG WECONBOX and is the answer not in the manual?
Questions and answers