Advertisement
Quick Links
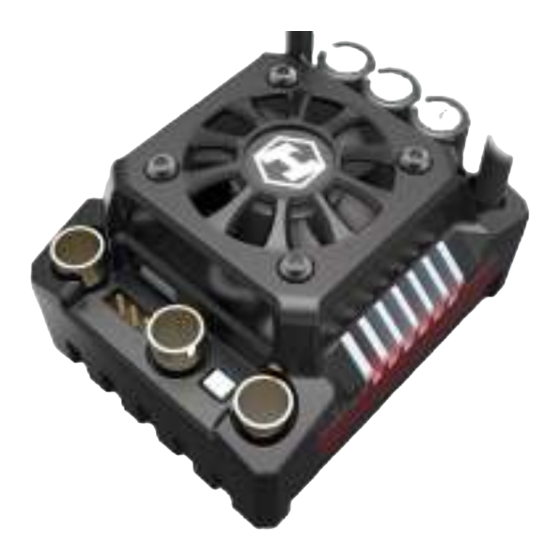
HEX8-150 ESC USER MANUAL
Thank you for purchasing the Hexfly Hex8 Electronic Speed Controller (ESC). Power systems designed for
RC vehicles can be very dangerous if not used correctly, so please read this manual carefully. Hexfly
assumes no responsibility of any kind for the use, installation, application, or maintenance of this product.
No liability shall be assumed nor accepted for any damages, losses or costs resulting from the use of this
product. Any claims arising from operating, failure, or malfunction, etc. will be denied. We assume no liability
for personal injury, consequential damages resulting from our product, or our workmanship.
01 Warnings
Ensure all wires and connections are properly insulated before connecting the ESC to related devices as short circuits will damage the ESC.
Ensure all devices are connected securely. Poor connections may cause loss of vehicle control or damage to electrical components. Loose connections
may also generate unwanted heat and cause damage or fire.
Thoroughly read all manuals to all components being used with this device, including the vehicle manual, to ensure all parameters are met before using.
Do not hold the vehicle in the air while pulling the throttle. Rubber tires can "expand" to extreme size and explode, causing serious injury.
Stop using the ESC when it's casing temperature exceeds 90ºC /194ºF. These temps. can destroy the ESC and may also cause damage to the motor.
We recommend setting the "ESC Thermal Protection" to 105ºC/221ºF (this refers to the internal temperature of the ESC).
We recommend removing the cooling fan from ESC before exposing vehicle to liquids, and completely dry the ESC immediately following use.
Always disconnect and remove batteries after use. The ESC will continue to draw current from the batteries, even if the ESC is turned off. Leaving the
batteries plugged into the ESC for a length of time may cause the batteries to become completely discharged, resulting in damage to the batteries,
electronics, persons, and surroundings. This will not be covered under warranty.
02 Features
Compatible with sensorless brushless motors (only in sensorless mode) and sensored brushless motors.
Fully waterproof design for all weather conditions. The power button is water proof and dust proof.
Super internal switching BEC with switchable voltage of 6V/7.4V and a cont. /peak current of 6A/15A for high voltage servos with high voltage and
amperage requirements.
Proportional braking with 9 levels of brake sensitivity, 9 levels of maximum brake force, and 9 levels of drag brake force.
5 levels of punch/acceleration, soft to aggressive, for different vehicles, tires, and track conditions.
Multiple protective features: motor lock-up protection, low-voltage cutoff protection, thermal protection, overload protection, and fail safe.
Single-button ESC programming and factory reset.
Advanced programming via portable LED program card.
03 Specifications
HEX8
Model
Cont./Burst Current
150A/950A
Motor Supported
Sensored / Sensorless Brushless Motor (only in sensorless mode)
Cars Applicable
1/8th Touring Car, Buggy, Truggy and Truck
4S LiPo :4274 size motor,KV≤ 3000
Motor Limit
6S LiPo :4274 size motor,KV≤ 2400
Battery
9-18 Cells NiMH,3-6S Lipo
BEC Output
6V/7.4V Switchable, Continuous Current of 6A (switching BEC)
Cooling Fan
Powered by the stable BEC voltage of 6V/7.4V
Size/Weight
59.8(L)x48(W)x36.8(H)/173.5g
Programming Port
FAN /PRG Port
04 Begining to use the HEX8 ESC
WARNING! This is an extremely powerful brushless motor system. For your safety and the safety of those around you, we strongly recommend removing the
motor's pinion gear before performing calibration and programming functions with this system, and keeping wheels off the ground when turning on the ESC.
1. Connect the ESC, Motor, Receiver, Battery and Servo
If using a sensorless motor, the #A, #B, #C wires of the ESC can be connected with the motor wires in any sequence. If the sensorless motor runs in the
opposite direction, just swap any two of the wire connections. If using a sensored motor, DO NOT SWAP THE WIRE CONNECTIONS! All three motor
wires must be connected in the correct sequence (A-A, B-B, C-C). Failure to do so may permanently damage the ESC and sensored motor. If a
sensored motor runs in the opposite direction you must change the rotation setting in the ESC menu.
* WARNING! Do no change the
motor wire sequence when using
a sensored motor! *
Yellow
Blue
Orange
Motor
Receiver
2. Throttle Range Setting (Throttle Range Calibration)
In order to match up the radio's throttle range with the radio and ESC, you must calibrate the radio and ESC before using. Be sure to do this when using for
the first time, or when changing radio settings such as throttle neutral position, ATV, EPA, etc. The following pictures show how to set the throttle range with a
Futaba™ style transmitter.
Battery
Battery
Electronic Speed
Controller
Switch
Example of calibrating neutral range and endpoint.
Release the SET
Press and hold
Press the
button once the
the SET
ON/OFF
LED flashes
button
button
Leave the throttle trigger to the neutral position and
press the SET button
The Green LED
flashes once and
motor emits
"Beep" tone
Pull the throttle trigger all the way back,
and press the SET button
The Green LED flashes
twice and motor emits
"Beep-Beep"
tone
Push the throttle trigger all the way forward and
press the SET button
The Green LED
flashes twice and
motor emits
"Beep-Beep-
Beep" tone
3. Check LED Status During Normal Running
A.
Red & Green LEDs go out when the throttle trigger is in throttle neutral zone.
B.
The Red LED lights up solid when the vehicle runs forward. The Green LED will also come on when pulling the throttle trigger to the full (100%) position.
C.
The Red LED lights up solid when applying brakes and the Green LED will also light up when moving the throttle trigger to full brakes, and the "brake
amount/maximum brake force" setting is set to 100%.
D.
The Red LED lights up solid when the vehicle is in reverse.
05 Power ON-OFF warnings
A.
Powering ON/OFF: Be sure the radio is turned ON before turning on the ESC.
(Start with the ESC turned off), press the ON/OFF button to turn on the ESC.
(Start with the ESC turned on), press and hold the ON/OFF button to turn off the ESC.
B.
Warning Tones:
Turn on the ESC as normal (not holding the SET button), the motor will beep the number of Lipo cells you have plugged in.
For example, 3 beeps indicate a 3S Lipo, 4 beeps indicate a 4S Lipo, 6 beeps indicate a 6S Lipo.
06 Programmable Items List (The italics texts in the following form are the default settings)
Option
Option
Programmable Items
1
2
1.Running Mode
Fwd/Br
Fwd/Rev/Br
2. LiPo Cells
Auto
2S
3. Low Voltage Cutoff
Disabled
Auto (Low)
(Intermediate)
4. ESC Thermal Protection
105ºC/221°F
125ºC /257°F
5. Motor Thermal Protection
Disabled
6. Motor Rotation
CCW
CW
7. BEC Voltage
7.4V
6.0V
8. Max Brake Force
12.50%
25.00%
9. Max Reverse Force
25.00%
50.00%
10. Start Mode (Punch)
Level 1
Level 2
11. Drag Brake
0%
2%
1.
Running Mode:
Option 1: Fwd/Br (Forward with Brake) The vehicle can go forward and brake but cannot reverse in this mode. This mode is usually for racing.
Option 2: Fwd/Rev/Br (Forward / Reverse with Brake) This mode includes the reverse function. "Forward/Reverse with Brake" mode uses the
"DOUBLE-CLICK" method. The vehicle only brakes (won't reverse) the 1st time the throttle trigger is pushed forward. If the motor stops when you
release the throttle trigger and you quickly push it again (2nd push), the vehicle will go into reverse. If the motor does not stop (1st push), the vehicle will
not go into reverse on the second push, it will continue to brake. You will need to push the throttle trigger one more time to enter into reverse. The vehicle
only goes in reverse after the motor has stopped. This method is to prevent the vehicle from accidentally going into reverse.
Page 1 of 2
1.
Turn on the transmitter and set the parameters for the throttle
channel, such as "D/R", "EPA " and "ATL", to 100% and the throttle
"TRIM" to "0". For Futaba™ style transmitters, throttle reversing
should be set to "REV" while other radio systems may be set to
"NOR". Please be sure to DISABLE the "ABS braking function" on
the transmitter.
2.
Plug the battery into the ESC, but leave the power turned off. On
the ESC, while pressing and holding the SET button, press and
release the ON/OFF button to turn on the ESC. Release the SET
button immediately when the motor begins to beep and the Red
light on the ESC begins to blink. The ESC will continue to beep after
the button is released, to show the ESC is now in calibration mode.
3.
Set the neutral point, full throttle endpoint, and full brake endpoint.
a)
While leaving the throttle trigger in the neutral position, press and
release the SET button one time. The Red LED will go out, the
Green LED will flash one time, along with one motor beep. Now
release the trigger.
b)
While holding the trigger at the full throttle position, press and
release the SET button one time. The Green LED will flash two
times, along with two motor beeps. Now release the trigger.
While holding the trigger at the full brake (or reverse) position,
press and release the SET button one time. The Green LED will
flash three times, along with three motor beeps. Now release the
trigger.
4.
After waiting at least three seconds, the ESC should be calibrated
and ready to use.
Option
Option
Option
Option
Option 7
3
4
5
6
3S
4S
6S
Auto
Auto (High)
37.50%
50.00%
62.50%
75.00%
87.50%
Level 4
Level 5
Level 3
4%
6%
8%
10%
12%
2017.08.08
Option
Option
8
9
100.00%
Disabled
14%
16%
Advertisement

Summary of Contents for HEXFLY HEX8
- Page 1 Turn on the transmitter and set the parameters for the throttle Example of calibrating neutral range and endpoint. RC vehicles can be very dangerous if not used correctly, so please read this manual carefully. Hexfly channel, such as “D/R”, “EPA ” and “ATL”, to 100% and the throttle assumes no responsibility of any kind for the use, installation, application, or maintenance of this product.
- Page 2 NOTE 2: In the program process, the motor will emit a “Beep” tone when the LED is flashing. The Hex8 uses a long flash and a long “Beep---” tone to represent number “5”, to help identify the larger menu items. A long flash (Motor sounds “B---”) = the No.5 item. A long flash + a short flash (Motor sounds “B--- B”) = the No.6 item.
Need help?
Do you have a question about the HEX8 and is the answer not in the manual?
Questions and answers