
Subscribe to Our Youtube Channel
Related Manuals for Sharper Image ZipConnect stereo METRO

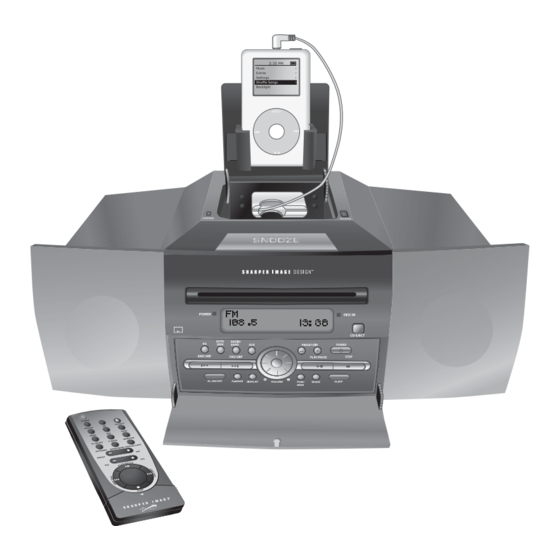
Summary of Contents for Sharper Image ZipConnect stereo METRO
- Page 1 ZipConnect™stereo METRO CD/AM/FM Stereo & Subwoofer + ZipConnect™ for iPod & MP3 Players ® GT308 Instructions Read and save these instructions.
- Page 3 We offer generous return privileges and excellent warranties on all our products. For more than 25 years, The Sharper Image has shared the fun of discovering innovative products that make life better and more enjoyable. We’ve been in business a long time because we are an exciting place to shop and —...
-
Page 4: Table Of Contents
Table of Contents Warnings......................5 . Important.Safety.Instructions...............6 Quick.Start.....................7 . Installation....................7 . ZipConnect™.Operation................7 . Tuner/Radio.Operation................8 . CD.Player.Operation..................8 General.Instructions..................9 . Overview....................9 Parts.Diagram....................10 . Main.Unit....................10 . Remote.Control..................13 Installation.and.Operation................15 . Zip.Connect™.Operation................15 . Changing.the.Zip.Connect™.Module............16 . Tuner/Radio.Operation................17 . CD.Player.Operation................18 . Auxiliary.Input..................20 . -
Page 5: Warnings
Warnings •. . T o.prevent.fire.or.shock.hazard,.do.not.use.this.stereo’s.plug.with.an.exten- sion.cord,.receptacle.or.other.outlet.unless.the.blades.can.be.fully.inserted.to. prevent.blade.exposure. •. . D o.not.expose.this.appliance.to.rain.or.moisture. The.lightning.flash.with.arrowhead.symbol,.within.an.equilateral.tri- angle,.is.intended.to.alert.the.user.to.the.presence.of.uninsulated. “dangerous.voltage”.within.the.product’s.enclosure.that.may.be.of. significant.magnitude.to.constitute.a.risk.of.electric.shock.to.persons. Warning:.To.reduce.the.risk.of.electric.shock,.do.not.remove.cover.. (or.back)..No.user-serviceable.parts.inside..Refer.servicing.to.quali- fied.service.personnel. The.exclamation.point.within.an.equilateral.triangle.is.intended.to.. alert.the.user.to.the.presence.of.important.operating.and.mainte- nance.(servicing).in.the.literature.accompanying.the.unit. -
Page 6: Important.safety.instructions
Important Safety Instructions 1.. Read.these.instructions. 2.. Keep.these.instructions. 3.. Heed.all.warnings. 4.. Follow.all.instructions. 5.. Do.not.use.near.water. 6.. Clean.only.with.a.dry.cloth. 7.. Do.not.block.any.ventilation.openings..Install.in.accordance.with.manufac- turer’s.instructions. 8.. Do.not.install.near.any.heat.source.such.as.radiators,.heat.registers,.stoves,. amplifiers.or.other.appliances.that.produce.heat. 9.. Do.not.defeat.the.safety.purpose.of.the.polarized.or.grounding-type.plug..A. polarized.plug.has.two.blades.and.a.third.grounding.prong..The.wide.blade. or.the.third.prong.are.provided.for.your.safety..If.the.provided.plug.does.not. fit.into.your.outlet,.contact.an.electrician.for.replacement.of.the.obsolete. outlet. 10.. P rotect.the.power.cord.from.being.walked.on.or.pinched,.particularly.at. plugs,.convenience.receptacles.and.the.point.where.they.exit.from.the.. apparatus. 11.. O nly.use.attachments/accessories.specified.by.the.manufacturer. 12.. U nplug.the.stereo.during.lighting.storms.or.when.unused.for.long.periods.. of.time. 13.. R efer.all.servicing.to.qualified.service.personnel..Servicing.is.required.when. the.apparatus.has.been.damaged.in.any.way,.such.as.when.the.power-sup- ply.cord.or.plug.is.damaged,.liquid.has.been.spilled.or.objects.have.fallen. -
Page 7: Quick.start
Quick Start Installation 1..Connect.the.FM.antenna.wire.to.the.FM ANTENNA.jack. 2..Connect.the.AM.loop.antenna.to.the.AM LOOP.connecter. 3..For.clock.backup,.install.2.AAA.batteries.(purchase.separately).into.the. backup.battery.compartment.located.on.the.bottom.of.the.unit. 4..Insert.the.AC.power.plug.into.AC.wall.outlet. 5..To.activate.the.remote.control’s.battery,.remove.the.plastic.tab.from.the. remote.battery.compartment. ZipConnect™ Operation 1.. To.access.the.ZipConnect™.dock,.press.the.RELEASE.button.on.the.top.of. the.stereo. 2.. To.enable.the.METRO.stereo.to.play.music.from.any.audio.player.with. a.headphone.jack.(MP3.player,.iPod ,.portable.CD.player).through.the. ® system’s.speakers,.slowly.pull.and.extend.the.ZipConnect™.cable.to.the. desired.length..(See.illustration.in.General.Instructions.) 3.. Insert.the.plug.into.the.headphone.jack.of.your.audio.device. 4.. To.retract.the.cable.to.the.desired.length,.pull.on.the.cable.with.a.quick,.gentle. tug,.then.gently.guide.it.as.it.automatically.spools.back.into.the.module. 5.. Slide.the.audio.player.into.the.built-in.stand.on.the.ZipConnect™.dock.and. adjust.the.width.as.needed. 6.. To.select.ZipConnect.as.the.auxiliary.source,.slide.the.ZipConnect.switch. on.the.back.of.the.stereo.to.the.ZipConnect.position. 7.. To.turn.on.the.stereo,.press.the.POWER.button. 8.. To.listen.to.music.from.the.auxiliary.ZipConnect.source,.press.the.ZIP/AUX. button. 9.. -
Page 8: Tuner/Radio.operation
Tuner/Radio Operation 1.. Connect.the.FM.antenna.wire.to.the.FM ANTENNA.jack.and.extend,.then. slide.the.FM ANT INT/EXT.(Internal/External).switch.to.the.EXT.position. Note:.If.you.do.not.wish.to.use.the.external.FM.antenna,.slide.the.FM ANT INT/EXT.to.the.INT.position. 2.. Connect.the.AM.loop.antenna.to.the.AM LOOP.connecter. 3.. To.activate.the.radio,.press.the.RADIO/BAND.button.. 4.. To.select.AM.or.FM.band,.press.the.RADIO/BAND.button.again. 5.. To.manually.tune.to.desired.station,.repeatedly.press.the.TUNE-/9 .or. TUNE+/:.button. 6.. To.automatically.search.for.stations.with.strong.signals,.press.and.hold.the. TUNE-/9.or.TUNE+/:.button.until.the.display.digit.begins.to.scan.then. release.the.button..The.tuner.stops.on.the.first.strong.station.signal.it.finds. CD Player Operation 1.. . P ress.the.POWER.button. 2.. If.the.“DISC.IN”.indicator.is.off,.insert.a.CD.into.the.CD IN/OUT.slot.. 3.. The.stereo.begins.CD.playback.automatically. 4.. Adjust.the.sound.level.by.rotating.VOLUME +/-.dial. 5.. -
Page 9: General.instructions
General Instructions Overview Features 1.. Front-Loading.CD.Player 2.. Built-in.Subwoofer 3.. Dot-Matrix.LCD.with.Blue.Backlight 4.. ID3.Technology.Displays.MP3-CD.Audio.Text.Tags 5.. Digital.PLL.Tuner.with.15.AM.&.15.FM.Presets 6.. Remote.Control.with.ZipConnect™.Capabilities 7.. Headphone.&.AUX.Audio.Input.Jacks 8.. Digital.Volume.Control.and.Adjustable.Equalizer.(Classic,.Pop,.Jazz,.Rock) 9.. Snooze.Alarm.Clock.and.Sleep.Timer 10.. Z ipConnect™.to.play.iPod.+.MP3.(included) 11.. Z ipConnect™.to.charge.+.play.iPod.Shuffle™.(purchase.separately) 12.. Z ipConnect™.to.charge.+.play.+.remote.control.iPod.&.iPod.mini.. (purchase.separately) 13.. . P lays.CD/CD-R/CD-RW/MP3/WMA.Discs 14.. . P layback.Modes:. •.Repeat.One/Repeat.Directory/Repeat.All. -
Page 10: Parts.diagram
Parts Diagram Main Unit 1.. . R ELEASE.Button:.Opens.ZipConnect.dock.door. 2.. . Z ipConnect.Dock.and.Stand 3.. . Z ipConnect™.Module 4.. . i Pod.CHARGE.Indicator:.Illuminates.when.an.iPod.is.connected.to.the.. ZipConnect.module.using.the.optional.charge+play+remote.control.. ZipConnect™for.iPod.and.iPod.mini.(purchase.separately). 5.. . S NOOZE.Button:.Activates.the.snooze.function.. - Page 11 Main Unit Front POWER DISC IN CD EJECT ZIP/ AUTO RADIO/ SEEK BAND PRESET/DIR POWER – WIDE BWD SKIP FWD SKIP STOP PLAY/PAUSE – AL ON/OFF P-MODE DISPLAY SLEEP PGM/ MODE VOLUME 6.. . P ower.On.Indicator 7.. . Z IP/AUX.Button:.Selects.auxiliary.audio.input. 8..
- Page 12 Main Unit POWER DISC IN CD EJECT ZIP/ AUTO RADIO/ SEEK BAND POWER PRESET/DIR – WIDE BWD SKIP STOP FWD SKIP PLAY/PAUSE – SLEEP AL ON/OFF P-MODE DISPLAY PGM/ MODE VOLUME 23.. . P RESET/DIR.+/-.Buttons:.Selects.preset.radio.station;.selects.CD.. MP3/WMA.directory. 24.. . C D.EJECT.Button:.Ejects.CD.from.the.IN/OUT.slot. 25..
-
Page 13: Remote.control
Remote Control 1.. . P OWER.Button:.Turns.the.unit.on.and.off. 2.. . D ISPLAY.Button:.Displays.time.and.date. 3.. . E Q.Button:.Selects.equalizer.(EQ).effect 4.. . C D.EJECT.Button:.Ejects.CD.from.slot-in.loader. 5.. . M ODE.Button:.Enters.the.setting.mode. 6.. . Z IP/AUX.Button:.Select.auxiliary.audio.input. 7.. . S LEEP.Button:.Selects.sleep.timer.duration. 8.. . A L.ON/OFF.Button:.Turns.the.alarm.on.and.off. 9.. . P -MODE.Button:.Selects.CD.play.mode. 10.. . P GM/MEM.Button:.Sets.CD.program;.saves.radio.preset.station. 11.. - Page 14 Remote Control Slide down to open. 14.. . P RESET/DIR.+/-.Buttons:.Selects.preset.radio.station;.selects.CD.. MP3/WMA.directory. 15.. . V OL.+/-.Button:.Adjusts.volume.level.up.or.down. 16.. . P LAY/PAUSE.Button:.Plays.or.pauses.CD.playback. 17.. . R EW/TUNE-/9.and.FWD/TUNE+/:.Buttons:.Tunes.the.radio.down.or.up;. skip/searches.CD.playback.backward.or.forward. 18.. . S TOP.Button:.Stops.CD.playback 19.. . i Pod.REW.7.and.F.FWD.8.Buttons.(under.sliding.cover):.searches.iPod.. playback.in.reverse.or.forward.* 20.. . i Pod.PLAY/PAUSE4 ; ..INSIDE.Button.(under.sliding.cover):.Plays.or.pauses. iPod.playback.* *To.enable.the.remote’s.iPod.capabilities,.you.much.install.the.charge+play+.
-
Page 15: Installation.and.operation
Installation and Operation 1.. . C onnect.the.FM.antenna.wire.to.the.FM ANTENNA.jack. 2.. . C onnect.the.AM.loop.antenna.to.the.AM LOOP.connecter. 3.. . F or.the.dual.ZipConnect/auxiliary-in.(AUX).feature: a.. To.access.the.ZipConnect™.dock,.press.the.RELEASE.button.on.the.top. of.the.stereo..Slowly.pull.and.extend.the.ZipConnect™.cable.to.the. desired.length.and.insert.the.plug.into.the.headphone.jack.of.your.audio. device.(MP3.player,.iPod,.portable.CD.player)..(See.ZipConnect.Opera- tion.for.more.information.) b.. Plug.one.end.of.an.audio.cable.(not.included).into.the.stereo.AUX IN. jack.located.on.the.back.of.the.main.unit.and.the.other.end.into.your. auxiliary.device.(TV,.DVD.player,.VCR). 4.. . F or.clock.backup,.install.2.AAA.batteries.(purchase.separately).into.the. backup.battery.compartment.located.on.the.bottom.of.the.unit. 5.. . I nsert.the.AC.power.plug.into.AC.wall.outlet. 6.. . T o.activate.the.remote.control’s.battery,.remove.the.plastic.tab.from.the. remote.battery.compartment. -
Page 16: Changing The Zipconnect™ Module
ZipConnect™ Operation 3.. . I nsert.the.plug.into.the.headphone.jack.of.your.audio.device. 4.. . T o.retract.the.cable.to.the.desired.length,.pull.on.the.cable.with.a.quick,. gentle.tug,.then.gently.guide.it.as.it.automatically.spools.back.into.the.module. 5.. . S lide.the.audio.player.into.the.built-in.stand.on.the.ZipConnect™.dock.and. adjust.the.width.as.needed. 6.. . T o.select.ZipConnect.as.the.auxiliary.source,.slide.the.AUX/ZipConnect. switch.on.the.back.of.the.main.unit.to.the.ZipConnect.position. 7.. . T o.turn.on.the.stereo,.press.the.POWER.button. 8.. . T o.listen.to.music.from.the.auxiliary.ZipConnect.source,.press.the.ZIP/AUX. button. 9.. . T urn.on.the.connected.audio.player.(MP3.player,.iPod,.portable.CD.player). according.to.the.manufacturer’s.instructions. 10.. . S et.the.volume.for.audio.player.to.about.70%.of.the.maximum.volume. Note:.You.may.need.to.adjust.the.volume.on.your.personal.audio.player.above. or.below.70%.to.achieve.a.desired.volume.level.or.to.reduce.distortion..Start.at. -
Page 17: Tuner/Radio.operation
Changing the ZipConnect™ Module Note:.If.you.are.unable.to.get.a.secure.grip.on.the.module.when.trying.to.pull. it.out.from.the.sleeve,.fully.extend.the.ZipConnect.cable.and.gently.pull.the. module.out.by.the.cable. 2.. . S lide.the.replacement.ZipConnect.module.into.the.sleeve.. Note:.The.ZipConnect.module.can.only.fit.into.the.sleeve.the.correct.way..If. the.module.does.not.easily.slide.into.the.sleeve,.rotate.the.ZipConnect.module. around.and.insert.it.the.other.way.. 3.. . F or.information.on.using.the.replacement.ZipConnect.module,.see.the. instruction.manual.included.with.the.module. Tuner/Radio Operation External FM Antenna Plug.the.external.wire.antenna.into.the.FM.antenna.jack.at.the.side.of.the. unit.and.extend..Reception.quality.depends.on.the.length.of.the.antenna;.the. greater.the.distance,.the.stronger.the.reception.quality..Select.the.“EXT”.posi- tion.of.the.FM ANT INT/EXT.switch. Radio Tuning 1.. . T o.activate.the.radio,.press.the.RADIO/BAND.button.. 2.. . T o.select.AM.or.FM.band,.press.the.RADIO BAND.button.again. 3.. -
Page 18: Cd.player.operation
Tuner/Radio Operation Notes: •. Use.manual.tuning.to.select.weaker.stations.that.might.be.bypassed.during. automatic.tuning. •. If.the.automatic.tuning.does.not.stop.on.the.exact.frequency.of.the.station,. for.example,.it.stops.on.100.85.MHz.instead.of.100.8.MHz,.use.the.manual. tuning.method.to.“fine.tune”.to.the.exact.frequency.of.the.desired.station. Radio Preset Stations The.unit.allows.you.to.store.up.to.15.AM.and.15.FM.stations.in.the.tuner.preset. memories.for.easy.recall.at.any.time. 1.. . T o.activate.the.radio,.press.the.RADIO/BAND.button.. 2.. . T o.select.AM.or.FM.band,.press.the.RADIO/BAND.button.again. 3.. . T une.to.the.radio.station.you.want.to.store.in.memory.using.the.TUNE-/9. or.TUNE+/:.button. 4.. . P ress.the.PGM/ MEM.button..The.preset.channel.number.“CH01”.flashes.. on.display. 5.. . T o.select.desired.preset.station.number,.press.PRESET/DIR +/-.button. 6.. . T o.confirm.preset.location,.press.the.PGM/MEM.button. 7.. - Page 19 CD Player Operation CD Play Modes For CD disc: • Repeat Playback 1.. . T o.repeat.playback.of.one.track,.press.the.P-MODE.button.once..A.repeat. one.icon.appears.on.the.LCD. 2.. . T o.repeat.playback.of.an.entire.CD,.press.P-MODE.button.twice..A.repeat. all.icon.appears.on.the.LCD. • Intro Playback 1.. . T o.playback.the.first.10.seconds.of.each.track.on.the.disc,.press.the.P- MODE.button.three.times..“INTRO”.appears.on.the.LCD. 2.. . T o.begin.intro.playback.from.track.#1,.press.the.PLAY/PAUSE4 ; ..button. • Random Play 1.. . T o.playback.CD.tracks.in.random.order,.press.the.P-MODE.button.four. times..“SHUF”.appears.on.the.LCD.
-
Page 20: Auxiliary.input
CD Player Operation CD Program Playback This.feature.allows.you.to.program.up.to.30.tracks.to.play.in.a.desired.order. 1.. . W ith.CD.playback.stopped,.press.PGM/MEM.button.once..“PGM”.and. “000”.(track.number).indicators.flash.on.the.display. 2.. . T o.select.the.track.number.for.the.first.program.position,.press.the.9.or.:. button..For.MP3/WMA.disc,.another.two.digits.showing.the.directory.num- ber.appears.on.display..To.select.a.directory,.if.necessary,.press.the.PRESET/ DIR.+/-.button. 3.. . W hen.desired.track.number.is.displayed,.press.the.PGM/MEM.button.to.set. the.position..Track.number.“000”.indicator.flashes.on.display.again. 4.. . T o.program.up.to.30.tracks,.repeat.steps.2.and.3.until.all.desired.tracks.are. entered. 5.. . T o.begin.programmed.playback,.press.the.PLAY/PAUSE4 ; ..button..The. “PGM”.indicator.stops.flashing.and.the.CD.starts.programmed.playback. 6.. . T o.cancel.programmed.playback,.press.STOP.< button. Notes: •... -
Page 21: Additional.features
Additional Features EQ Setting In either RADIO, CD or AUX mode: 1.. . T o.select.preset.EQ:.CLASSIC,.POP ,.JAZZ.or.ROCK;.press.EQ.button. 2.. . T o.adjust.BASS.level,.press.MODE.button.once.then.rotate.the.VOLUME +/-.dial. 3.. . T o.adjust.TREBLE.level,.press.MODE.button.twice.then.rotate.VOLUME +/-. dial..Press.MODE.button.to.exit.BASS.and.TREBLE.setting.mode. Virtual Surround Sound Effect To.activate.the.virtual.surround.sound.effect,.press.the.WIDE.buttton. Audio Line Out The.unit.provides.an.audio.output.source.for.the.connection.with.another. audio.device. The.LINE.OUT.jack.is.located.on.the.back.of.the.unit. Subwoofer The.unit.has.a.built-in.Subwoofer.for.a.heavy.bass.effect. Clock, Alarm and Sleep Timer Functions Clock and Calendar Setting Note:.Ensure.the.power.is.off. - Page 22 Clock, Alarm and Sleep Timer Functions Setting the Alarm 1.. . P ress.the.MODE.button.once..The.clock.display.for.the.alarm.flashes. 2.. . T o.set.the.hour.and.minute,.rotate.the.VOLUME +/-.dial.to.set.advance.or. reverse.the.clock.. 3.. . P ress.the.MODE.button.again..The.alarm.source.icon.flashes. 4.. . T o.select.to.wake.to.buzzer,.radio.or.CD,.rotate.the.VOLUME +/-.dial.until. the.desired.icon.appears.on.LCD. Note:.When.alarm.to.CD.is.selected,.ensure.a.CD.is.loaded.into.the.unit.. When.alarm.to.radio.is.selected,.ensure.a.desired.radio.station.is.tuned. 5.. . T o.select.snooze.time,.press.MODE.button.again. 6.. . T o.set.snooze.time,.from.5.to.30.minutes,.rotate.the.VOLUME +/-.dial.to. advance.or.reverse.the.value..
- Page 23 Clock, Alarm and Sleep Timer Functions Wake to Radio •. At.the.desired.wake.up.time.the.radio.turns.on..It.starts.softly.and.gradually. becomes.louder. •. It.plays.for.30.minutes.and.then.shuts.off.and.resets.itself.for.the.following.day. •. You.may.press.the.SNOOZE.button.to.activate.the.snooze.function..The.ra- dio.stops.for.the.selected.snooze.time.and.then.turn.on.again..This.manual. snooze.operation.may.be.repeated.up.to.a.total.of.3.times..Each.time.the. radio.turns.on,.it.will.play.for.30.minutes.(without.pressing.the.SNOOZE. button). •. After.the.radio.sounds.you.may.also.press.the.AL ON/OFF.button.to.stop.it. immediately..It.will.reset.itself.for.the.following.day. Wake to CD •. At.the.desired.wake.up.time.the.CD.plays.back..It.starts.softly.and.gradually. becomes.louder. •. It.will.play.back.for.30.minutes.(or.up.to.end.of.the.disc,.depending.on.which. one.comes.first).and.then.shuts.off.and.resets.itself.for.the.following.day. •. You.may.press.the.SNOOZE.button.to.activate.the.snooze.function..The. CD.stops.for.the.selected.snooze.time.and.then.turns.on.again..This.manual. snooze.operation.may.be.repeated.up.to.a.total.3.times. •. During.the.CD.playback.you.may.also.press.the.AL ON/OFF.button.to.stop. it.immediately..It.will.reset.itself.for.the.following.day.
-
Page 24: Troubleshooting.guide
Troubleshooting Guide Should.this.unit.exhibit.a.problem,.check.the.following.before.seeking.service. Symptom Possible Cause Solution Radio Noise.or.sound.dis- Station.is.not.tuned. Retune.the.AM.or.FM. torted.on.AM.(MW).. properly.for.AM.or.FM. broadcast.station. or.FM.broadcasts.. FM:.Wire.antenna.is.not. Extend.FM.wire.. extended. antenna. AM:.The.bar.antenna.is. Reposition.the.unit. not.positioned.correctly.. until.best.reception.is. obtained. AM.or.FM.mode.is.not. To.select.AM.or.FM,. AM.(MW).or.FM,.. selected.. press.the.BAND.. no.sound. button. Volume.at.minimum. Increase.volume.level. level. CD Player CD.mode.is.not.. To.select.CD,.press. CD.Player.will.. selected. the.PLAY/PAUSE.4 ;... -
Page 25: Specifications
Specifications Power Supply AC:..120V./.60Hz..(See.rating.indicated.on.bottom.of.unit.) Remote Control:..2.CR2032.Batteries.(included) Main Unit backup:..2.AAA.Batteries.(purchase.separately) Frequency Range AM:..520.-.1710kHz. FM:..87.5.-.108MHz... -
Page 26: Statement.of.fcc/Dhhs.compliance
Statement of FCC/DHHS Compliance WARNING:.Changes.or.modifications.to.this.unit.not.expressly.approved.by.the. party.responsible.for.compliance.could.void.the.user’s.authority.to.operate.the. equipment. NOTE:.This.product.complies.with.DHHS.Rule.21.subchapter.J.at.date.of. manufacture. This.equipment.has.been.tested.and.found.to.comply.with.the.limits.for.a.Class. B.digital.device,.pursuant.to.Part.15.of.the.FCC.Rules..These.limits.are.designed. to.provide.reasonable.protection.against.harmful.interference.in.a.residential. installation..This.equipment.generates,.uses,.and.can.radiate.radio.frequency. energy.and,.if.not.installed.and.used.in.accordance.with.the.instructions,.may. cause.harmful.interference.to.radio.communications..However,.there.is.no. guarantee.that.interference.will.not.occur.in.a.particular.installation. If.this.equipment.does.cause.harmful.interference.to.radio.or.television.recep- tion,.which.can.be.determined.by.turning.the.equipment.off.and.on,.the.user. is.encouraged.to.try.to.correct.the.interference.by.one.or.more.of.the.following. measures: •. R eorient.or.relocate.the.receiving.antenna.. •. I ncrease.the.separation.between.the.equipment.and.receiver.. •. . C onnect.the.equipment.into.an.outlet.on.a.circuit.different.from.that.to.which. the.receiver.is.connected.. •. . C onsult.the.dealer.or.an.experienced.radio/TV.technician.for.assistance. FCC Label Compliance Statement This.device.complies.with.Part.15.of.the.FCC.Rules..Operation.is.subject.to.the. following.two.conditions:.(1).This.device.may.not.cause.harmful.interference,. - Page 28 Warranty What Is Covered This.warranty.covers.any.defects.in.materials.or.workmanship,.with.the.exceptions.stated.below. How Long Coverage Lasts This.warranty.runs.for.90.days.from.the.date.of.original.purchase. What Is Not Covered This.warranty.does.not.cover.damage.caused.by.misuse.or.use.other.than.as.intended.and.de- scribed.in.the.product.instruction.manual,.or.loss.or.damage.to.batteries.or.removable.parts.. What The Sharper Image Will Do The.Sharper.Image.will.repair.any.defects.in.materials.or.workmanship..In.the.event.repair.is.not.. possible,.The.Sharper.Image.will.either.replace.this.product.with.one.of.similar.features.and. price,.or.refund.the.full.purchase.price.of.the.product,.whichever.you.prefer. How to Obtain Service Return.the.product.and.receipt,.along.with.a.brief.explanation.of.the.problem,.to: T.S.I. - Returns Department 2901-A West 60th Street Little Rock, AR 72209 If.you.have.questions.please.feel.free.to.contact.our.customer.service.representatives.at..
Need help?
Do you have a question about the ZipConnect stereo METRO and is the answer not in the manual?
Questions and answers