Advertisement
Quick Links
Installatie Handleiding
Installation Manual
Installation Manuel
Installationshandbuch
Alpha GSE 2023
Q-Access
Delften 23, hal 84
2390 Malle
+32 (0) 3 312 07 42
info@q-mobilitygroup.be
Access
Your car upgrade provider
FORD RANGER 2023 XLT
FORD RANGER 2023 LIMITED
FORD RANGER 2023 WILDTRAK
FORD RANGER 2023 RAPTOR
Advertisement

Related Manuals for Q Mobility Group Q Access Alpha GSE 2023

Summary of Contents for Q Mobility Group Q Access Alpha GSE 2023
- Page 1 Access Installatie Handleiding Installation Manual Your car upgrade provider Installation Manuel Installationshandbuch Alpha GSE 2023 Q-Access Delften 23, hal 84 2390 Malle FORD RANGER 2023 XLT FORD RANGER 2023 LIMITED +32 (0) 3 312 07 42 FORD RANGER 2023 WILDTRAK info@q-mobilitygroup.be FORD RANGER 2023 RAPTOR...
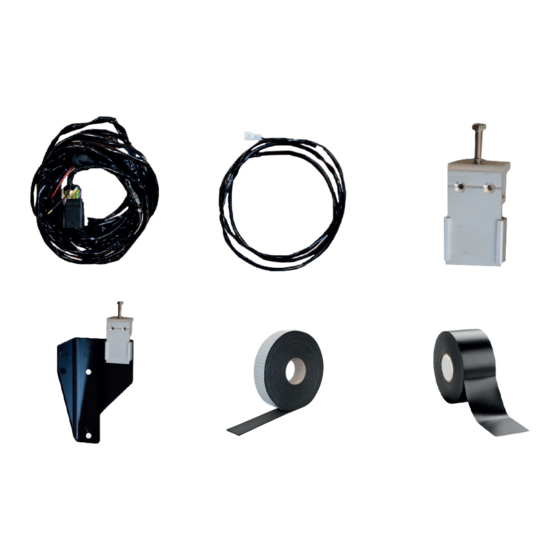
- Page 2 Installation Manual Type E+ Air INSTALLATION MANUAL NL: Installatiekit INSTALLATION MANUAL Access Installation Manual GB: Installation kit Access FR: Kit de montage NL: Installatiekit GB: Installation kit FR: Kit de montage DE: Installationssatz DE: Installationssatz NL: Installatiekit NL: Installatiekit GB: Installation kit FR: Kit de montage DE: Installationssatz NL: Installatiekit...
- Page 3 Installation Manual Access NL: Kabelboom (a + b) GB: Wiring Loom (a + b) FR: Harnais de fil (a + b) DE: Kabelbaum (a + b) NL: Verwijder de sleutels van de hardtop voor je begint met de installatie. GB: Remove the keys from the hardtop before starting the installation. FR: Retirez les clés du toit rigide avant de commencer l'installation.
- Page 4 NL: Schroef de massakabel (-) los van Access batterij. GB: Unscrew the ground cable (-) from the battery. FR: Dévisser le câble de mise à la terre (-) de la batterie. DE : Schrauben Sie das Massekabel (-) von der Batterie Boor een gat van 26mm ter hoogte...
- Page 5 Access Ontvet de bovenzijde van de laadbak. Degrease the bed rail. Dégraissez le bord du haut de la benne Entfetten Sie die Oberseite des Ladefläche Kleef de montagestrip (e) in één stuk op de bovenzijde van de laadbak. Apply the mounting tape (e) in one piece on the upper side of the bed rail.
- Page 6 Lijn de hardtop uit op de achterkant van de wagen Access en zorg ervoor dat de rubber van de hardtop goed aansluit. Align the hardtop with the rear of the car and make sure that the rubber of the hardtop fits properly. Alignez le hardtop avec l'arrière de la voiture et assurez vous que le caoutchouc de l’hardtop est bien ajusté.
- Page 7 NL: Sluit kabelboom (b) aan op punt 2 van kabelboom (a). Doe dit ter hoogte van de brandstoftank. Access GB: Connect the wiring loom (b) to point 2 of wiring loom (a). Do this near the fuel tank. FR: Connectez le faisceau de câbles (b) au point 2 du faisceau de câbles (a).
- Page 8 NL: Ontkoppel van boven de originele stekker voor achterruitverwarming en koppel hier punt (6) van kabelboom (b) op aan. Access GB: Disconnect the original plug for the rear window heating from above and connect point (6) of the wiring loom (b) to it.
- Page 9 NL: Test de volgende punten FR: Testez les points suivants Achterruitverwarming Chauffage de la lunette arrière Access 2. Derde stoplicht 2. Troisième feu de stop 3. Centrale vergrendeling 3. Verrouillage centralisé 4. Binnenverlichting 4. Eclairage intérieure GB: Test the following points DE: Testen Sie die folgenden Punkte Rear window defroster Heckscheibenheizung...
Need help?
Do you have a question about the Q Access Alpha GSE 2023 and is the answer not in the manual?
Questions and answers