Advertisement
Quick Links
#
PRP1745
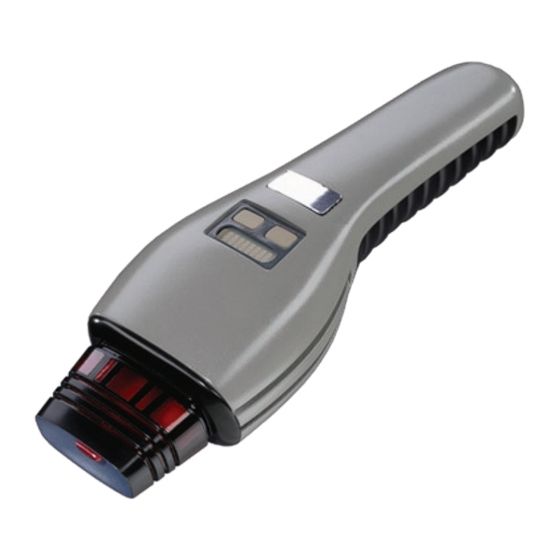
The Next Generation 1st Season "Dustbuster"
Phaser Prop Kit Assembly Manual
Thank you for your purchase of the Roddenberry.com Star Trek: The Next Generation First Season
Phaser Prop Kit. These instructions will enable you to construct an accurate replica of the phaser used
in the first two seasons of The Next Generation.
Commonly known as the "Dustbuster" Phaser, it is cast hollow for light weight and ease of upgradeability.
It features a snap-in grip, so no screws are visible or necessary, and includes a translucent red emitter.
Advertisement

Summary of Contents for Roddenberry Next Generation 1st Season Dustbuster
- Page 1 The Next Generation 1st Season "Dustbuster" Phaser Prop Kit Assembly Manual Thank you for your purchase of the Roddenberry.com Star Trek: The Next Generation First Season Phaser Prop Kit. These instructions will enable you to construct an accurate replica of the phaser used in the first two seasons of The Next Generation.
-
Page 2: Parts List
#PRP1745 - T “D ” P eNeRaTioN easoN usTbusTeR haseR ssembly aNual BASIC LAYOUT AND INVENTORY PARTS LIST: • 1 Main Body • 1 Emitter • 1 Grip • 2 Bullet Catches • 1 LED Detail Plate • 1 Trigger and Force Setting Button Template •... - Page 3 #PRP1745 - T “D ” P eNeRaTioN easoN usTbusTeR haseR ssembly aNual Step 1: Wash your parts with soap and water to remove traces of mold release before starting. Step 2: Test fit the LED plate, sand it if necessary until it looks good and fits properly. Also test fit the emit- ter and the grip.
- Page 4 #PRP1745 - T “D ” P eNeRaTioN easoN usTbusTeR haseR ssembly aNual Step 4: When the body is prepared, hang the body on a hook and spray your first coat of gray primer. When dry, putty and sand any pits or dips that weren’t visible before painting. When you have a surface you’re pleased with, spray a fresh coat of primer over the sanded areas before proceeding.
- Page 5 #PRP1745 - T “D ” P eNeRaTioN easoN usTbusTeR haseR ssembly aNual Step 8: Mask around the top display block with the masking tape and either brush-on or spray a coat of dark gray in the visible area. Step 9: Prepare the grip like you did the body -- cut off the sprue and sand the mold seams until smooth and putty if necessary.
- Page 6 #PRP1745 - T “D ” P eNeRaTioN easoN usTbusTeR haseR ssembly aNual Step 11: Make a hook as shown using a wire hanger, then spray primer (with gray or black), then spray the color coats with the semi-gloss or gloss black. A gloss finish will look better, but it takes longer to dry and will show off more surface flaws than the duller paints.
- Page 7 #PRP1745 - T “D ” P eNeRaTioN easoN usTbusTeR haseR ssembly aNual Step 15: Prepare the emitter by sanding the mold seams and lightly sanding the surfaces. Be very careful around the lightly detailed areas, you do not want to sand the squared details off! Step 16: Mask the “inner”...
- Page 8 #PRP1745 - T “D ” P eNeRaTioN easoN usTbusTeR haseR ssembly aNual Step 19: When the paint is cured, pry off the masking tape from everywhere except the front tip -- leave that tape on! You may need to lightly use your hobby knife on the tape edges to separate them and to keep from lifting your fresh paint job.
- Page 9 #PRP1745 - T “D ” P eNeRaTioN easoN usTbusTeR haseR ssembly aNual Step 23: Carefully cut the buttons to size and file or sand to final size. Step 24: Test fit on the body and sand more if needed. Step 25: Secure the buttons on a Popsicle stick, cardboard, etc. and spray primer. The two small buttons are beige in color, these can be brushed-on or spray-painted.
- Page 10 #PRP1745 - T “D ” P eNeRaTioN easoN usTbusTeR haseR ssembly aNual Step 27: Scrape away the paint on the body where the buttons (and the LED detail plate) will be glued to -- glue joints work better on resin than on paint. Apply glue to the button depressions (NOT the LED slot) and place the buttons.
- Page 11 #PRP1745 - T “D ” P eNeRaTioN easoN usTbusTeR haseR ssembly aNual Step 30: When dry, remove the tape. Step 31: Apply glue to the LED depression and install the LED plate. Step 32: Scrape away paint from the inside of the large phaser cavity where the emitter goes.
- Page 12 #PRP1745 - T “D ” P eNeRaTioN easoN usTbusTeR haseR ssembly aNual Step 33: With the hot glue gun, spread a quantity of hot glue all around the inside of the front hole and push in the emitter, again making sure you don’t get glue on the outside surfaces. You have a little time to get enough hot glue in and to install and align the emitter onto the phaser before the hot glue hardens.
- Page 13 Step 35: ...and you have a completed TNG First Season “Dustbuster” Phaser! IMPORTANT NOTES: The physical reproduction by any means known or yet to be invented (including recasting and/or reverse-engineering or 3D scanning/printing) of the Roddenberry.com Next Generation First Season Phaser Kit or any of its parts is expressly prohibited under U.S.
Need help?
Do you have a question about the Next Generation 1st Season Dustbuster and is the answer not in the manual?
Questions and answers