
Subscribe to Our Youtube Channel
Summary of Contents for Marshall Amplification VMV-402-SH
- Page 1 B r o a d c a s t A / V D i v i s i o n VMV-402-SH 4-Input 3G SDI Switcher with Quad Mode and Ethernet Control User Manual July 2022 www.marshall-usa.com...
-
Page 2: Table Of Contents
8. IR Remote Control 9. Configuration and Remote Operation 9.1 Installing the Application 9.2 Updating the Firmware 9.3 Setting Up the VMV-402-SH for the First Time 9.4 Most Common Settings 9.5 Select the Outputs Tab 9.7 Quad Mode Settings 9.8 Using an Ethernet Connection with the Default Address 9.9 Establishing a new Static IP Address... -
Page 3: Introduction
VMV-402-SH Manual 1. Introduction The Marshall VMV-402-SH is ideal for presentation systems, control rooms, and remote productions by providing seamless switching between four selectable inputs. Inputs can be a combination of mixed formats and frame rates. Simultaneous output is provided via 3G SDI and HDMI. The SDI output supports up to 1080p while the HDMI output may be scaled up to UHD. -
Page 4: Specifications
5. Specifications Model Name VMV-402-SH Quad-viewer/Switcher Role of Usage Quad-viewer or 4x1 Video Switcher [3G] 1080p @50/59.94/60Hz (4:2:2) Video Input Support [HD] 720p @50/59.94/60Hz, 1080i @50/59.94/60Hz, 1080p @24/30/60Hz Audio Pass Through Embedded surround sound (up to 7.1ch) or stereo digital audio... -
Page 5: Panel Descriptions
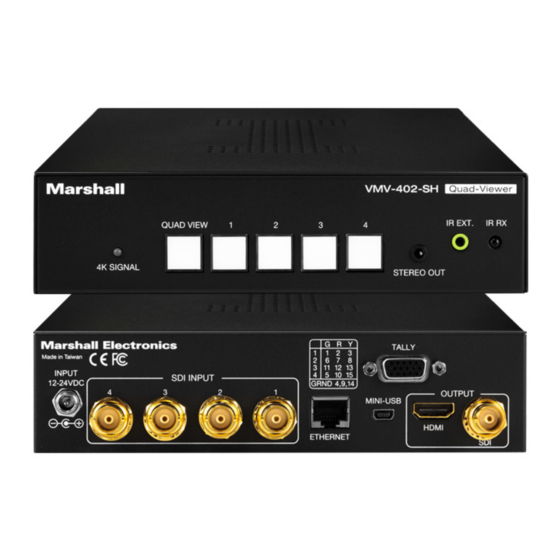
VMV-402-SH Manual 6. Panel Descriptions 1. 4K Signal LED: Lighted when output is set for 4K when HDMI output is set to UHD format (HDMI output). 2. Quadview Button: Changes output to quad view mode. 3. 3. Input Select Buttons: Selects between sources. The button will illuminate when source is selected. -
Page 6: Hardware Installation
7. Hardware Installation 1. Connect display, recorder, etc. to SDI or HDMI output of the VMV-402-SH 2. Connect the SDI input sources to the inputs of VMV-402-SH 3. Securely attach the provided supply unit to the locking power jack 4. Use IR remote or computer software to switch between input channels 8. -
Page 7: Configuration And Remote Operation
Important: Make sure to check the box “Create a Desktop Icon” during the installation 9.2 Updating the Firmware It is strongly recommended that the firmware in the VMV-402-SH be updated before using the product. 1. Double-click on the new desktop icon. - Page 8 7. Select the COM Port. Ignore the IP Address, it has no function in this process. 8. Click on the Connect button. 9. The Main page will appear. Click the Settings button.
- Page 9 VMV-402-SH Manual 10. Click on the Utilities Tab on the Settings page 11. Then click on Firmware Update The Update Page will appear. 12. Please confirm that the Update Version is newer or the same as the existing Device Version 13.
- Page 10 Please allow at least 3 minutes from the time the process starts until you use the switcher as background processes may still be completing. Select Yes to set a static IP address for the VMV-402-SH ethernet connection. Select No to skip this step at this time.
-
Page 11: Setting Up The Vmv-402-Sh For The First Time
9.3 Setting Up the VMV-402-SH for the First Time Configuring the VMV-402-SH the first time is most easily done using the USB connection and running the control application by following the steps as described above. It is recommended to use this method of connection BEFORE attempting an Ethernet connection. -
Page 12: Select The Outputs Tab
9.5 Select the Outputs Tab At the bottom, click on the Output Resolution. pulldown window and select an output format and frame rate. All incoming video sources will be converted to this choice. Special Note: When a UHD format is selected, it applies to the HDMI output only. The SDI output will be 1080p at the same frame rate. -
Page 13: Quad Mode Settings
VMV-402-SH Manual 9.6 Other Settings on this Page Vertical Flip: Turn picture upside down Mirror: Reverse picture left & right These two settings affect the entire output frame including Quad mode. Video Shift: Move output image Up/Down and Left/Right Horizontal position may be moved in 200 increments. 100 is default center. -
Page 14: Using An Ethernet Connection With The Default Address
9.8 Using an Ethernet Connection with the Default Address The VMV-402-SH maybe be setup with a Static (fi xed) IP address or an automatically assigned IP address using DHCP mode. To use the control app in DHCP mode it should be connected to the unit using USB or Static Ethernet connection fi rst. -
Page 15: Establishing A New Static Ip Address
NOT checked then click the Apply button. At this point, the VMV-402-SH will restart (indicated by all front panel buttons lighting). Close and restart the control app. Allow at least one full minute before attempting to connect using the new address using the method described above. -
Page 16: Setting Dhcp Mode
9.10 Setting DHCP Mode The VMV-402-SH may be operated in DHCP mode. That is, the address is not Static but is, instead, set automatically by a router on the network. When DHCP mode is enabled, the current IP address may change. -
Page 17: Warranty
Warranty For Warranty information please refer to Marshall website page: https://marshall-usa.com/company/warranty.php 20608 Madrona Avenue, Torrance, CA 90503 Tel: (800) 800-6608 / (310) 333-0606 • Fax: 310-333-0688 www.marshall-usa.com support@marshall-usa.com V.1.2...
Need help?
Do you have a question about the VMV-402-SH and is the answer not in the manual?
Questions and answers