Advertisement
Quick Links
ASSEMBLY INSTRUCTIONS
Before You Begin:
Please identify all component parts and hardware pieces required before you begin. Carefully remove all of the
components from the packaging and set aside for assembly. Assemble on a soft surface to prevent scratching
during assembly.
Caution:
Tighten all components securely before use. Failure to do so may result in personal injury.
DO NOT use any sharp objects to open plastic wrapped components as damage to product or components may
result.
Warning:
CHOKING HAZARD - Small Parts. Adult Assembly Required.
lnjury may result from tipping furniture. You must install the Tipping Restraint Hardware with the unit to prevent
the unit from tipping and causing any accidental injury , instability, death or damage. The tipping restraint is
intended only as a safety measure, it is not a substitute for proper adult supervision.
This tipping restraint is not an earthquake restraint. lf you wish to add the extra security of earthquake restraints,
they must be purchased and installed separately.
Serious or fatal crushing injuries can occur fromfurniture tipping over. To prevent furniture from tipping over
it must be permanently fixed to the wall. Fixing devices for the wall are not included since different wall
materials require different types of fixing devices. Use fixing devices suitable for the walls in your
home
Failure to detach this restraint before moving furniture may result in injury or damage.
DO NOT ALLOW CHILDREN TO CLIMB ON FURNITURE
..................................................................................
Customer Service Email:
YK-1078-BEIGE-K-GG / YK-1078-GY-K-GG / YK-1078-CHAR-K-GG
CustomerExperience@belnick.com
Thank you for your purchase !
UPHOLSTERED
PLATFORM BED
I Phone: 866-552-2810
Advertisement

Related Manuals for Flash Furniture YK-1078-BEIGE-K-GG


Summary of Contents for Flash Furniture YK-1078-BEIGE-K-GG
- Page 1 Use fixing devices suitable for the walls in your home Failure to detach this restraint before moving furniture may result in injury or damage. DO NOT ALLOW CHILDREN TO CLIMB ON FURNITURE .................. Customer Service Email: CustomerExperience@belnick.com I Phone: 866-552-2810 YK-1078-BEIGE-K-GG / YK-1078-GY-K-GG / YK-1078-CHAR-K-GG...
- Page 2 Have a Question/Concern? Quality products and first-class customer service are the cornerstone of longlasting consumer relationships. We strive toward excellence in all we do and want you to be completely satisfied with your purchase. Please contact our exceptional Customer Experience Agents at the email address or phone number shown below to assist you with any product questions or issues before requesting a return.
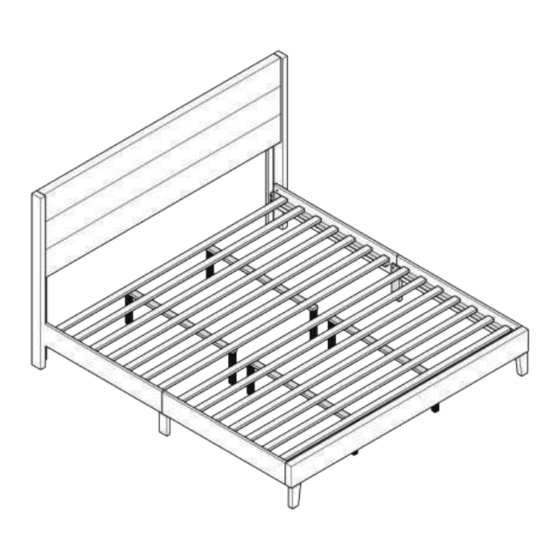
- Page 3 Part Footboard Legs Part 1: Left & Right Side Rails Part 2: Headboard Part 3: Part 4: Headboard Legs 2pcs 2pcs Part 5: Left & Right Side Legs Part 6: Center Legs Part 7: Center Rail Part 8: Support Slats 2pcs 4pcs 2pcs...
- Page 4 Hardware M8 x 1mm Large Lock Washer M8 x 20mm Screws M8 x 35mm Screws M8 x 1mm Large Flat Washer M6 x 23mm Adjustable Height Glides Part B 10pcs Part C 10pcs Part D 8pcs Part E 8pcs Part A 10pcs M6 x 1mm M6 x 45 mm Screws M6 x 50mm Screws...
- Page 5 NOTE: Unzip liner to access screw holes. Headboard Wings Headboard Step 1 : Attach the Headboard Wings (Part 10) to both sides of the Headboard (Part 2) using (4) M8x35mm Screws (Part A), (4) M8x1mm Large Lock Washers (Part B), and (4) M8x1mm Large Flat Washers (Part C). Tighten using M5 Large Allen Wrench (Part M).
- Page 6 Step 6 : Attach (2) Side Legs (Part 5) to the Left and Right Side Rails (Part 1) using (8)M6x25mm Screws (Part H), (8) M6x1mm Large Lock Washers (Part J) and (8) M6x1mm Large Flat Washers (Part K). Tighten using M4 Small Allen Wrench (Part L).
- Page 7 Step 11: Insert (8) M6x50mm Screws (Part G) through the Support Slats (Part 8) and the Center Rails (Part 7) and attach to the Center Legs (Part 6). Tighten using M4 Small Allen Wrench (Part L). M6x50mm Screw Support Slat Center Rail Center Rail Center Legs...
- Page 8 Step 12: Attach (2) sets of Support Slats (Part 8) to the Left & Right Side Rails (Part 1) using (8) M30 Self-Tapping Screws (Part I). Tighten using a Phillips Screwdriver (Not Included).