Table of Contents
Advertisement
Quick Links
Advertisement
Table of Contents

Related Manuals for Wonwoo SF-H308

Summary of Contents for Wonwoo SF-H308
- Page 1 INSTALLATION / OPERATING MANUAL STAINLESS STEEL CAMERA - Before attempting to connect or operate this product, please read these instructions carefully and save this manual for future use. - The design and specifications are subject to be changed without prior notice to improve product’s quality.
-
Page 2: Table Of Contents
TABLE OF CONTENTS 1. PRECAUTIONS 1. 1 IMPORTANT SAFETY INSTRUCTION 2. DISCRIPTIONS 2. 1 PACKAGE COMPONENTS 2. 2 PART NAMES AND FUNCTIONS 3. OPERATION SETTING 3. 1 EXTERNAL I/O 4. INSTALLATION 5. MAIN SETUP MENU 5. 1 Camera Setting 5. 2 Inteligence Setting 5. -
Page 3: Precautions
1. PRECAUTIONS 1. 1 Important Safety Instruction • Read these instructions. • Pay attention on all the warnings. • Follow all instructions. • Arbitrary disassembly will void product warranty. • Do not block any ventilation openings. Install in accordance with the manufacturer's instructions. •... -
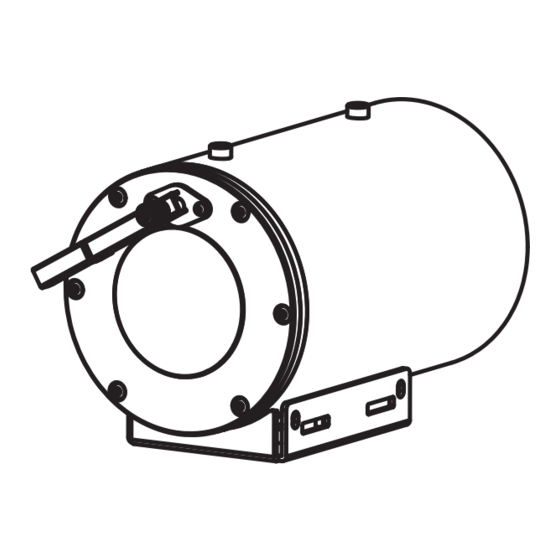
Page 4: Discriptions
2. DISCRIPTIONS 2. 1 PACKAGE COMPONENTS Nipple Seal fitting Sunshield/Sunshield bolt Rotation bracket Camera body Pole bracket(Option) Corner bracket(Option) Wall bracket(Option) 2. 2 PART NAMES AND FUNCTIONS 1. Windshield Wiper : Wipes away water or dust on the camera screen. 2. -
Page 5: Operation Setting
3. OPERATION SETTING Set the protocol, address and dipswitch before set the camera. The manufacturer is not responsible for any problems after disassembling and reassembling by whom is not explosion-proof certificate holder or explosion-proof certificate approval company. 3. 1 EXTERNAL I/O (HD-SDI TYPE + IP TYPE) RY1_NO(White) RY1_NC(Brown) RY1_COM(Red) -
Page 6: Installation
4. INSTALLATION Precautions before installation Ensure you read out the following instructions before installing the camera: • Install the system based on the following directions. If you want to install using a different method, you should confirm the safety recommendations by making a request to the manufacturer in advance. - Page 7 How to install Sunshade Connect the sunshade to the camera housing with screws using a wrench. How to install a rotation bracket on the system 1. Assemble the rotation bracket under the housing bracket using 3 or 4 screw bolts according to the angles. 2.
- Page 8 How to install wall brackets on the system 1. Assemble the wall bracket under the rotation bracket using 4 screw bolts. 2. Install the wall bracket on the wall using screw bolts. •When the camera is installed on a concrete floor, be sure to use an M12 anchor bolt.
-
Page 9: Main Setup Menu
5. MAIN SETUP MENU Camera menu subject to be changed without prior notice to upgrade and quality increase and we may use slip sheet for the change. Please check the camera version and the slip sheet if the camera menu and this manual menu is not matched. - Page 10 - D-ZOOM Decide using of digital zoom function. ZOOM MENU D-ZOOM : ON/ OFF ZOOM SPD : USER ▷ D-ZOOM : OFF Select : Set ON : Set OFF : NEAR NEAR BACK < NEAR / RIGHT ▷ D-ZOOM > 5.
- Page 11 - FOCUS MODE AUTO : The camera adjusts the focus automatically while FOCUS MENU monitoring the screen continuously in the auto mode. In the auto focusing mode, zoom key operation is not recognized as the input FOCUS SPD : USER ▷...
- Page 12 5. 1. 3 WHTE BALANCE White balance setting is a function revising color temperature to CAMERA MENU resolve the problem that screen’s colors change by the color ZOOM MODE ▷ temperature’s difference arrcording to time. FOCUS MODE ▷ ▷ WHITE BAL. ▷...
- Page 13 5. 1. 4 AUTO EXPOSURE AE setting is a function adjusting shutter speed acoording to CAMERA MENU subject’s brightness to get standard amount of exposed light. ZOOM MODE ▷ FOCUS MODE ▷ WHITE BAL. ▷ ▷ AUTO EXP. ▷ WDR MODE ▷...
- Page 14 - AGC LEVEL If you set AUTO or IRIS in the AE MODE, you can set the AUTO EXPO. MENU AGC level from 00 to 10 AE MODE : AUTO EXPOSURE : 10 ※ Set value depends upon the camera models. AGC LEVEL : ON ▷...
- Page 15 - DSS LEVEL Digital Slow Shutter : Control digital slow shutter speed. AUTO EXPO. MENU - 2x ~ 64x AE MODE : AUTO EXPOSURE : 10 ※ DSS LEVEL can be set when the AE MODE is set to AGC LEVEL : ON AUTO or IRIS.
- Page 16 5. 1. 5 WDR MODE Set WDR funtion. CAMERA MENU WDR(Wide Dynamic Range) ZOOM MODE ▷ FOCUS MODE ▷ WHITE BAL. ▷ AUTO EXP. ▷ ▷ WDR MODE ▷ SPECIAL ▷ STABILIZER ▷ CAMERA RESET ▷ SAVE BACK EXIT < NEAR / RIGHT ▷ WDR MODE > - WDR MODE Select ON/OFF in the WDR MODE function.
- Page 17 5. 1. 6 SPECIAL In the Special menu, it’s available to set special function CAMERA MENU of the camera. ZOOM MODE ▷ FOCUS MODE ▷ WHITE BAL. ▷ AUTO EXP. ▷ WDR MODE ▷ SPECIAL ▷ ▷ STABILIZER ▷ CAMERA RESET SAVE BACK EXIT...
- Page 18 - BLC MODE SPECIAL MENU BLC SETTING ▷ BLC MODE : OFF BLC SETTING < SIZE ▷ TELE/WIDE > < POSITION ▷ L/R/U/D MOVE > BACK < EXIT ▷ FOCUS NEAR > < NEAR / RIGHT ▷ BLC MODE > Select ON/OFF in the BACK LIGHT function.
- Page 19 - MIRROR MODE Set mirror or flip image mode. SP1 MENU ▷ MIRROR MODE : OFF Select : Set ON : Set OFF : NEAR NEAR FREEZE MODE : OFF IMAGE RANGE : FULL IMAGE LEVEL : XX BACK < NEAR / RIGHT ▷ MIRROR MODE > - FREEZE MODE This function stops video.
- Page 20 - SHARPNESS Select Sharpness. SP2 MENU ▷ SHARPNESS : 07 Select : Set ON : Set OFF : NEAR NEAR DNR LEVEL : LEV2 DEFOG : OFF FLICKERLESS : OFF GAMMA LEVEL : 01 BACK < NEAR / RIGHT ▷ SHARPNESS > - DNR LEVEL DNR, Digital Nois Reduction funtion.
- Page 21 - FLICKERLESS Occurs flicker correction function in the SP2 MENU Power frequency is different areas(50Hz/60Hz) SHARPNESS : 07 -Select ON, OFF or AUTO. DNR LEVEL : LEV2 -AE MODE AUTO / IRIS MODE can be in control DEFOG : OFF FLICKERLESS : OFF ▷...
- Page 22 5. 1. 7 STABILIZER Select Digital Image Stabilizer mode. CAMERA MENU ZOOM MODE ▷ FOCUS MODE ▷ WHITE BAL. ▷ AUTO EXP. ▷ WDR MODE ▷ ▷ SPECIAL ▷ STABILIZER ▷ CAMERA RESET ▷ SAVE BACK EXIT < NEAR / RIGHT ▷ STABILIZER > - STABILIZER MODE Set the Stabilizer mode.(ON/OFF) STABILIZER MODE...
- Page 23 - AUTO C Setting Auto Centering mode.(OFF, HALF, FULL) STABILIZER MODE MODE : ON Select : Set ON : Set OFF : NEAR NEAR RANGE : 10% FILTER : LOW AUTO C : OFF ▷ BACK < NEAR / RIGHT ▷ DIS AUTOCEN > 5.
-
Page 24: Inteligence Setting
5. 2 Inteligence Setting MAIN MENU CAMERA SET ▷ ▷ INTELIGENCE ▷ SPECIAL FUNC ▷ FACTORY SET SYSTEM RESET EXIT < NEAR / RIGHT ▷ INTELIGENCE > 5. 2. 1 Zoom Preset INTELIGENCE MENU ▷ ZOOM PRESET ▷ ZOOM TOUR ▷... - Page 25 (2) Set the Preset TITLE Move : Select : Delete : TELE WIDE JOYSTICK JOYSTICK It’s available to set the desired TITLE, displayed on the executing screen of Preset. PRESET MENU PRESET TITLE EDIT ( 01 ) TITLE : NUMBER : 001 TITLE FOCUS...
- Page 26 (5) EXIT TIME Setting the dwell time to exit Preset mode after PRESET MENU completing Preset working. (OFF ~ 30MIN) ※ Default : 10SEC NUMBER : 001 TITLE FOCUS : AUTO Select : Set ON : ZOOM POS. SET ▶ NEAR EXIT TIME : OFF...
- Page 27 5. 2. 2 Zoom Tour INTELIGENCE MENU ZOOM PRESET ▷ ▷ ZOOM TOUR ▷ PRIVACY MASK ▷ SYSTEM ALARM ▷ DATA CLEAR ▷ EXIT < NEAR / RIGHT ▷ TOUR > The Tour function consists of several presets run by turn. It is also adjusts the moving speed (1~63 step) and dwell time (1~99secs).
- Page 28 (3) Define the Preset position ① Move to the set-up window ② Move and set the position ③ Set & Back NEAR NEAR TOUR MENU TOUR EDIT (01) TOUR MENU PRESET SELECT : 001 P001 P002 P003 P004 P005 NUMBER : 01 TITLE : TOUR SET ▶...
- Page 29 5. 2. 3 Privacy Mask INTELIGENCE MENU ZOOM PRESET ▷ ZOOM TOUR ▷ PRIVACY MASK ▷ ▷ SYSTEM ALARM ▷ DATA CLEAR ▷ EXIT < NEAR / RIGHT ▷ PRIVACY > The Privacy Zone Masking function means that it sets the blocking territories to prevent camera functions for the privacy of personal reasons.
- Page 30 (3) “Save” above settings of Privacy Zone data to the memory. PRIVACY MENU (4) “CLR” means above setting of Privacy Zone data will not NUMBER : 01 be saved and be cleared. COLOR : XXXXXXX MASK SET ▷ (5) “BACK” means it goes back to the previous menu :Motion.
- Page 31 5. 2. 4 System Alarm INTELIGENCE MENU ZOOM PRESET ▷ ZOOM TOUR ▷ PRIVACY MASK ▷ SYSTEM ALARM ▷ ▷ DATA CLEAR ▷ EXIT < NEAR / RIGHT ▷ ALARM > The Alarm function means that the camera moves to the programmed Preset position by the Alarm trigger. Maximum 2 Alarm functions are toured in order.
- Page 32 (3) Define the Preset position with Alarm trigger ① Select the “Preset Num” ② Move and set the position ③ Set & Back NEAR NEAR ALARM MENU ALARM MENU PRESET SELECT : 001 P001 P003 P002 P004 P005 NUMBER : 01 TITLE PRESET NUM : NONE SAVE...
- Page 33 5. 2. 4 Data Clear Clears the PTZ position and function value. INTELIGENCE MENU CLEAR ZOOM PRESET ▷ PRESET <X> ALARM ZOOM TOUR ▷ TOUR MOTION ALL PRIVACY MASK ▷ PRIVACY SYSTEM ALARM ▷ DATA CLEAR ▷ ▷ EXIT < ON TELE BACK NEAR>...
-
Page 34: Special Setting
5. 3 Special Setting MAIN MENU SPECIAL FUNC. CAMERA SET ▷ ▷ TITLE : INTELIGENCE ▷ OSD SET ▷ SPECIAL FUNC ▷ WIPER SET ▷ ▷ FACTORY SET TEMP SET ▷ SYSTEM RESET PARK SET ▷ ETC. SET ▷ DATA RESET ▷... - Page 35 5. 3. 3 WIPER Set (1) WIPER MODE WIPER SET Select ON MODE / OFF MODE / TIME SET to use the wiper function. WIPER MODE : OFF MODE (Default : OFF MODE) WIPER INT. TIME : XXXX WIPER ON TIME : XXXX (2) WIPER INTERVAL TIME 10SEC ~ 4HOUR...
- Page 36 5. 3. 5 PARK MODE This function enables to locate the camera to specific PARK SET position automatically if operator doesn’t operate the controller for a while. ON/OFF : ON TIME : ----- - ON/OFF : ON/OFF MOTION : ------ - TIME : 10sec~1 HOUR NUMBER : ----- - MOTION : PRESET / TOUR...
-
Page 37: Factory Set
5. 4 Factory set Clear the DOME, CAMERA and MOTION setting value. MAIN MENU CAMERA SET ▷ INTELIGENCE ▷ SPECIAL FUNC ▷ FACTORY SET ▷ Restore setting values to the factory default. SYSTEM RESET All existing setting value will be erased. EXIT <... -
Page 38: Specification
6. SPECIFICATION 6. 1 Mechanism Specification 6. 1. 1 MECHANICAL - Weight : 5.2kg - Dimensions Set : 140(W) x 151.8(H) x 270(D) 6. 1. 2 ENVIRONMENTAL - Construction : Stainless steel (SUS316L) - Ingress Protection : IP68/IK10 - Operating Temp : -40°C to 60°C - Humidity : 0% to 90% (non-condensing) - Fan operate : 50°C on , 40°C off - Heater operate : 5°C on , 30°C off... -
Page 39: Camera Specification
6. 2 Camera Specification 6. 2. 1 30x Camera Image Sensor 1/3" Panasonic CMOS Sensor Total Pixels 1956 (H) x 1266 (V) = 2.48M Pixels Active pixels 1944 (H) x 1092 (V) = 2.12M Pixels Scanning system Progressive Scan Internal Sync. -
Page 40: Dimension
7. DIMENSION 3/4-14 87.6 3/4-14 87.6 16.5...
Need help?
Do you have a question about the SF-H308 and is the answer not in the manual?
Questions and answers