Advertisement
Product description
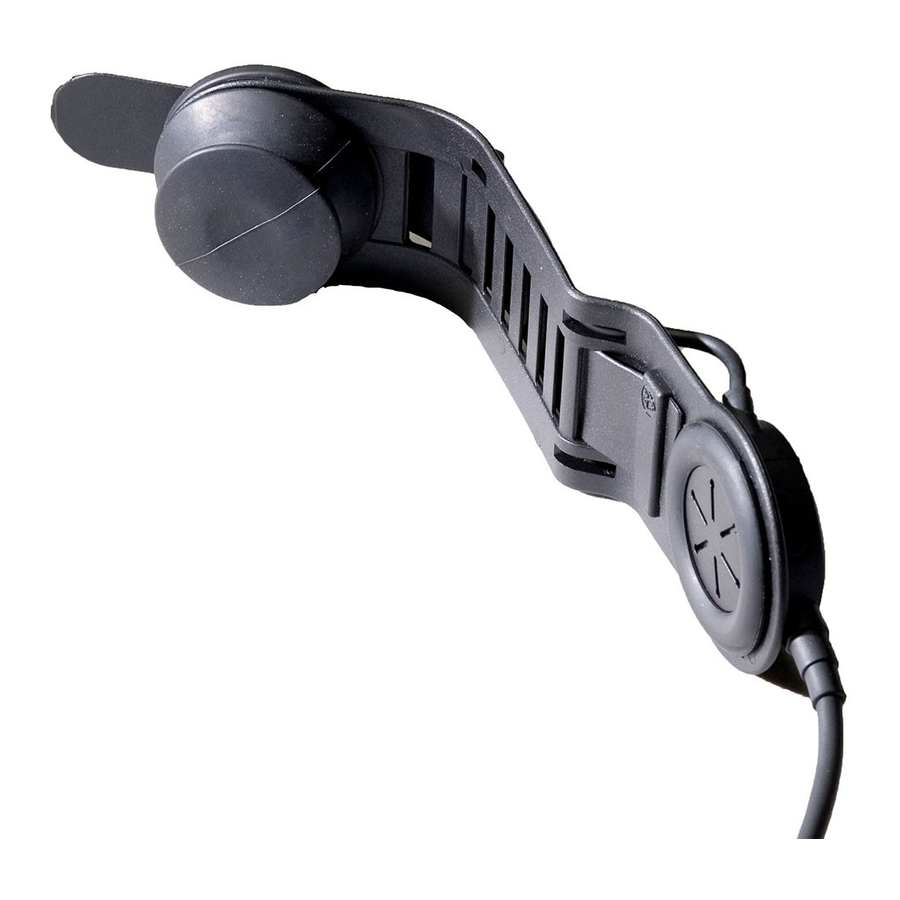
The SAVOX® HC-1(2) is a durable and light weight helmetcom unit for professionals working in extreme and hazardous conditions. The SAVOX® HC-1(2) provides instant, clear and reliable "hands-free" communication, increasing personal safety and work efficiency, allowing full concentration on the actual task.
Thanks to the unique arm/strap fastening system the SAVOX® HC-1 easily mounts in almost any type of helmet without any tools. The HC-2 is the dual speaker version that mount in helmets particulary prepared for communication.
The convenient bone conduction microphone is voice sensitive and makes a perfect combination with a breathing mask. The SAVOX® HC-1(2) is the ideal communication solution for fire and rescue, special task operations – simply whenever using a helmet. The SAVOX® HC-1(2) connects to most SAVOX® comcontrol/PTT units adapting to most types of two-way radios.
The unit consists of the following parts/functions

- Bone conduction microphone
- Speaker(s)
- Detachable arm (HC-1)
- Flexible strap (HC-1)
- Cable with quick release plug compatible with most SAVOX with most SAVOX com-control units
Helmet specific mounting kit (HC-2)- for MSA/Gallet helmet included
- for Dräger helmet available
Installation of the SAVOX HC-1 into the helmet
- Choose the side of the helmet on which you prefer to have the unit.
- Push the flexible strap (4) behind the headband of the helmet, or similar type of framework (fig.1). (Alternatively slide the flexible strap through a proper slot to the other side of the arm and then carefully slide the arm behind the headband (fig.2).)

- When positioned in the helmet, weave the flexible strap (4) through an appropriate slot in the arm (3). Finally, weave the flexible strap (4) to the backside of the arm (3).
- It is important that when the helmet is on your head, the slots you have used keep the unit steady and that the speaker is positioned on your ear.

Installation of the SAVOX HC-2 to the MSA/Gallet/Drägerhelmet: (using specific mounting kit)
Speakers
- Mount the speaker on the left side of the helmet using fixing clip marked L. Mount the Left side speaker so that the cable, going to the push-to-talk unit goes backwards and the cables for the microphone and the right side speaker goes forwards. Assure that the speaker sink into the spacing between the cushion and the mounting slit. In some helmets it might be necessary to press the cushion with the thumb aside a little (fig.3).
![]()
- Mount the speaker on the right side of the helmet using fixing clip marked R. Thread the Right side speaker between the harness and the inner liner of the helmet to the right side. Mount the right side speaker into the slit on the right side of the helmet. Turn the speaker in such way that the cable is going upward out of the speaker. Finally place the cable connecting the speakers to the rear of the helmet, lift the cushion and feed the cable underneeth the cushion (fig.4).
![]()


Microphone
- Clean the inside of the helmet under the net with grease solvent. Threadthe microphone (1) under the sweatband and the harness of the helmet.
- If a face mask with quick helmet fastenings is used, place the microphone in the center of the inside of the helmet. If a face mask with rubber strap fastenings is used, place the microphone 3-4cm of the center to the left side so that the center strap of the face mask does not get in between the microphone and the skull.
- Remove the paper from the Velcro disc. Lift up the harness of the helmet and place the microphone on the best suitable spot and press down to glue the Velcro (fig.5).
![]()

Strain-relief
Clean the inner surface of the helmet, underneath the left side cushion with grease solvent. Remove the paper of the anchor part of the strain relief. Place the anchor part approximately 1cm of the edge of the helmet behind the cushion and press down to glue. Place the cable leading to the Push-To-Talk unit in the sinking of the cushion. Fasten the cable with the bundle-tie to the anchor part of the strain-relief (fig.6).

NOTE!
- Make shure that the headband of the helmet is correctly adjusted and that the chin strap is correctly adjusted and allways in use. The speaker(s) and the microphone of the SAVOX® HC-1(2) are sensitive parts. Always handle with care.
- SAVOX Communications Ltd strongly recommends to (detach or) take the SAVOX® HC-1(2) off the helmet when two-way radio communications is not needed.
- SAVOX Communications Ltd is not responsible for any possible damages caused to any other equipment or clothing when using the SAVOX® HC-1(2).
Interconnection/Use
- Make sure that the battery of the radio is fully charged.
- Connect the radio interconnection cable of your SAVOX® com-control/PTT unit to the radio.
- Attach the SAVOX® com-control/PTT unit to a proper spot from where it can be easily operated.
- It is preferable to wear the equipment inside clothing where it is protected from the environment.
- Connect the quick release connector plug of the SAVOX® HC-1(2) to the jack of the SAVOX® com-control/PTT unit.
- Switch your radio ON.
- Adjust the volume of the radio to a suitable level
- Press the Push-To-Talk button to verify that the two-way communication is working
Cleaning
The unit can be cleaned with a wet sponge or brush and diluted dish washing detergent. Clean the connectors with some high-class Vaseline spray (SAVOX recommends PRF BAJOL, manufactured by Taerosol, (www.taerosol.com) or similar type of lubricant.

Do not apply solvent or similar caustic chemicals!


Documents / Resources
References
Download manual
Here you can download full pdf version of manual, it may contain additional safety instructions, warranty information, FCC rules, etc.
Advertisement

Need help?
Do you have a question about the HC-1 and is the answer not in the manual?
Questions and answers