Table of Contents
Advertisement
Advertisement
Table of Contents

Summary of Contents for Owandy Radiology RX-PRO
- Page 1 USER MANUAL User manual • Owandy-RX PRO • 01/2023 • NORPEN010B...
- Page 2 User manual • Owandy-RX PRO Language of the original document: ENGLISH Important: All new editions and revisions of the manuals supersede the previous ones Refer to complete manuals and For complete manuals Scan the QR code to access the instructions and instructions dedicated website www.owandy.com...
- Page 3 User manual • Owandy-RX PRO MANUFACTURER Owandy Radiology 2 rue des Vieilles Vignes 77183 Croissy-Beaubourg FRANCE Tel. + 33 1 64 11 18 18 info@owandy.com www.owandy.com Page 3 User manual • Owandy-RX PRO • 01/2023 • NORPEN010B...
- Page 4 Owandy Radiology THIS MANUAL MUST ALWAYS BE KEPT NEAR THE MEDICAL DEVICE FOR FUTURE REFERENCE. “Owandy Radiology” SHALL NOT BE HELD LIABLE FOR MISUSE OF THE INFORMATION PROVIDED BY THIS MANUAL. Page 4 User manual • Owandy-RX PRO • 01/2023 • NORPEN010B...
-
Page 5: Table Of Contents
User manual • Owandy-RX PRO CONTENTS INTRODUCTION ....................7 1.1 PRELIMINARY INFORMATIONS ..........................7 1.2. INFORMATION FOR THE OPERATOR ........................8 1.2.1. QUALITY DETERMINANTS IN X-RAY INTRAORAL RADIOGRAPHY ..............9 1.3. WARRANTY CONDITIONS .............................9 1.4. TRANSPORT CONDITIONS..........................10 1.5. SAFETY WARNINGS..............................10 X-RAY SYSTEM OVERVIEW ......................16 2.1. - Page 6 User manual • Owandy-RX PRO X-RAY CALIBRATION PROCEDURE ..................46 ERROR MESSAGES ........................47 SUGGESTED MAINTENANCE AND REPAIR ................50 10.1. NTENANCE AND CLEANING ..........................50 10.2. DISPOSAL ................................51 SSD - SOURCE TO SKIN DISTANCE AND FOCAL SPOT POSITION ..........52 ANNEX A : TECHNICAL DATA ....................53 A.1 TECHNICAL SPECIFICATIONS ..........................53 A.2 INTENDED ENVIRONMENT ..........................57 A.3 DIMENSIONS OF THE UNIT ..........................58...
-
Page 7: Introduction
User manual • Owandy-RX PRO 1. INTRODUCTION 1.1. PRELIMINARY INFORMATIONS Before starting with the use of the “Owandy-RX PRO” x-ray system, it is mandatory to carefully read and follow the instructions contained herein in order to obtain the best performance and assure the safety of the patient, operator, device and the environment. -
Page 8: Information For The Operator
Owandy-RX PRO x-ray system. This medical device has been designed and manufactured by Owandy Radiology and is the result of many years of experience in the radiology and medical imaging industry and of advanced electronic applications. This device is a further step forward in dental radiology. -
Page 9: Quality Determinants In X-Ray Intraoral Radiography
User manual • Owandy-RX PRO 1.2.1. QUALITY DETERMINANTS IN X-RAY INTRAORAL RADIOGRAPHY Image quality is linked to the precise and accurate acquisition of information from the x-ray beam transmitted through the patient (ito the x-ray detector). Most problems in dental radiography are not the result of x-ray equipment failure: the production of consistent and high quality x-ray diagnostic images, concurrent with minimal patient exposure, depends generally on different components: quality performance of equipment, characteristics of the modules used which affect the imaging system resolution (i.e.: x-ray image detector type and relevant image processing chain, analogue or digital) -
Page 10: Warranty Conditions
• Owandy Radiology is not responsible for any damages caused by any person or thing as a consequence of non com- pliance of any or all guidelines contained in all the manuals provided with the Owandy-RX PRO device. - Page 11 It is prohibited to modify any part of the Owandy-RX PRO medical device. • Owandy Radiology and its authorized technicians are not required to verify compliance of the installation site with local standards concerning electrical safety and X-ray protection and with any other directive concerning safety in force in the country of installation.
- Page 12 User manual • Owandy-RX PRO CAUTION PROTECTION AGAINST RADIATIONS • The «General principles for safeguarding and protecting the personnel and patients» must always be applied during the use of the X-ray unit. 1. Justification of the practice 2. Optimization of protection principle (ALARA principle) 3.
- Page 13 User manual • Owandy-RX PRO CAUTION MECHANICAL RISK • Pay extreme attention to the tension of the internal spring of the scissor arm in order to avoid the arm opening outward and causing injury. • Check that the installation of the unit complies with the mechanical specifications of the support (walls, ceiling, etc..) where it is installed •...
- Page 14 User manual • Owandy-RX PRO CAUTION ELECTRICAL SAFETY • The x-ray system contains high voltage. It’s prohibited to inspect internal parts of the system. • Never attempt to open the x-ray tube head. • The covers on the Owandy-RX PRO equipment must only be removed by qualified and authorized service personnel. •...
- Page 15 CAUTION SYSTEM MODIFICATIONS OR UPGRADES • Modifications or upgrades of the system can be carried out only if advised by Owandy Radiology and performed by authorized and qualified personnel, using ONLY genuine original spare parts of Owandy Radiology • Owandy Radiology proscribes improper, unauthorized modifications or upgrades of the device, in order to avoid malfunctioning resulting in breakdowns and/or accident for patient, operator and equipment.
-
Page 16: X-Ray System Overview
User manual • Owandy-RX PRO 2. X-RAY SYSTEM OVERVIEW The “Owandy-RX PRO” is manufactured in compliance with the following American Standard: • American Radiation Performance Standard 21 CFR, Subchapter J Many protective measures have been adopted in the design and construction of the unit, such as: protection against the risk of electric injuries, ensured by a grounded protection conductor and in accordance with the 2nd and 3ed of the IEC 60601-1, together with the applicable worldwide international deviations. -
Page 17: System Components
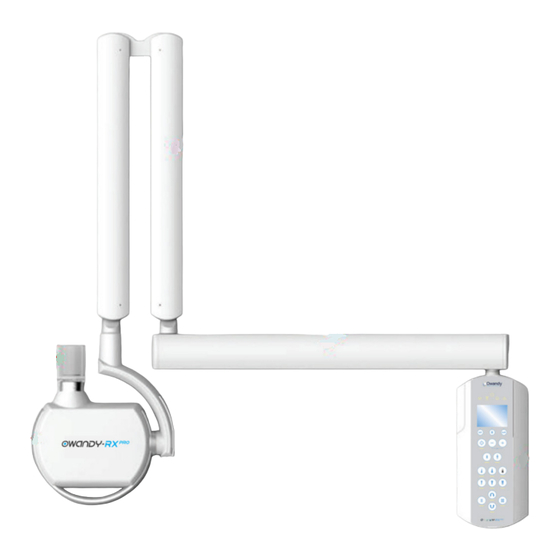
User manual • Owandy-RX PRO 2.1. SYSTEM COMPONENTS The Owandy-RX PRO x-ray system (Fig.1) consists of the following components: 1 - X-RAY CONTROL UNIT (TIMER) With it’s clear and highly visible display this component allows for easy and clear selection, of the exposure settings, the creation of personal settings while alerting you with a visual display and an audible alert in case of incorrect operation or eventual failures. -
Page 18: Owandy-Rx Pro Accessories
User manual • Owandy-RX PRO The tubehead is equipped with an angle scale indicator and is designed for easy handling and positioning of the tubehead during the x-ray examination. 5 - COLLIMATOR CONE (Beam Limiting Device) Made of transparent polycarbonate or PC-ABS, it allows for: - correct focal spot to skin distance - dimension, direction and centering of the x-ray beam - implementation of different x-ray techniques (bisecting and parallel technique) -
Page 19: Identification Tags
User manual • Owandy-RX PRO 2.3. IDENTIFICATION TAGS The identification tags on the tube head, timer and cone indicate the model number, serial number, the manufacturing date and the symbols of the main technical characteristics. 2.4. MEANING OF INFORMATION REPORTED ON THE LABEL Rated line voltage Rated line voltage Absorbed Power... -
Page 20: Symbols
User manual • Owandy-RX PRO 2.5. SYMBOLS En: Power ON (IEC 60417) En: Power OFF (IEC 60417) En: Protective earth (IEC 60417) En: Applied Part: Type B (IEC 60601-1) Attention, refer to the attached documents Ionizing radiation hazard Emitting X-ray equipment (IEC 60417) Comply with the implementation standards in your country. - Page 21 CAUTION - WARNING In the event the line fuse needs replacement you must observe all ratings and specifications declared by Owandy Radiology Call the technical support service for assistance as shown on pages 3 and 4 of this manual. Page 21...
-
Page 22: Control Panel Overview
User manual • Owandy-RX PRO 3. CONTROL PANEL OVERVIEW 1. STATUS LED 2. INFORMATION DISPLAY 3. LOADING FACTORS AND RADIOGRAPHIC TECHNIQUE BUTTONS 4. FUNCTIONAL AND EXPOSURE TIME BUTTONS 5. TYPE OF PATIENT 6. TYPE OF EXAM Page 22 User manual • Owandy-RX PRO • 01/2023 • NORPEN010B... -
Page 23: Status Led
User manual • Owandy-RX PRO 3.1. STATUS LED Stand by Armed (ready to take an x-ray exposure if the exposure button is pressed) X-ray emission Pause (cooling down time after x-ray exposure) Error / Malfunctioning 3.2. INFORMATION DISPLAY SSD (Source-skin distance) 20= 20cm SSD 30= 30cmSSD Type of cone installed (circular beam output or rectangu-... -
Page 24: Type Of Patient
User manual • Owandy-RX PRO X-ray detector type set key mA set key Memo key Increase or decrease exp. time / Pushed simultaneously shows DAP 3.4. TYPE OF PATIENT Child / Small patient key Adult / Normal patient key 3.5. TYPE OF EXAMS Maxilla –... -
Page 25: Operating Instructions
User manual • Owandy-RX PRO 4. OPERATING INSTRUCTIONS • Toggle the main switch (1) located on the left part of the timer to the “I” position (ON). • The display will light up. • The main supply switch is the isolation means that connect the device (ON), or isolate the device (OFF) from the Mains Supply. - Page 26 In this case it is possible to reset the error pushing the “memo” key or turning the timer off and then turn it back on again. If it is not possible to clear the error code call your local Owandy Radiology customer service as shown on pgs 3 & 4 of this manual.
-
Page 27: Configuration And Taking An X-Ray Exposure
User manual • Owandy-RX PRO 5. CONFIGURATION AND TAKING AN X-RAY EXPOSURE The “Owandy-RX PRO“ x-ray system is factory configured in “standard mode”. On the control panel, the led relevant to the following exposure parameters will light up: Ready for x-ray exposure (Armed mode) X-Ray Exposure Time selected Type of cone installed (rectangular or circular shaped x-ray beam output) SSD distance... - Page 28 User manual • Owandy-RX PRO PLEASE NOTE These values of the programmed exposure times MAY NOT be modified. Certain exposure values have been predefined which depend on the selection of the operating parameters: - cone (8”/12”) - type of patient (ADULT/CHILD) - x-ray technique - intra-oral exam type PLEASE NOTE...
-
Page 29: Check The Selected Type Of Cone
This selection can be enabled or disabled by means of a specific procedure that has to be performed by an authorized and trained technician only. Contact your authorized installer or the local Owandy Radiology Customer Service number on page 3 & 4 of this manual for further information. -
Page 30: Check The Selected Type Of Patient
User manual • Owandy-RX PRO 5.3. CHECK THE SELECTED X-RAY TUBE VOLTAGE The set x-ray voltage will be shown on the display To change the selected value press “kV” key until you have reached the desired value It is possible select x-ray voltage among these values: 60kV/65kV/70kV 5.4. -
Page 31: Check The Selected X-Ray Detector Support (Film/Digital/Psp)
User manual • Owandy-RX PRO 5.6. CHECK THE SELECTED X-RAY DETECTOR SUPPORT (FILM/DIGITAL/PSP) The letter of the desired speed film or sensor will be shown on the display - letter D indicates that the x-ray system is set for use with D speed film - letter E indicates that the x-ray system is set for use with E speed film - letter F indicates that the x-ray system is set for use with F speed film - Digit indicates that the x-ray system is set for use with external digital x-ray sensors... -
Page 32: Bitewing Exam
User manual • Owandy-RX PRO 5.7.3. BITEWING EXAM The led of the selected type of exam should be illuminated led ANT ON indicates that the x-ray system is set for anterior bite-wing exam. led POST ON indicates that the x-ray system is set for posterior bite wing exam. 5.8. -
Page 33: Positioning The Patient
User manual • Owandy-RX PRO 5.10. POSITIONING THE PATIENT Comfortably seat the patient and follow the standard intra-oral procedures for correct patient positioning. 5.11. POSITIONING FILM OR SENSOR Positioning either the film or the digital sensor depending on the technique and exam type to be used. WARNING According to the x-ray examination to perform and the relevant technique, it is strongly recommended to use a shielded, open-ended posi- tion-indicating device (PID, x-ray detector support holder) in order to maintain precise positioning during the examination and also to help... -
Page 34: Paralleling Technique
User manual • Owandy-RX PRO Sensor or film positioned 5.11.1. PARALLELING TECHNIQUE The paralleling technique results in good quality x-rays with a minimum of distortion and is the most reliable technique for taking periapical x-rays. The film is placed parallel to the long axis of the tooth in question and the central x-ray beam should be directed perpendicular to the long axis of the tooth. 5.11.2. -
Page 35: Positioning The X-Ray Generator And Collimator (Beam Limiting Device)
User manual • Owandy-RX PRO CAUTION - WARNING NEVER operate the system with sensor cover or any other enclosure disassembled or assembled improperly. This can endanger the safety of the patient and / or operator 5.12. POSITIONING THE X-RAY GENERATOR AND COLLIMATOR (BEAM LIMITING DEVICE) CAUTION - WARNING... -
Page 36: Suggested Inclination Angles
User manual • Owandy-RX PRO 5.12.1. SUGGESTED INCLINATION ANGLES MAXILLA Molar 35° Premolar and canine 45° Incisor 55° Bite-wing exam 10° -------------------------------------------------- --------- Bite-wing exam 0° Incisor -20° Premolar and canine -10° Molar -5° MANDIBLE 5.13. MAKE THE EXPOSURE PLEASE NOTE To obtain the best radiological diagnostic results, pay extreme attention in all the steps of the process: positioning the patient, the x-ray generator and collimator, exposing the x-ray detector (film/digital sensor/plates);... - Page 37 User manual • Owandy-RX PRO 1. Remove the exposure switch from the timer and move away from the tube head maintaining a safety distance of at least 2 meters (6 ft) to be able to constantly check the x-ray exposure. 2.
- Page 38 To re-activate the control unit into armed mode just press any key on the keypad. CAUTION It is extremely important not to use a remote exposure switch other than the original part provided by Owandy Radiology for operating the Owandy-RX PRO.
-
Page 39: Transport And Positioning Of The Mobile Stand
User manual • Owandy-RX PRO 5.14. TRANSPORT AND POSITIONING OF THE MOBILE STAND Owandy-RX PRO has also mobile version and it is sustained by the stand as shown in the following figure: Generally, Owandy-RX PRO mobile version can be in the two following positions: Transport position Operative position The following steps should be taken in order to transport the mobile version of the device:... - Page 40 User manual • Owandy-RX PRO Transport the device to a desired position using the handle Activate brakes of all four wheels PROHIBITION Pushing prohibited: pushing or leaning the device using other parts respect to the handle, or with the brakes activated, or with the scissor arm opened, could overbalance the equipment.
-
Page 41: Charts Of Default Exposure Values
User manual • Owandy-RX PRO 6. CHARTS OF DEFAULT EXPOSURE VAL- The charts below indicate the predefined exposure values stored in the “Owandy-RX PRO” x-ray system. PLEASE NOTE The following exposure values are only indicative and the manufacturer cannot warranty the universal applicability of them for any kind of circumstances or type of x-ray sensor used, since variations and inaccuracies may arise from sensor to sensor and may require adjustments to accommodate local configurations (software, film processing, digital processing, CCD or CMOS types, etc.) Therefore you must establish for each support used and for each type of patient the correct technique factors (kV, mA, s) settings needed. -
Page 42: Short Cone: 8 Inches - 20 Cm Sdd
User manual • Owandy-RX PRO 6.1. SHORT CONE: 8 INCHES – 20 CM SDD 8 inches – 20 cm SSD FILM D FILM E FILM F 70 kV – 6 mA Child Adult Child Adult Child Adult Incisor 0,125 s 0,2 s 0,08 s 0,125 s... -
Page 43: Long Cone: 12 Inches - 30 Cm Sdd
User manual • Owandy-RX PRO 6.2. LONG CONE: 12 INCHES – 30 CM SDD 12 inches – 30 cm SSD FILM D FILM E FILM F 70 kV – 6 mA Child Adult Child Adult Child Adult Incisor 0,25 s 0,4 s 0,16 s 0,25 s... -
Page 44: Customize Default Exposure Values
User manual • Owandy-RX PRO 7. CUSTOMIZE DEFAULT EXPOSURE VALUES PLEASE NOTE The value and steps of the 21 programmed exposure times of the Owandy-RX PRO (refer to chapter 3 ) cannot be modified in the Owandy-RX PRO x-ray system, since their values are in conformity according to the regulation in force concerning x-ray intra-oral equipment. however the operator does have the abilityto customize the default exposure values. -
Page 45: Restoring Factory Values
User manual • Owandy-RX PRO 7.1. RESTORING FACTORY VALUES 1. Press and hold the key for 5 seconds untill the “SET” message is shown on the display. 2. After a few seconds the name of the first parameter is shown in the bottom of the display 3. -
Page 46: X-Ray Calibration Procedure
User manual • Owandy-RX PRO 8. X-RAY CALIBRATION PROCEDURE CAUTION Perform this operation only if necessary or suggested by the Technical Support Service During this operation x-rays will be emitted! It is mandatory to adopt all the safety measures relevant to radioprotection. 1. -
Page 47: Error Messages
User manual • Owandy-RX PRO 9. ERROR MESSAGES In the case of malfunction or an event error, the display will indicate an error code together with acoustic signals (5 beeps). Furthermore an error symbol is shown on the display, warning the operator about the error status. All functions are inhibited until the error status is fixed or restored. - Page 48 User manual • Owandy-RX PRO E113 wrong use of keyboard Keys pressed during an exposure Exposure button released beforehand after an E114 button release timeout exposure Exposure parameters (kV, mA, exposure time, E115 wrong parameters in generator mode) does not match with the ones set in the control box E116 generator reset during emission...
- Page 49 E232 system error hardware error For the errors that can’t be cleared by the reset button on the keypad, please contact your installer or your local Owandy Radiology customer service Page 49 User manual • Owandy-RX PRO • 01/2023 • NORPEN010B...
-
Page 50: Suggested Maintenance And Repair
Do not use UV systems to disinfect the equipment, as exposed parts of the device can turn yellow or discolour. • To avoid any potential hazard or danger to operators and patients, contact your authorized Owandy Radiology Technical Representative immediately if you experience any unusual operation, mechanical issues, or equipment malfunction CAUTION •... -
Page 51: Disposal
User manual • Owandy-RX PRO CAUTION - WARNING It is strictly prohibited to attempt repairs to any electronic or mechanical parts by yourself. Failure to observe this warning can irreversibly compromise the overall safety of the system and can be dangerous for operators, patients and the environment. -
Page 52: Ssd - Source To Skin Distance And Focal Spot Position
User manual • Owandy-RX PRO SSD - SOURCE TO SKIN DISTANCE AND FOCAL SPOT POSITION The position of the focal spot, together with the target angle and the reference axes are shown in the figure below: LONG CONE (cylindrical and rectangular) SHORT CONE (cylindrical and rectangular) The tolerances of the focal spot on the reference axes are ±... -
Page 53: Annex A: Technical Data
User manual • Owandy-RX PRO Annex A: Technical data A.1 TECHNICAL SPECIFICATIONS X-RAY SOURCE ASSEMBLY >1,5 mmAl / 70 kV Total filtration 2,2 mmAl / 70 kV Inherent Filtration 1,2 mmAl équivalent / 70 kV Leakage radiation <0,25 mGy/h@1000 mm (measured 70kV/6mA/2s) X-ray tube voltage accuracy ±10%... - Page 54 User manual • Owandy-RX PRO Focal Spot Size (IEC 336) 0,4 mm 0,4 mm Anode Angle 16° 12,5° Anode material Tungsten Tungsten Anode Heat Content 7000 J 4300 J Maximum Anode Heat Dissipation 110W 100W Maximum Rating Charts TOSHIBA D-041 CEI OX70-4C Heating/Cooling Curves TOSHIBA D-041...
- Page 55 User manual • Owandy-RX PRO PLEASE NOTE Firmware versions maybe periodically updated therefore the versions indicated in the chart above may be different from the versions instal- led on the unit. To know the firmware versions installed in your Owandy-RX PRO please follow the instructions in the following chapter “ADVANCED SET- TINGS”...
- Page 56 User manual • Owandy-RX PRO DEGREE OF PROTECTION PROVIDED BY ENCLOSURES According to the standard EN 60529, the degree of protection is: IP20 MECHANICAL DATA Dimensions Refer to the dedicated annex relevant to the dimensions 24kg / (52.9 lbs) (with horizontal bracket length 1100mm) / (43.3”) Total Weights 23kg / (50.7 lbs) (with horizontal bracket length 800mm) / (31.4”) 22kg / (48.5 lbs) (with horizontal bracket length 400mm) / (15.7”)
-
Page 57: Intended Environment
User manual • Owandy-RX PRO A.2 INTENDED ENVIRONMENT CAUTION - WARNING • Owandy-RX PRO is for INDOOR USE ONLY • If the Owandy-RX PRO has been stored at a temperature below + 10°C/ + (50° F) for more than a few hours, enough time must be allowed for the device to reach the room temperature before reconnecting it to the mains voltage and applying power . -
Page 58: Dimensions Of The Unit
User manual • Owandy-RX PRO A.3 DIMENSIONS OF THE UNIT FRONT VIEW (REST POSITION) - BOTTOM MOUNT 40cm (16”) bracket 79cm (31”) 80cm (31”) bracket 119cm (46”) 110cm (43”) bracket 149cm (59”) FRONT VIEW (REST POSITION) - TOP MOUNT 40cm (16”) bracket 79cm (31”) 80cm (31”) bracket 119cm (46”) - Page 59 User manual • Owandy-RX PRO C1 - LONG CONE 40cm (16”) bracket 140cm (55”) 80cm (31”) bracket 180cm (71”) 110cm (43”) bracket 210cm (83”) C2 - SHORT CONE 40cm (16”) bracket 150cm (59”) 80cm (31”) bracket 190cm (75”) 110cm (43”) bracket 220cm (87”) C3 - FULL SIZE 40cm (16”) bracket...
- Page 60 User manual • Owandy-RX PRO SIDE VIEW (CLOSED) - TOP MOUNT 40cm (16”) bracket 60cm (24”) 80cm (31”) bracket 100cm (39”) 110cm (43”) bracket 130 (51”) SIDE VIEW (OPEN) - BOTTOM MOUNT E1 - LONG CONE Page 60 User manual • Owandy-RX PRO • 01/2023 • NORPEN010B...
- Page 61 User manual • Owandy-RX PRO 40cm (16”) bracket 140cm (55”) 80cm (31”) bracket 180cm (71”) 110cm (43”) bracket 210cm (83”) E2 - SHORT CONE 40cm (16”) bracket 150cm (59”) 80cm (31”) bracket 190cm (75”) 110cm (43”) bracket 220cm (87”) E3 - FULL SIZE 40cm (16”) bracket 188cm (74”) 80cm (31”) bracket...
- Page 62 User manual • Owandy-RX PRO FRONT VIEW (REST POSITION) - MOBILE no bracket 141cm (55”) Page 62 User manual • Owandy-RX PRO • 01/2023 • NORPEN010B...
-
Page 63: List Of International Standards And Directives
User manual • Owandy-RX PRO A.4 LIST OF INTERNATIONAL STANDARDS AND DIRECTIVES The system is classified as: 21CFR SOR 98/282 TG(MD) Regulations 2002 Directive 872.1800 rule 8 Schedule 2 part 4.3 Class IEC/EN 60601-1:2005 + A1:2012 (3.1 edition) IEC/EN 60601-1-3:2008 + A1:2013 (2.1 edition) IEC/EN 60601-1-6:2010 + A1:2013 (1.1 edition) IEC 62366: 2007 IEC 60601-2-65:2012 A1:2017 (1.1 edition) -
Page 64: Dosimetric Indications
User manual • Owandy-RX PRO A.5 DOSIMETRIC INDICATIONS The radiation exposure is reported in terms of Dose Area Product (DAP), which takes into account the entire area of the x-ray beam and the total amount of x-ray radiation incident on the patient. The DAP is obtained by multiplying the Air Kerma by the corresponding x-ray beam area, which is dependent by the typology of beam limiting device installed. - Page 65 User manual • Owandy-RX PRO BLD SHAPE Circular SSD [mm] Time [s]/DAP [mGy cm²] 0,02 0,025 0,032 0,04 0,05 0,063 0,08 11,4 11,3 0,125 12,3 10,6 14,3 12,2 10,2 14,0 11,7 0,16 15,8 13,5 11,3 18,3 15,6 13,1 10,5 17,9 15,0 12,0 19,7...
- Page 66 User manual • Owandy-RX PRO 0,16 19,0 16,2 13,6 10,8 22,1 19,0 15,8 12,7 21,6 18,1 14,4 23,7 20,4 16,9 13,6 27,6 23,7 19,7 15,8 27,0 22,5 18,1 0,25 29,7 25,4 21,2 16,9 34,5 29,6 24,6 19,7 33,8 28,2 22,5 0,32 38,0 32,5...
-
Page 67: Emc Compatibility
User manual • Owandy-RX PRO A.6 EMC COMPATIBILITY Electromagnetic compatibility (EMC) is assessed with reference to the following standards: IEC/EN 60601-1-2: 2014 (4 edition) EMISSION • EN 55011:2008+A2 • EN 61000-3-2:2006 +A1 +A2 • EN 61000-3-3:2008 IMMUNITY • EN 61000-4-2:2009 •... - Page 68 User manual • Owandy-RX PRO Electrostatic discharge +/- 8 kV contact IEC 60601-1-2 Floors should be wood, concrete (ESD) +/- 15 kV air Test level or ceramic tile. If floors are IEC 61000-4-2 covered with synthetic material, the relative humidity must be at least 30% Electrical fast transient/burst +/- 2 kV for power supply lines +/-...
- Page 69 User manual • Owandy-RX PRO where P is the maximum output power rating of the transmitter in watts (W) according to the transmitter manufacturer and “d” is the recommended separation distance in metres (m). Field strength from fixed RF transmitters as determined by an electromagnetic site surveya must be below the compliance level corresponding to each frequency range.b Interference can occur in the proximity of equipment marked with...
- Page 70 User manual • Owandy-RX PRO Recommended separation distances between portable and mobile RF communication equipment and Owandy-RX PRO medical device These devices are intended to be used in environments where radiated RF interference is controlled. The customer or Owandy-RX PRO operator can help prevent electromagnetic interference by maintaining a minimum distance between portable and mobile RF communication equipment (transmitters) and Owandy-RX PRO, as indicated below, according to the maximum output power of the communication equipment.
- Page 71 DIGITAL WORKFLOW OWANDY RADIOLOGY A COMPREHENSIVE RANGE TO MEET ALL YOUR REQUIREMENTS CEPHALOMETRIC UNITS 2D/3D UNITS HF INTRA-ORAL GENERATOR FACE SCAN .PLY IMPORT INTRAORAL PLATE SCANNER DENTAL IMPRESSIONS .STL IMPORT DIRECT USB SURGICAL DIGITAL USB EXPORT TO SENSORS GUIDE INTRAORAL CAMERA...
Need help?
Do you have a question about the RX-PRO and is the answer not in the manual?
Questions and answers