Advertisement
- 1 The Product
- 2 Important Information
- 3 Technical Characteristics
- 4 Installation - Wall mounting
- 5 Electrical Installation
- 6 Hydraulic Installation
- 7 Procedure after the hydraulic system
- 8 Cleaning and Conservation
- 9 Replacement Refill
- 10 Technical information
- 11 Troubleshooting
- 12 Documents / Resources
The Product
Learn more about FR600 Speciale and FRQ600 Purifier


- Practical Tap
- Removable drip tray
- Air Vent
- Turned, Changed Refill
- Tap with security lock (FRQ600)
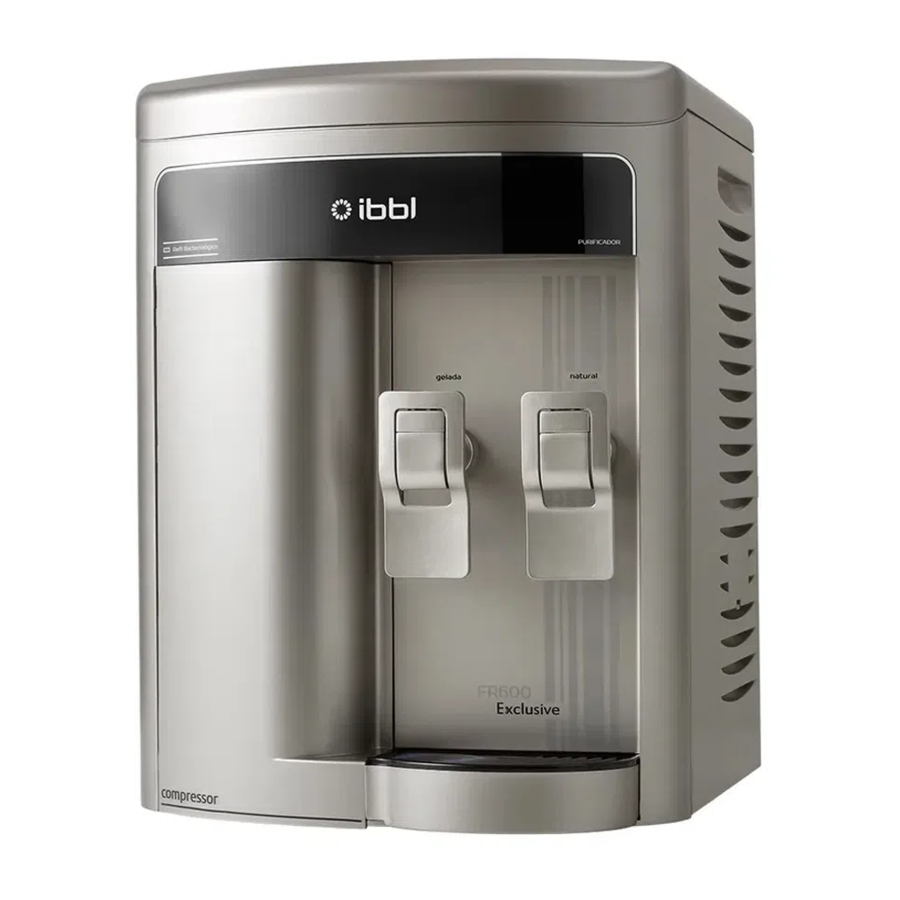
Learn more about FR600 Exclusive Purifier

- Exclusive Tap
- Removable drip tray
- Air Vent
- LED indicating Exchange of Refill
- Reset button: Restarts the life count refill
Important Information

This product is designed to purify, cool and heat water. Do not use it for any other type of drink, as this may cause damage to the unit, resulting in loss of warranty. Apparatus for point of use (POU). This purifier is designed for domestic use and designed to be used with water or chlorinated public network as MS Ordinance No. 2914/2011.
The appliance must be installed in a horizontal plane.
- Warn for more care with models that have hot water, they serve water at high temperature and may cause burns.
- When removing water through the hot water tap, make use of the water trap (drip tray) to support the glass. This facilitates the use and ensures your safety.
- Never connect the boiler of your device that has hot water, without being water in the reservoir.
- The thermostat knob (cold water setting) is housed on the right side of the purifier (Fig. 2). For best performance and economy of your water purifier, the thermostat already out-set.
![warning]() Attention! The IBBL water purifier should be installed only where the water pressure of the water network does not exceed 490.33 kPa (50 m.c.a.*). Above this pressure, you must install a suitable pressure regulator that must be purchased separately.
Attention! The IBBL water purifier should be installed only where the water pressure of the water network does not exceed 490.33 kPa (50 m.c.a.*). Above this pressure, you must install a suitable pressure regulator that must be purchased separately. - The minimum operating pressure is 49,03 kPa ( 5m.c.a.*).
- Unplug the Purifier take whenever perform a maintenance.
- When leaving the Purifier unused for long periods, and off, keep it empty. Here's how:
For FRQ 600 model: - Close the mains water valve
- Turn off the boiler "0" button, which is on the back of the unit. (Fig. 10)
![]()
- Completely empty the water tank, drive the cold tap first fully draining the water from the reservoir, then remove the drain that is underneath the product (front right side) to completely drain the water boiler. Be careful when opening the lid of the drain because the water may be hot. After draining all the water refit the drain. (Fig. 11)

For FR600 Speciale and FR600 Exclusive models: - Open The natural and cold water faucet until you exhaust all the water of the product.
- It is normal the air outlet from the side of the unit. This is due to the type of refrigeration system used. Therefore, we recommend that you respected the guidance of appliance installation keeping a vent area of 100 mm on each side, as well as periodic cleaning the side rails with a cloth damp microfiber is performed by removing the dust that may accumulate.
- Flow Maximum recommended is 60 liters / hour.
- This device complies with the ABNT NBR 16098:2012 standard, particle retention Class C ≥ 5 to <15μm, with free chlorine reduction and no bacteriological effi ciency for FR600 Speciale and FRQ600 product and bacteriologically efficiency for FR600 Exclusive product. Reference volume for the retention test particles= 3.000 liters, having a durability to chlorine retention 3.000 liters of water. Unit internal volume of the water is 2,18 liters for FR600 Speciale and FR600 Exclusive product, and 2,93 liters for FRQ600 model.
 Attention! The IBBL water purifier should be installed only where the water pressure of the water network does not exceed 490.33 kPa (50 m.c.a.*). Above this pressure, you must install a suitable pressure regulator that must be purchased separately.

* m.c.a. (In meters water column) is the distance between the height of the water tank and the height of the product.
** Cooling Capacity performed at 32°C according to Standard ABNT NBR 16236: 2013
Technical Characteristics
IBBL products are distinguished from competition because of certain special characteristics:
- Safety and quality guaranteed by Brazilian standards.
- Compressor refrigeration: Gas R134a (eco).
- Nontoxic plastic injected water reservoir with outside coil, which facilitates cleaning and does not modify the properties of water.
- Water reservoir with nanotechnology application, acting as shield, that inhibits the proliferation of bacteria.
- Adjustable thermostat to control the temperature of cold water.
- Low power consumption: balanced cooling system.
- Float: float control water level.
- Replacement Refill: Practical system "Turned, Changed" Refill (Patent PI 0600399-0). Can be exchanged without the need of closing the water records and allow connection to the hydraulic system.
- Bacteriological efficiency (only for the FR600 Exclusive model).
- Led code: Tells you when it is necessary to change the bacteriological refill (only for the FR600 Exclusive model).
- Great taps flow, removable for cleaning via authorized service IBBL.
- IPX4 Rating: Product used indoor and outdoor areas.
Installation - Wall mounting
You can use your water Purifier on a countertop, kitchen sink or table, or set it on the wall. Use the template located on the side fl ap of this manual to guide the drilling to be made on the wall and drill a hole with no drill nº8. The screws (AACP 8X5/8") and nylon plug #8 with the appliance and are located within the drip tray (Fig.2).

- The wire greater support must be fixed on the wall through bushings and screws, as shown in Fig.3 (both are inside the product and are located within the drip tray).
![]()
![warning]() Attention: Fit the purifier in the condenser (blac grid located atthe rear of scrubber)
Attention: Fit the purifier in the condenser (blac grid located atthe rear of scrubber) - Insert the spacer (lower support wired) in metal base, behind the Purifier, as shown in (Fig.1).

- Attach the Purifier in biggest wired support (already fixed on the wall according to item "a"). This fixing should occur in the condenser (black grid located at the rear of scrubber). Prevent the fitting occurs on the machine's top plastic cover.


Electrical Installation

- Before connecting the water Purifier, check that the voltage is the same as the electric outlet. This product is sold in versions 127V and 220V separately.
- Unplug the water Purifier every time you cleaning or maintenance.
- Always check the voltage and connect the device to a dedicated electric outlet only. Never use extension or adapter to connect the product.
- If the power cable is damaged in order risks and the loss of the warranty, the manufacturer, dealer and/or another qualified person should replace it.
Refrigeration system
This Purifier uses cooling system compressor. The chilled water temperature can range from 5°C to 10°C depending on the ambient temperature. The volume of the cold water tank is approximately 1.25 liters. If this volume is depleted, you must wait for the tank and refill the cooling system operate to provide chilled water again.
Note: This device is not intended for use by persons (including children) with reduced physical, sensory or mental capabilities, or lack of experience and knowledge, unless given supervision or instruction concerning use of the appliance by a person responsible for their safety. It is recommended that children be supervised to ensure that they are not playing with the device.
As NBR NM IEC 60355-1. After wiring wait 01:25:00 minutes to drink cold water at the perfect temperature.
Hydraulic Installation
For hydraulic installation of water Purifier IBBL, make sure to follow the instructions below:
- The device must be installed in the horizontal plane.
- When installing the product, the minimum distance of installation should be 100 mm on the sides and 50 mm in depth (Fig. 2).
- The device must not to be installed in areas that are close to gush of water.
- Look for a water point with ½ "to eff ect the hydraulic connection.

Over 490,33 kPa (50 m.c.a.*) using a pressure regulator is required. This control is not included with the product and must be purchased separately through a local dealer IBBL.
- The minimum operating pressure is 49,03 kPa ( 5 m.c.a.*).
- Close the record of this water of the hydraulic net point.
- Take the connection (nipple), pass tape type "VEDA THREAD" the thread and snap at the exit point of water.
- Connect one end of the hose connection on the "nipple".
- Remove the protective label from the hydraylic system (Fig. 4).

- Connect the oterh end of the hose in the back of the unit (Fig. 5).

- Attach the hose to the maximum within the connection (about 2 cm). Heads Up! The locking of the hose does not mean that the sealing was performed. When fitting you should overcome the sealing rings inside the connection.
- To release, simply press the latch on the end of the connector and pull the hose (Fig. 6).

- After attaching the hose on the back of the water Purifier, open the registry of the hydraulic net to release the flow of water and make sure that there is no leakage in the connections. *m.c.a. (In meters water column) is the distance between the height of the water tank and the height of the product.


Procedure after the hydraulic system
After installing the product in hydraulics, operate the natural water faucet leaking about 5 liters for removal of coal waste, for model FRQ600 after operate the natural water faucet, operate the hot water faucet until the water comes out. After making sure that the boiler water is coming out, turn the unit into the outlet and the boiler button (Figure 10) in "position 1". Do not move the product with the reservoir full of water.
To turn the hot water tap must hold together the two levers and press down.
Do not connect the appliance into the outlet before finalizing the hydraulic system.
Cleaning and Conservation
The external cleaning of the purifier should be performed only using mild detergent and a damp microfiber cloth.
The product should not be cleaned with water jets, abrasive products, alcohol or solvents, or products that leave taste in water or damage plastic parts.
Internal cleaning should be performed whenever you replace the refill your water purifier, or every 6 months. This service should be performed by your dealer and is not covered by the product wa ranty.
Heads Up! Examine the water connections often. Under normal use, the hydraulic connectors and hoses, nipples and/or taps should be replaced once a year.
Replacement Refill
The life of "Turned, Changed" refilll is 3,000 liters or up to 6 months. This lifetime refill can vary according to consumption and quality of water.
Changing the refill in Purifier FRQ600 and FR600 Speciale
- Turn "Turned, Changed" Refill to the left to disengage it from the product (Fig. 7).

- Replace with new "Turned, Changed" Refill in the product, snap it up and turn right to connect the product (Fig. 9).


Changing the refill in Purifier FR600 Exclusive
When the Refill is won will light a red light on the dashboard indicating that the replacement will be necessary.
- Turn "Turned, Changed" Refill to the left to disengage it from the product (Fig. 7).
- After removing the refill used, trigger for 5 seconds the reset button located behind the refill in painel. This operation should be done at each change of refill (Fig. 8). Obs.: When pressing the RESET button LED (light panel) should return to the blue color, starting again in time or litragem count.

- Replace with new "Turned, Changed" Refill in the product, snap it up and turn right to connect the product (Fig. 9).
![]()
If there is need of change of refi ll due to external problems, example excessive dirt in the water due to problems in the piping or water tank, as well as water outside the standard established by Ordinance 2914/2011, request for hygienization from a technical assistance, and follow the same foregoing procedure for change of refill.

Technical information

* Can be used indoors and outdoors.
Troubleshooting


Documents / ResourcesDownload manual
Here you can download full pdf version of manual, it may contain additional safety instructions, warranty information, FCC rules, etc.
Advertisement

Need help?
Do you have a question about the FR600 and is the answer not in the manual?
Questions and answers