Table of Contents
Advertisement
Quick Links
Advertisement
Table of Contents

Related Manuals for NTT docomo SH-52A

Summary of Contents for NTT docomo SH-52A
- Page 1 SH-52A INSTRUCTION MANUAL...
- Page 2 This manual describes detailed guidance and operations of functions. You can download it from the DOCOMO website. z Note that “SH-52A” is referred to as “device” in this manual. z This manual contains the information available at the time of purchase.
-
Page 3: Table Of Contents
Appendix/Index Contents Using the device ..........2 Menu lists ............... 64 Key features of the SH-52A ........ 3 Troubleshooting (FAQ) ..........69 Precautions (ALWAYS FOLLOW THESE Warranty and After-Sales Service ......71 DIRECTIONS) ............ 5 Software update ............72 Handling precautions .........11 Main specifications .......... -
Page 4: Using The Device
Using the device z The device supports 5G, LTE, W-CDMA, and wireless LAN systems. z Because the device relies on radio signals, it cannot be used in a place with no signal (such as tunnels, underground or in buildings), in places with a weak signal or outside the 5G service area, LTE service area or FOMA service area. You may not use the device in the upper floors of a building even with no obstructions in sight. -
Page 5: Key Features Of The Sh-52A
Key features of the SH-52A This device supports the fifth generation mobile communications system (5G) (both “Sub6 (frequency bands with less than 6 GHz)” and “Millimetric waves (higher frequency bands such as a 28 GHz band)”). Also, LTE ® communication of this device supports PREMIUM 4G (LTE-Advanced) audio. - Page 6 Support for QR codes & WPS connections „ You can easily connect your smartphone or other device to the device over Wi-Fi by displaying a QR code on the device and reading it with your smartphone's camera. WPS connections are also supported to allow you to connect your smartphone to the device using the WPS key. You can quickly connect and use your first Wi-Fi device with ease.
-
Page 7: Precautions (Always Follow These Directions)
Precautions (ALWAYS FOLLOW THESE DIRECTIONS) „ Before use, read these “Precautions” carefully and use your device properly. „ These precautions contain information intended to prevent bodily injury to the user and to surrounding people, as well as damage to property, and must be observed at all times. „... - Page 8 Handling the device, adapters, USB Do not attempt to remove the back cover from the device. cable and docomo nano UIM card May cause fires, burns, bodily injury, electric (general) shock, etc. Do not attempt to disassemble or modify Danger the equipment.
- Page 9 Handling the device If you notice any trouble such as an unusual odor, unusual noise, smoking, Danger overheating, discoloration, or deformation during use, charging, or storage, be careful and follow the instructions below. Do not throw the device into a fire or heat z Unplug the power plug from the outlet or accessory socket.
- Page 10 Turn off the device near high-precision When removing the docomo nano UIM electronic devices or devices that use card, be careful with the tip of the SIM weak electronic signals. eject tool or paper clip not to injure any part of your body such as fingers. May interfere with the operation of electronic devices because of signals.
- Page 11 Do not connect a voltage converter (travel If the charger terminal is deformed such converter for overseas, etc.) to the AC as bending it, immediately stop using. adapter. Also, do not use the deformed one by returning it to the original shape. May catch fire, or cause overheat, electric shock, etc.
- Page 12 USB cable Patients receiving medical treatment away from a medical facility (e.g. home Part Material/Surface treatment treatment) who are using electronic USB Type-C plug Corson copper/Gold plating medical equipment other than implanted (Connector) cardiac pacemakers or implanted USB Type-C plug LCP resin cardioverter-defibrillators should consult (Resin section)
-
Page 13: Handling Precautions
Keeping an external connector device plugged into the external connection jack may cause a malfunction or damage. z Use only optional parts specified by NTT DOCOMO. May cause a malfunction or damage when equipment other than those specified by NTT DOCOMO are used. z Read the respective user's manuals supplied with supported optional parts carefully. - Page 14 Notes about adapters z Charge the battery in areas where the ambient temperature is between 5° C and 35° C. z Do not charge the internal battery in the following locations. y Areas with high humidity or dust, or in areas exposed to frequent vibrations y Close to household electronic equipment (TVs, radios, etc.) z Adapters may become warm during charging but this is not a malfunction.
- Page 15 z Cautions on using 2.4 GHz devices WLAN-installed devices operate at radio frequencies assigned to the in-house radio stations for a mobile object identifier (radio stations requiring a license) used in production lines of a factory, specific low power radio stations (radio stations requiring no license), and amateur radio stations (radio stations requiring a license) in addition to industrial, scientific and medical devices or home electric appliances such as microwave ovens.
-
Page 16: Before Using The Device
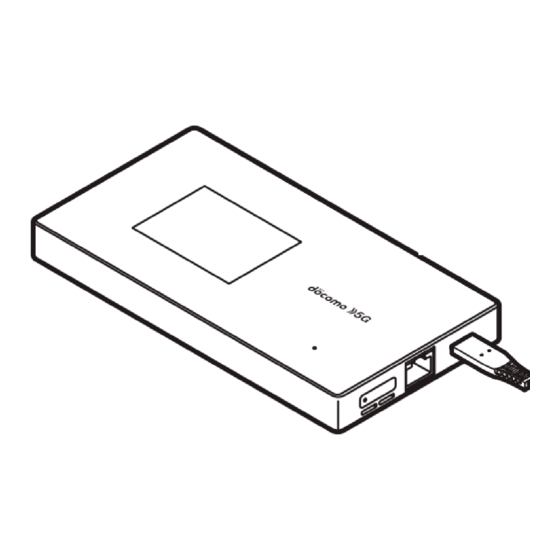
Before using the device Part names and functions Device „ Left side Right side Front 1 Heat exhaust vent z Do not cover the vent while using the device. 2 RESET button z The device settings can be restored to the factory default settings. z The device settings can also be restored to the factory default settings using operations from the setting tool ☞... -
Page 17: Docomo Nano Uim Card
The back cover cannot be removed. Removing it forcibly may cause damage or a malfunction. The battery is built into the device and you cannot replace it by yourself. RESET button Use the SIM eject tool (sample) when pressing the RESET button. When restoring the device settings to the factory default settings, insert the tip of the SIM eject tool into the RESET button hole when the power to the device is on▶press the RESET button for at least 2 seconds▶[OK]. - Page 18 Inserting docomo nano UIM card „ Insert the tip of SIM eject tool into the docomo nano UIM card tray hole z Insert it horizontally until the card tray comes out. If you do not insert it horizontally, may cause damage or malfunction.
- Page 19 If the SIM eject tool is lost, a paper clip can be used as a substitute for it. Example of a paper clip Removing docomo nano UIM card „ z For details on how to insert and remove the docomo nano UIM card tray, see “Inserting docomo nano UIM card” ☞...
-
Page 20: Charging
Charging The internal battery is not fully charged at the time of purchase. Be sure to charge the battery before use. z The latest charger compatible with the device can be checked on docomo online shop. ttps://onlineshop.smt.docomo.ne.jp/options/search.html) (in Japanese only) Cautions while charging „... - Page 21 Charging with AC adapter When charging the battery with AC Adapter 07 (sold separately), operate the following steps. Insert the Type-C plug of the AC adapter horizontally into the USB Type-C connection jack on the device Erect the AC adapter power plug and insert it into an outlet z The charging lamp illuminates and charging starts.
-
Page 22: Turning Power On/Off
Turning power on/off Turning power on „ ○ (power key) (for at least 2 seconds) ☞ z When you turn on the device for the first time, make the initial settings ( P. 20 “Initial settings”). Turning power off/rebooting „ ○... -
Page 23: Screen Layout
Screen layout Home screen „ 1 Status icon displaying area : Signal status level (five steps) y The [ ] is displayed in white during data receiving and [ ] is displayed in white during data sending. y When 5G/4G (LTE)/3G can be used, [5G]/[4G+]/[3G] is displayed on the right side of the signal mark. When there is no service, [OUT] is displayed on the right side of the signal mark. -
Page 24: Using The Touch Panel
Using the touch panel The operations to use the display (touch panel) are described below. z Operations may differ depending on the function and screen in use. Cautions when using the touch panel z The touch panel is designed to be lightly touched with your finger. Do not forcefully press with your finger or a pointed object (fingernail, ballpoint pen, pin, etc.). -
Page 25: Setup
Setup About setup There are three methods to connect devices that will communicate with this device: a method that uses a Wi-Fi connection, a method that uses the USB cable (sample), and a method that uses the LAN cable (commercially available). - Page 26 Checking supported devices This section describes devices that are supported by this device. For the latest information on supported devices, refer to the DOCOMO website. Ensure that your computer has the latest updates installed. Operation through a USB hub (including the USB ports on monitors and keyboards) is not guaranteed. The USB connection may not work depending on your environment and devices.
-
Page 27: Connecting And Communicating Over Wi-Fi
Connecting and communicating over Wi-Fi This device can simultaneously connect to and perform data communications with multiple Wi-Fi devices, such as PCs and game consoles, using Wi-Fi. z Depending on the usage environment and connected Wi-Fi devices, it may take time until these are connected, and data communication is enabled. - Page 28 Connecting to the device by searching for the access point (manual connection) You can manually connect your Wi-Fi device to this device if it does not support WPS or if the WPS connection does not work. Device ○ (power key) (for at least 2 seconds) z The device power will turn on.
- Page 29 Connecting a Windows PC These examples describe the procedures for Windows 10 and Windows 8.1. For details, refer to the instruction manual for your PC. Windows 10 „ This example describes the procedure when using a mouse. For how to use a touch panel or other input device, refer to the instruction manual for your PC.
- Page 30 When a device that used WPS setup is connecting to this device, other Wi-Fi devices may be disconnected. WPS setup may fail for Wi-Fi devices on which MAC address filtering has been set. Connecting to the device by searching for the access point (manual connection) You can connect the PC manually if the WPS connection does not work.
- Page 31 Enter the password and click [Next] z A message about PC sharing may be displayed. For a share on the PC, refer to Windows help. Windows 8.1 „ This example describes the procedure when using a mouse. For how to use a touch panel or other input device, refer to the instruction manual for your PC.
- Page 32 Select the SSID of the device, select the [Connect automatically] check box, and then click [Connect] z A message about PC sharing may be displayed. For a share on the PC, refer to Windows help. z It will take about two minutes until the setup procedures are completed. z The setup procedure is completed when [WPS connected successful.] is displayed on the device.
- Page 33 Turn on Wi-Fi Point the mouse at the top right of the desktop, move the mouse down, and then click (Settings) on the displayed menu (Charms) Click (Wi-Fi available) Select the SSID of the device, select the [Connect automatically] check box, and then click [Connect] Enter the password and click [Next] z A message about PC sharing may be displayed.
- Page 34 Connecting a Mac This example describes the procedure for macOS Catalina 10.15. The windows may differ depending on your version of macOS. Device ○ (power key) (for at least 2 seconds) z The device power will turn on. Wi-Fi will be turned on. The device will automatically connect to the Internet with the default settings.
- Page 35 Select the SSID of the device from the [Network Name] pulldown list. Enter the password in the [Password] field, select the [Remember this network] check box, and then click [Join] Setup...
- Page 36 Connecting an Android device The operations and screens will depend on your Android device and its version of Android. For details, refer to the instruction manual for your Android device. Connecting using WPS (automatic connection) If the Android device supports the WPS push button method, you can easily set the SSID and security method required for the connection.
- Page 37 Connecting to the device by searching for the access point (manual connection) You can manually connect your Android device to this device if it does not support WPS or if the WPS connection does not work. This example describes the procedure for Android 10. Device ○...
- Page 38 Enter password correctly▶[CONNECT] Connecting using the QR code display function of the device You can automatically connect a device to this device by reading the QR code displayed on this device with the camera on the connecting device. This example describes the procedure for Android 10. z As for a model of Android 9 Pie or earlier, the QR code reader installed on your Android device may not be able to automatically perform Wi-Fi settings.
- Page 39 Read the QR code displayed on the device with the camera▶Follow the instructions on the screen z The connecting device will be connected to the device. If the device cannot automatically connect to this device even by reading the QR code with the recommended apps, use WPS or search for the access point.
- Page 40 Set [Wi-Fi] to ON Touch the SSID of the device from the list screen Enter password correctly▶[Join] Connecting using the QR code display function of the device You can automatically connect a device to this device by reading the QR code displayed on this device with the camera on the connecting device.
- Page 41 Connecting a Nintendo Switch Device ○ (power key) (for at least 2 seconds) z The device power will turn on. Wi-Fi will be turned on. The device will automatically connect to the Internet with the default settings. [ ] will be displayed if the device successfully connects to the Internet. In the home screen, [Wi-Fi Guide] [Manual Connection] z The SSID, password, and security (encryption mode) of the device will be displayed.
- Page 42 Touch the SSID of the device from the list screen Enter password correctly▶[OK] z The settings will be saved. The setup procedure is completed when a connection successful message is displayed. Setup...
-
Page 43: Connecting And Communicating Over The Usb Cable
Connecting and communicating over the USB cable You can directly connect the device to a PC with USB cable (sample) for data communications. Connecting the device to a PC „ ○ (power key) (for at least 2 seconds) z The device power will turn on. Wi-Fi will be turned on. The device will automatically connect to the Internet with the default settings. -
Page 44: Connecting And Communicating Over The Lan Cable
Connecting and communicating over the LAN cable You can use this device as a wired router (supports 2.5GBASE-T). You can connect to the Internet via wired LAN connection by connecting this device to an Ethernet port installed device such as your PC with a LAN cable (commercially available). -
Page 45: Settings (Web Browser)
Settings (Web browser) Setting tool You can configure the various functions of the device using a web browser from a PC or mobile device connected to the device. This example describes the procedure when the PC is connected over Wi-Fi. The screens may differ depending on your operating system and web browser. - Page 46 Display setting tool For Windows/Mac „ Start the PC and connect to the device Start the web browser and enter “http://(host IP Address of the device)/” or “( h ttp://web. setting) ” in the address bar ☞ z The default setting for [Host IP Address] is “192.168.128.1” ( P.
- Page 47 Setting tool screen layout The settings and information screens for the functions and icon menus are displayed on the setting tool home screen. This example describes the procedure using a PC. 1 Settings menu 2 Connected status z Displays the connected network, connection time, each address, etc. 3 Wi-Fi settings z Displays the number of devices connected to each SSID.
-
Page 48: Connected Clients
Connected clients Check the devices connected to this device or set MAC address filtering (a function that allows you to restrict by MAC address Wi-Fi devices that can connect). z If using MAC address filtering, then add the Wi-Fi devices for which to allow connection, and set to [Enabled]. If the Wi-Fi device displaying the setting tool screen is not allowed to connect, then the connection will be denied, and changing of settings will not be possible. -
Page 49: Settings
Settings Mobile network settings You can set the mobile network, APN profile settings, and PIN code for the docomo nano UIM card. Network configuration „ Set the network mode and network operator to use for the mobile network. In the setting tool screen, click [Settings]▶[Mobile Network Settings] Click [Network Configuration] Set the following items ☞... - Page 50 PIN management ☞ You can set a PIN code for the docomo nano UIM card. For details on PIN code P. 17 “Security codes” In the setting tool screen, click [Settings]▶[PIN Management] Set the following items ☞ z For the setting ranges and default values P.
- Page 51 IP address filtering „ For communications with the Internet, the device will judge whether to allow passage through the firewall from each address on the LAN side (sender) and WAN side (destination) according to the rules that are set. In the setting tool screen, click [Settings]▶[LAN Settings] Click [IP Address Filtering] Click [Blacklist] or [Whitelist] for the [Filter Mode] Click [Add Rule]...
- Page 52 „ You can set a specific device on the LAN as a DMZ host that is isolated from other devices. This allows you to make the device public as a web server or use online games and other software without setting specific port number. In the setting tool screen, click [Settings]▶[LAN Settings] Click [DMZ] Set the following items...
- Page 53 Wi-Fi settings Basic „ You can set the basic Wi-Fi functions. In the setting tool screen, click [Settings]▶[Wi-Fi Settings] Click [Basic] Set the following items ☞ z For the setting ranges and default values P. 64 “Menu list (web browser)” „...
- Page 54 Advanced „ You can set advanced settings for Wi-Fi. In the setting tool screen, click [Settings]▶[Wi-Fi Settings] Click [Advanced] Set the following items ☞ z For the setting ranges and default values P. 64 “Menu list (web browser)” ☞ Wi-Fi Mode: For details P.
- Page 55 Wi-Fi mode Set the radio frequencies you use. z The default setting is [2.4 GHz]. z It cannot be set to [5 GHz] if the docomo nano UIM card is not inserted or during international roaming. z When you use the 5 GHz frequency band inside, set the radio frequencies during charging the device or communicating through a wired LAN connection.
- Page 56 Device settings You can make various settings for using the device. Web UI Password „ Set the login password for the setting tool. z The default password is the last 6 digits of the IMEI information (international mobile equipment identity number). In the setting tool screen, click [Settings]▶[Device Settings] Click [Web UI Password] Enter the current password in [Current Password] and the new password in [New...
- Page 57 Backup/Restore „ The content set on the device can be saved to a PC and the saved setting information can be loaded into the device. z You may not be able to specify a destination folder and file name depending on the web browser settings. ☞...
-
Page 58: About
Set automatic reboots You can set the device to reboot at the specified time after the specified number of days has elapsed. z The default setting is [Disabled]. In the setting tool screen, click [Settings]▶[Device Settings] Click [Reboot] Click [Enabled] for the [Automatic Reboot] Set the number of days and time in [Automatic Reboot Time] field Click [Apply] About... -
Page 59: Settings (Device Menu)
Settings (Device menu) Device menu You can change many of the settings and check the content of those settings from the menu on the device. z However, a portion of the functions cannot be set on the device. You can set all functions by using the setting tool ☞... -
Page 60: Data Usage
To select an item „ z Touch the item to select. z If [ ] is displayed, touch [ ] to select it. z If [ ] is displayed, touch [ ] to turn it off, and touch [ ] to turn it on. Data usage Set the amount of data communication using the mobile network. -
Page 61: Settings
Settings Mobile network Set the network mode to use for the mobile network, international roaming, and other settings. Swipe left on home screen▶[Settings]▶[Mobile Network] Set the following items ☞ z For the setting ranges and default values P. 68 “Menu list (device menu)” ☞... - Page 62 Wi-Fi sleep mode Set whether to automatically turn off Wi-Fi if the device is not used for a certain amount of time when no Wi-Fi devices are connected. z Sleep mode is not functioned in the following cases. y When the display is turned on y When charging with an AC adapter y When connected to a PC etc.
- Page 63 USB mode Set the USB communications standard. z The default setting is [USB 3.0]. Swipe left on home screen▶[Settings]▶[USB Mode] [USB 2.0]/[USB 3.0] z When this device is connected to a PC etc. with a USB cable, the confirmation screen is displayed. Check the content and select [OK].
-
Page 64: International Roaming
International Roaming Outline of international roaming (WORLD WING) International roaming (WORLD WING) is a service that allows you to use the device in the service area of DOCOMO affiliated overseas network operators when using the device overseas. For details on the international roaming (WORLD WING), refer to the DOCOMO website. ttps://www.nttdocomo.co.jp/english/service/world/roaming/) Available network You can use the device in the LTE network and 3G network service areas. -
Page 65: Settings For Use Overseas
Settings for use overseas International roaming You need to set [International Roaming] to [ON] to use packet communication overseas. Swipe left on home screen▶[Settings]▶[Mobile Network]▶[International Roaming]▶ set to ON z When the confirmation screen is displayed, check the content and select [OK]. Network mode Set a network to use. -
Page 66: Appendix/Index
Appendix/Index Menu lists Menu list (web browser) Backup/ Menu item/setting item Setting range Default value Reference Restore Home 日本語, English P. 45 言語 日本語 Connected Clients Client List P. 46 MAC Address Filtering MAC Address Filter Enabled, Disabled Disabled P. 46 ○... - Page 67 Backup/ Menu item/setting item Setting range Default value Reference Restore PIN Management PIN Lock Enabled, Disabled P. 48 4 to 8 digit numbers Change PIN 4 to 8 digit numbers LAN Settings DHCP Server Host IP Address 192.168.0.0 to 192.168.255.255 192.168.128.1 P.
- Page 68 Backup/ Menu item/setting item Setting range Default value Reference Restore Wi-Fi Settings Basic Wi-Fi Enabled, Disabled Enabled P. 51 ○ Multi SSID Enabled, Disabled Disabled ○ Multi-SSID AP Isolation Enabled, Disabled Enabled ○ Max Number of 1 to 16 ○ Connected Clients Show SSID and Security On, Off...
- Page 69 Backup/ Menu item/setting item Setting range Default value Reference Restore Advanced Wi-Fi Mode 2.4 GHz, 5 GHz 2.4 GHz P. 53 ○ Wi-Fi Channel 2.4 GHz: Automatic, 1 to 13 2.4 GHz: P. 52 ○ 5 GHz: Automatic (not include Automatic 144 ch), Automatic (include 144 5 GHz: Automatic...
- Page 70 Menu list (device menu) Backup/ Menu item/setting item Setting range Default value Reference Restore Wi-Fi Guide QR Code Connection P. 23 Manual Connection SSID A SSID B Enabled ON, OFF ○ Data Usage Reset P. 58 Data Usage Settings 1 MB to 999 TB 7 GB ○...
-
Page 71: Troubleshooting (Faq)
P. 18 “Cautions while charging” y Is an adapter specified by NTT DOCOMO being used for charging? Contact the number listed in “Repairs” (in Japanese only) on the last page or a repair counter that DOCOMO specifies if you cannot charge the battery even when using a specified one. - Page 72 Connection, communication „ z A Wi-Fi device cannot connect to this device y Check the device and Wi-Fi device to determine if Wi-Fi has been turned on. Check the instruction manual for ☞ your Wi-Fi device to determine if its specifications match those of the device. P.
-
Page 73: Warranty And After-Sales Service
Error messages Displayed on device „ z [Charging error] ☞ y An error has occurred during charging. Check the content of “Charging” of “Troubleshooting” . P. 69 “Troubleshooting” z [Incorrect PUK code] y The PIN unlock key is incorrect. Enter the correct PIN unlock key. z [Passcodes don't match] y [Set a new passcode] and [Confirm passcode] for [Screen Lock] are different. -
Page 74: Software Update
If your device needs repairs after contacting DOCOMO „ Bring your device to a repair counter that DOCOMO specifies. However, repair counters are only open during business hours. Note that it may take several days to repair depending on the condition on the malfunctions. During the warranty period z Repairs will be performed at no fee based on the stipulations of the warranty. - Page 75 Usage conditions „ z If you will use packet communication on 5G/Xi/FOMA, set [APN Profile Selection] to [spモード] (sp mode) ☞ P. 59 “Mobile network”). z Even if you use 5G/Xi/FOMA packet communication, the download is charged. z You cannot update if the software is modified. z You can update software while keeping the setting in the device.
-
Page 76: Main Specifications
„ The specifications may change due to software updates. For the latest information, refer to the DOCOMO website. Product name SH-52A Approx. 84 (H) × Approx. 157 (W) × Approx. 16 (D) mm (Approx. 16.2 mm Size at thickest point) Weight Approx. -
Page 77: Compliance Information On Human Exposure To Radio Waves Of Mobile Terminals
Compliance Information on Human Exposure to Radio Waves of Mobile Terminals This model SH-52A device complies with the Japanese technical regulations regarding human exposure to radio waves. This device was designed in observance of the Japanese technical regulations regarding human exposure to radio waves (*1). - Page 78 Regulatory information Hereby, SHARP CORPORATION declares that the radio equipment type SH-52A is in compliance with Directive 2014/53/EU. The full text of the EU declaration of conformity is available at the following internet address: ttps://jp.sharp/k-tai/) (in Japanese only) Manufacturer's Address:...
- Page 79 FCC Notice z This device complies with part 15 of the FCC Rules. Operation is subject to the following two conditions: (1) This device may not cause harmful interference, and (2) this device must accept any interference received, including interference that may cause undesired operation. z Changes or modifications not expressly approved by the manufacturer responsible for compliance could void the user's authority to operate the equipment.
-
Page 80: Export Administration Regulations
Registered trademarks and trademarks z “FOMA” , “WORLD WING” , “sp-mode” , “Premium 4G” , the “Wi-Fi STATION” logo and the “5G” logo are trademarks or registered trademarks of NTT DOCOMO, INC. ® ®... -
Page 81: Index
Index Entering numbers ......22 Numerics Error messages ......71 Export administration regulations . - Page 82 Privacy Separator ......51 Protocol ....... . . 49 Rule Name .
- Page 83 Checking your charges, data volume and subscription, and carrying out various procedures, etc. online From a PC My docomo (https://www.nttdocomo.co.jp/mydocomo/) (in Japanese only) ●You may not be able to access some website services due to system maintenance, the content of your subscription, etc. ●“Network security code”...
- Page 84 ●Please confirm the phone number before you dial. ●For Applications or Repairs and After-Sales Service, please contact the above-mentioned information center or check the docomo Shop etc. near you on the NTT DOCOMO website and contact. NTT DOCOMO website https://www.nttdocomo.co.jp/english/ Inquiries from overseas (In case of loss, theft, unconnected, etc.) (Business hours: 24 hours (open all year round)) ■From DOCOMO mobile phones...
Need help?
Do you have a question about the SH-52A and is the answer not in the manual?
Questions and answers