Advertisement
Quick Links
NOTES:
• Please read instructions completely before assembling kit. Save instructions for
future reference.
• Easy snap-together fit! No glue is needed to assemble this kit.
• Remove plastic parts from frames according to the instructions. When removing
parts, trim off any excess plastic using scissors or other suitable tool.
• Each frame is lettered, and the parts on each frame are numbered. Each individual
part is also marked with its part number and letter. Please follow the letters and
numbers carefully and make sure you are assembling the right parts.
• Runner Frame J parts are identical in all Zi-builders TM kits.
• Discard plastic bags immediately.
• This kit can be disassembled if necessary.
• When kit is completed, apply the labels anywhere you like.
- 1-
Advertisement

Subscribe to Our Youtube Channel
Related Manuals for Hasbro Tomy Zoids Chimera Dragon


Summary of Contents for Hasbro Tomy Zoids Chimera Dragon
- Page 1 NOTES: • Please read instructions completely before assembling kit. Save instructions for future reference. • Easy snap-together fit! No glue is needed to assemble this kit. • Remove plastic parts from frames according to the instructions. When removing parts, trim off any excess plastic using scissors or other suitable tool. •...
- Page 5 - 5-...
- Page 6 Align octagonal piece as shown. Be sure to assemble ring caps as shown. Using the Extractor Tool: Move tool gently to loosen tight joint parts. Extractor may not loosen some joints. - 6-...
- Page 7 Assembling the head. Lens - 7-...
- Page 9 Assembling right front leg. Top view - 9-...
- Page 10 Assembling the left front leg. Top view -10-...
- Page 11 Assembling right front leg. Assembling the right hind leg. Ring cap Ring caps Ring cap - 11-...
- Page 12 Assembling the left front leg. Assembling the left hind leg. Ring cap Ring caps Ring cap -12-...
- Page 13 Assembling the wings: Step 1. Left wing Ring caps Right wing Ring caps - 13-...
- Page 14 Assembling the wings: Step 2. Right wing Ring cap Top view Left wing Ring cap -14-...
- Page 15 - 15-...
- Page 16 Ring caps Ring caps - 16-...
- Page 17 Assembling the jaw. - 17-...
- Page 18 - 18-...
- Page 19 Assembling the tail. - 19-...
- Page 20 Side view -20-...
- Page 21 - 21-...
- Page 22 Attaching the left legs. -22-...
- Page 23 Attaching the right legs. - 23-...
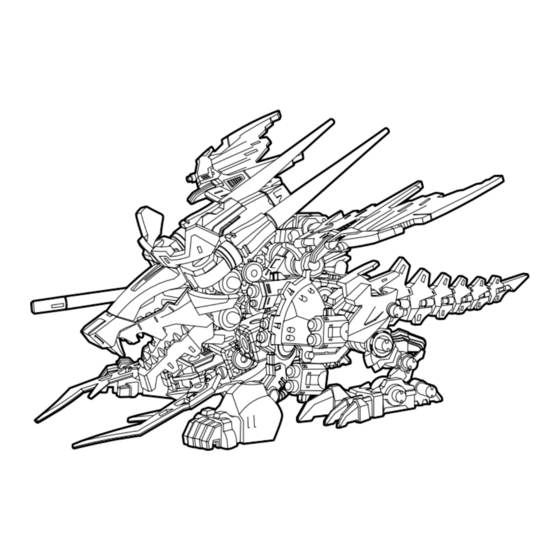
- Page 24 Complete! -24-...
- Page 25 Do not hold by tail or other parts indicated in the illustration. Do not force model to move. - 25-...
Need help?
Do you have a question about the Tomy Zoids Chimera Dragon and is the answer not in the manual?
Questions and answers