Advertisement
Available languages
Available languages
Quick Links
Advertisement

Related Manuals for Craftworx 1A-DS125

Summary of Contents for Craftworx 1A-DS125
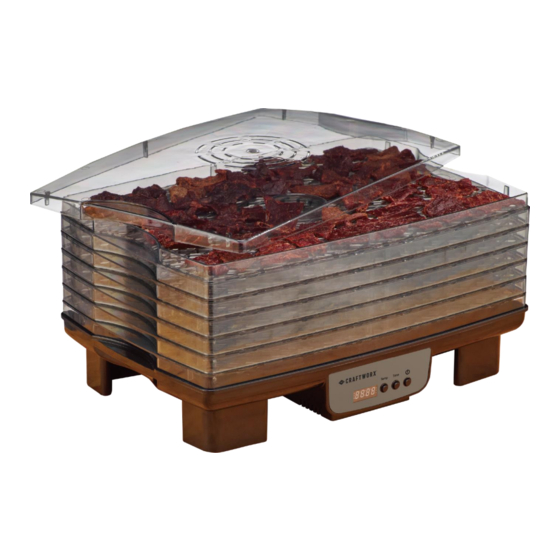
- Page 1 INSTRUCTION MANUAL | MFG#: 1A-DS125 HOUSEHOLD USE ONLY TOLL FREE: 1-877-258-6190...
- Page 2 When using electrical appliances, basic safety precautions should always be followed, including the following: READ ALL INSTRUCTIONS, PRODUCT LABELS AND WARNINGS BEFORE USING THE FOOD DEHYDRATOR. Do not touch hot surfaces or allow them to come into contact with flammable materials. Use handles or knobs.
- Page 3 To clean the heating base, unplug from wall outlet and wipe with damp cloth or sponge and mild soap. Do not immerse base or cord in water. Top lid and trays may be submerged in warm water and washed with mild soap or washed in TOP rack of dishwasher only.
-
Page 4: Tray Rotation
Before operating your food dehydrator for the first time, please be sure to completely read and understand these instructions. Wash and dry the trays and any other parts that will be in contact with food. The first time you turn on your food dehydrator you may notice an odor. This is normal. To avoid odor from being transferred to the food, place one tray covered with lid on the base of the unit, and following instructions, allow the unit to run without food in place until the odor is gone. - Page 5 Before operating your Dehydrator for the first time, please be sure to completely read through and understand the instructions in this booklet. Wash and dry the trays and any other parts that will be in contact with food. Stacking the trays Before loading the trays with food, it is a good idea to make sure that they are all aligned right-side up by stacking them up in one place near the preparation area.
- Page 6 Your food dehydrator is simple to use and is designed to make the dehydration process simple and accurate if the instructions are followed. Be sure that you have read the safety tips at the beginning of this manual before proceeding. The first time you turn on your food dehydrator you may notice an odor.
- Page 7 Once food is properly dried, it is important to store it properly for best results. By following these storage techniques, your food will stay fresh and ready-to-use for the longest time possible. Containers Any container which is clean, airtight and moisture proof is suitable for storage. Heavy, zippered plastic bags or heat sealing cooking bags are excellent.
- Page 8 Symptom Possible Cause Possible Solutions No Heat No power 1. Be sure unit is plugged in. No Fan 2. Make sure power switch is on. 3. Check that outlet is working. No Heat Broken wire in unit Not user repairable Fan-OK Return for service Heat-OK...
- Page 9 VEGETABLE PREPARATION DRYNESS TEST APPROX. TIME (hours) Artichokes Cut into 1/2 inch strips. Boil about 10 minutes brittle 6 to 14 Asparagus Cut into 1-inch pieces. Tips yield better product brittle 6 to 14 Beans Cut and steam blanch until translucent brittle 8 to 26 Beets...
- Page 10 FRUIT PREPARATION DRYNESS TEST APPROX. TIME (hours) Apples Pear, core and cut slices or rings flexible 5 to 6 Artichokes Cut into 1/2 inch strips brittle 5 to 13 Apricots Clean, cut in halves or in slices flexible 12 to 38 Bananas Peel and cut into 1/2 inch slices crisp...
- Page 11 MANUEL D’INSTRUCTIONS | N FAB. 1A-DS125 À USAGE DOMESTIQUE UNIQUEMENT Sans frais : 1-877-258-6190...
- Page 12 Lorsque vous utilisez des appareils, respectez toujours les consignes de sécurité de base, y compris les suivantes: VEUILLEZ LIRE TOUTES LES INSTRUCTIONS, LES ÉTIQUETTES DE PRODUIT ET LES AVERTISSEMENTS AVANT D’UTILISER LE DÉSHYDRATEUR Ne pas toucher la surface chaude et ne pas la mettre en contact avec des matériaux inflammables. Utiliser la poignée ou le bouton.
- Page 13 N'exposez aucune partie du déshydrateur à des températures supérieures à 167 °F. Ne pas utiliser près de contenants aérosols inflammables ou sous pression. Pour nettoyer la base chauffante, retirez la fiche de la prise murale, puis essuyez-la avec un chiffon ou une éponge humide et un savon doux.
-
Page 14: Soins Et Entretien
Assurez-vous de lire et de bien comprendre ces instructions avant d'utiliser le déshydrateur alimentaire pour la première fois. Nettoyez et séchez le plateau et toutes les autres pièces entrant en contact avec les aliments. Lorsque vous allumez le déshydrateur pour la première fois, vous remarquerez peut-être une odeur. C'est normal. - Page 15 Assurez-vous de lire et de bien comprendre ces instructions avant d'utiliser le déshydrateur alimentaire pour la première fois. Nettoyez et séchez le plateau et toutes les autres pièces entrant en contact avec les aliments. Empiler des plateaux Avant de remplir les plateaux, il est conseillé de s'assurer qu'ils sont tous alignés en les empilant au même endroit près de la zone de préparation.
- Page 16 Positionnez les plateaux de sorte que toutes les flèches sur les poignées du plateau soient visibles en haut des poignées. Pour modifier la hauteur d'empilement, il suffit de faire pivoter un plateau de 180 degrés pour déterminer s'il est haut ou court. Plateaux empilés pour les aliments minces.
- Page 17 nombre de minutes souhaité soit atteint. 4. Pour mettre le déshydrateur en marche, appuyez sur le bouton <ON / OFF> (C) pour lancer le cycle de programmation. L'affichage basculera entre la température et la durée restante au format HH: MM. Vous entendrez également le ventilateur fonctionner.
- Page 18 ventilateur fonctionne Chaleur Moteur en panne ou 1.Éteindre immédiatement. suffisante, ventilateur bloqué 2.Vérifier si des corps étrangers (morceaux de nourriture ventilateur ne séchée) bloquent le ventilateur. Retournez la base et secouez fonctionne vigoureusement. Tournez l'appareil sur le côté et secouez les particules.
- Page 19 LÉGUME PRÉPARATION TEST DE TEMPS APPROX. (h) SÉCHERESSE Artichauts Coupez en lanières de 1,25 cm. Faire bouillir fragile 6 à 14 environ 10 minutes. Asparagus Coupez en morceaux de 2,5 cm. Les pointes fragile 6 à 14 donnent un meilleur résultat. Haricots Coupez et cuisez à...
- Page 20 Rhubarbe Retirez la peau extérieure et coupez en lanières sèche 6 à 38 de 1,25 cm. Épinards Cuisez à la vapeur jusqu’à ce qu’ils soient fanés, fragile 6 à 16 mais pas détrempés. Chou frisé, etc. Tomates Retirez la peau. Coupez en deux ou en tranches. comme du cuir 8 à...
- Page 21 Celcius Fahrenheit C° F°...
Need help?
Do you have a question about the 1A-DS125 and is the answer not in the manual?
Questions and answers
How long does it take to make beef jerky